Gridded Data Layer
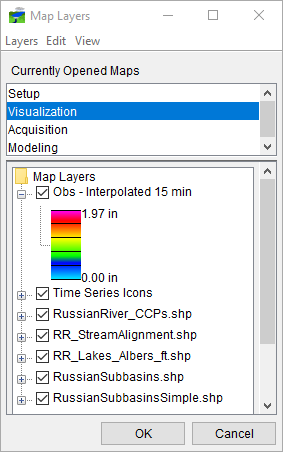
The Gridded Data layer (Figure 1) is available in the Visualization and Modeling modules, only when gridsets are included or computed for the watershed. A gridset is a sequence or time series of precipitation grids. The Gridded Data layer contains the gridsets for the watershed that have been created outside of HEC-RTS using the HEC-GridUtil or HEC-MetVue software.

Gridded Data Layer - Properties
You can change the appearance of a girdset and set the visualization scale for the Gridded Data layer. From the Map Layer dialog (Figure 1), right-click on the name of the gridset (Obs – Interpolated 15 min), from the shortcut menu, click Properties. The Grid Display Options dialog will open (Figure 2).
From the Grid Display Options dialog (Figure 2) you can choose a color contour scheme (default is Precipitation), tic interval, and override the minimum/maximum values for the contour limits. There are several advanced features. These features are accessed by clicking Advanced, which expands the Grid Display Options dialog (Figure 2). The advanced options are:

- Brightness: The relative lightness or darkness of a color, from full color to black.
- Saturation: The relative intensity of the color, from white to full color.
- Transparency: The relative opacity of the color from opaque to translucent to transparent.
- Aspect Shading: Enabling this feature causes the display color to change based on the viewing angle.
- Adjust Color Scale to Clipping Area: Enabling this feature causes the displayed color ramp to rescale to the maximum and minimum clipping thresholds.
Gridded Data Layer - Scale
To set the visualization scale for the Gridded Data layer:
- From the Grid Display Options dialog (Figure 2), click on the Scale tab, the Grid Display Options dialog (Figure 3) will change. By default, the gridded data layer is set for Always show layer (Figure 3).

- To set visualization scales click show layer in the following scale range (Figure 3). To set the scale so that the gridded data layer becomes visible as you zoom-in, you can set the scale to the current scale by clicking Set to Current. If you wish to enter a value, in the Only visible below 1: box (Figure 3) enter the scale factor.
- To set the scale so that the Gridded Data layer becomes visible as you zoom-out, you can set the scale to the current scale by clicking Set to Current. If you wish to enter a value, in the Only visible above 1: box (Figure 3) enter the scale factor.
- Click OK, the Grid Display Options dialog closes (Figure 3), and the visualization scale is set for the gridded data layer.