Master Watershed Base Data
Data that resides in the watershed's main folder is called base data. Base data includes all the data that supplies information displayed in the Setup, Acquisition, and Visualization modules. This data encompasses all data needed to create a forecast. Base data includes maps, layers, layouts, reports, scripts, extract post information, all model alternatives, shared and study information, and HEC-RTS data. Base data does not include data for the forecast, more detailed information on forecast data is described in Team Forecasting.
This section walks through how to determine which local base data files are up-to-date, how to download base data from the master watershed, and how to upload revised files back to the master watershed to share with other team members working on the watershed.
Master Watershed Synchronization Dialog
The Master Watershed Synchronization dialog (Figure 1) is used to upload or download base data to and from the master watershed. From the HEC-RTS main window, click on the Setup tab, from the Watershed menu, point to Team, click Sync with Master Watershed, the Master Watershed Synchronization dialog will open (Figure 1).

On the Master Watershed Synchronization dialog (Figure 1), the base data is displayed in an expandable tree called the Synchronization Tree. Each node in the Synchronization Tree represents a data group for the watershed. The data groups reflect the folder structure of the current watershed folder (Figure 2).

The Watershed Data node (Figure 3), is a special data group. This data group represents three folders in the watershed's folder structure - study, reports, and layouts. Hovering the mouse over a node in the Synchronization Tree displays a tooltip (Figure 3), that provides information on what watershed folder(s) represent the data group; what master watershed folder(s) represent the data group; what the version is for the local copy of the watershed; what the version is for the server copy of the watershed; and comments.

For example, in Figure 4, the top node is R462 (3/3). This is the name of the watershed. The top node represents all the data groups under the watershed's main folder. If you upload or download this node, all watershed base data will be transferred.

Next to a data group node, there are two numbers shown in parenthesis. For example, in Figure 5, from the Synchronization Tree, the Shared folder has (1/2) displayed. These numbers indicate what version of the folder is on your computer and what version is on the master watershed. The first number (top) represents the watershed that is on your computer. The second number (bottom) represents the version of the master watershed. If the top number is less than the bottom number, the master watershed folder has been updated and the changes need to be downloaded to your local copy. For example, Shared (1/2), informs you that the Shared folder on the local copy of the watershed is Version 1, and the master watershed is Version 2. If the numbers were "(0/0)" or "(Na/Na)", this means the folder has never been uploaded to the master watershed.
In addition to the displayed version numbers, the Synchronization Tree nodes will highlight in different colors depending on the node's revision state (Figure 5). The different colors and their meaning are listed in the Legend area (Figure 5) below the Synchronization Tree. The highlight colors represent the following information:

| White | Nodes highlighted in white means that the local watershed copy is up to date with the master watershed copy for those data groups. The version number displayed next to the node name will have both numbers matching, for example CAVI (3/3). |
| Orange | Nodes highlighted in orange mean that the master watershed has a newer version of the files in a data group than the local watershed copy. The files will need to be downloaded from the master watershed. The version numbers displayed next to the node name will show the top number is less than the bottom number. For example, CAVI (1/3) indicates the local watershed copy version is 1, and the master watershed version is 3. To download the files, select a highlighted node (orange), the Master Watershed Synchronization dialog (Figure 6) now displays an Actions box, from that box, click Download. |
| Yellow | Nodes highlighted in yellow mean that the data group has not been uploaded to the master watershed. For example, if the FIA data group displays FIA (0/0) or FIA (Na/Na), this means there is no version for the data group on the mater watershed. |

To upload the files, select a highlighted node (yellow), the Master Watershed Synchronization dialog (Figure 6) now displays an Actions box, from that box, click Upload.
In the Team section of the Master Watershed Synchronization dialog (Figure 6), when you select a data group, information about that data is displayed. In addition, the Actions box (Figure 6) provides you with commands that allow you to interact with the selected data group:
| Upload | allows you to upload the selected data group node to the master watershed. |
| Download | allows you to download the latest version of the selected data group node from the master watershed. |
| Protect | is only available when the status of the selected data group node is Unprotected. This option allows you to prevent other team members from uploading changes for a data group to the master watershed. If the data group node is already protected, you will see an Unprotect option. Selecting Unprotect, will allow others to upload changes for that data group node to the master watershed. |
| Unprotect | is only available when the status of the data group node is Protected. Selecting Unprotect, will allow sharing of the master watershed so you can upload changes for the selected data group. |
Below the Action box (Figure 6) is the revision information for a selected data group:
| Revision | displays the revision number of the local watershed on your computer and the master watershed as "# Of #", respectively. The first number represents the version number of the selected data group for the local copy of the watershed on your computer. The second number is the revision number of the selected data group on the master watershed. If the two numbers are the same, this means that you have the most recent copy of the master watershed for the selected data group. If they are not the same, then you are not working on the most recent copy of the selected data group and need to download the updated data group from the master watershed. |
| Updated On | reports the date, time, and username of the person who last updated the selected data group on the master watershed (format - "DDMMMYYYY, HH:MM by: <username>"). The date is set by the team member who made the revision's (computer date and time). The username displayed is that team member's workstation login username. |
| Status | reports if the version of the selected data group from the local copy of the watershed on your computer is Current or Out of Date. The Current status means that your computer's version of the selected data group and the master watershed version are the same. The Out of Date status means that the current master watershed version is newer than the copy of the selected data group that is currently on your computer. |
| Comments | displays any comments made on the last revision on the master watershed. |
| History | opens the Revision History dialog which provides detailed information on all the revisions made to the master watershed data (further details about the Revision History dialog is available in the Revision History section of this chapter). |
Downloading Base Data
If base data has been changed for the master watershed or you would like to get the latest version, you can download the data from the Master Watershed Synchronization dialog (Figure 1).
To download base data from the master watershed:
- First, from the HEC-RTS main window, open the master watershed that is on your computer, click the Setup tab.
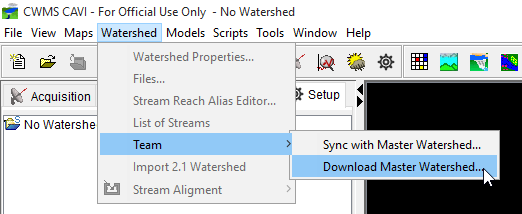
- From the Watershed menu, point to Team, click Sync with Master Watershed. The Master Watershed Synchronization dialog will open (Figure 1).
- From the Synchronization Tree (Figure 5), select the data group node that you need to download files. Hovering the mouse pointer over the nodes will display information about the data group node that will be downloaded.
- From the Master Watershed Synchronization dialog (Figure 1), click Download, the Download from Master Watershed window will open (Figure 7).
- Click Yes, the Download from Master Watershed window will close, and the download process will start.

- During the download process, the Master Watershed Synchronization dialog will disable and display a Downloading indicator (Figure 8).

- A Download tab will display in the Message Pane, providing status updates during the download process.
- When the download is complete, a notification message will display (Figure 9), and the Master Watershed Synchronization dialog will be active again (Figure 1).

- When you have downloaded all of the files that you need, close the Master Watershed Synchronization dialog (Figure 1).
Uploading Base Data
Changes made to the base data on the local copy of the master watershed can be uploaded to the master watershed's base data and then shared with other team members. If other team members have the same HEC-RTS study open during the upload, the team members will receive real-time notification messages indicating that the master watershed has been updated after the upload is complete.
To upload changes to the master watershed's base data:
- First, from the HEC-RTS main window, open the master watershed that is on your computer, click the Setup tab.
- From the Watershed menu, point to Team, click Sync to Master Watershed. The Master Watershed Synchronization dialog will open (Figure 1).
- From the Synchronization Tree (Figure 5), select the data group node that you need to upload the files for in the master watershed. Hovering the mouse over the data group node will display information about the data group node that will be uploaded. From the Actions box (Figure 10) click Upload.

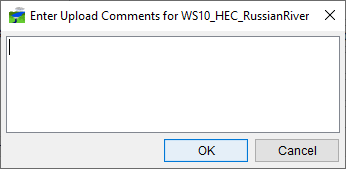
- The Enter Upload Comments dialog will display. Enter comments about the files that you are uploading. These comments will be seen by other team members as part of the revision.
- Click OK, the upload process will start. The watershed will close in the HEC-RTS main window and the Master Watershed Synchronization dialog will become inactive and display an Uploading indicator (Figure 11).
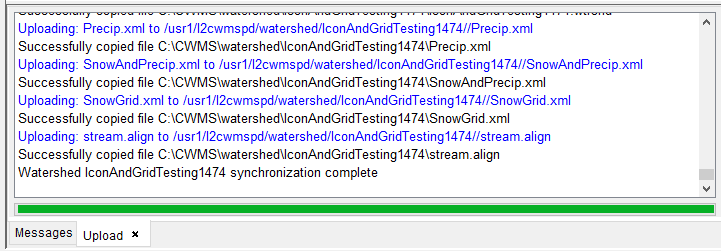
- An Upload tab will display in the Message Pane (Message Pane - Upload Tab), providing status updates during the upload process.

- When the upload is complete, the watershed will reopen in the CWMS CAVI main window and the Master Watershed Synchronization dialog (Figure 11) will be active again. A Real-Time Notification Message will display (like Download Complete - Real-Time Notification Message) indicating what files have been uploaded to the master watershed. Any team members that have the same master watershed open on their desktops will also receive a notification.
- If you do not have the most recent files, and then try to upload changes, you will get an Out of Date message (Figure 12).

- This is to prevent you from accidentally deleting another team member's changes. Click OK, then download the outdated files. Downloading files is further explained in the section titled Downloading Base Data.
Out of Date with Master Watershed
If new files have been uploaded to the master watershed since you closed the watershed an Out of Date with Master Watershed dialog will display (Figure 13) when you open the watershed, prompting you to update any files that are out of date.

The Out of Date with Master Watershed dialog (Figure 13) consists of the Data Group table and, Update and History buttons. The out-of-date data groups will have a checkmark in the Update column (Figure 13) of the Data Group table by default. To download the latest master watershed version of the data groups, click Update (Figure 13). All the data groups in the Data Group table with checkmarks will be updated. The Out of Date with Master Watershed dialog (Figure 13) and your watershed will close as the files will begin updating.
The columns of the Data Group table (Figure 13) represent the following information:
| Update | Checking the box in the Update column (Figure 13) will select the row's data group that will be uploaded to the master watershed when uploading begins. |
| Model | The Model column (Figure 13) displays the data group name. To view the watershed folders associated with the data group, hover the mouse over a data group name in the Model column row, a tooltip will display showing the associated data for that data group. |
| Local Rev. | displays the local revision number for the data group that is on your computer's copy of the master watershed. |
| Master Rev. | displays the master watershed's revision number for the data group. |
| Comments | displays the last comment provided for the revision on the master watershed. |
The highlight colors in the table are defined in the Legend box (Figure 13). The colors indicate the following states:
| White | means that data group is currently up to date. No further action needs to be taken. |
| Orange | represents data groups that are out-of-date with the master watershed, which means the master watershed version is newer the watershed on your computer. To resolve this, select a row that is highlighted in orange, then click Update. |
| Yellow | represents a data group that has never been uploaded to the master watershed. To upload the data group, select a row that is highlighted in yellow, then click Upload. |
At the bottom of the Out of Date with Master Watershed dialog (Figure 13) is a History button. The History button is active when a row is selected in the table. Clicking the History button displays the History dialog for the selected row. The History dialog displays a list of detailed information on the versions for the data group. For information on the Revision History dialog, see the section titled Revision History.