Download PDF
Download page Layer Selector.
Layer Selector
The Layer Selector is available in every module from the View menu (figure below), and is the main controller for the organization of map layers (e.g., imported shapefiles, .shp) and map schematic layers (e.g., *Stations in the Watershed Setup module). For example, to access the Layer Selector from Water Quality module, from the View menu, select Layers (figure below).

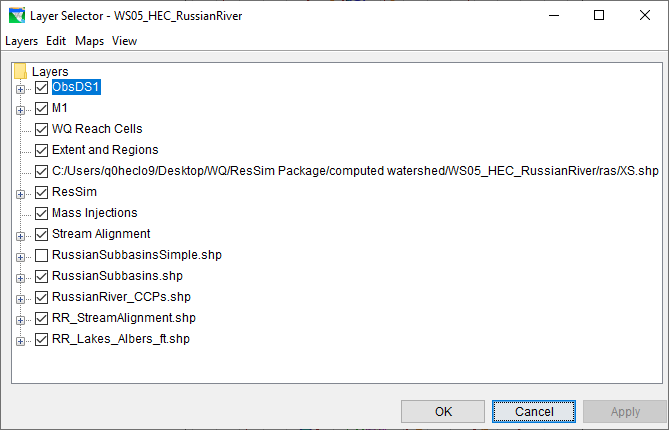
The Layer Selector window opens (first figure below) and displays a Layers tree (first figure below). The Layers tree identifies the map schematic display order. Layers display in the map schematic from top to bottom, where the top-most layer overlays the next one down the tree and continues to the bottom layer at the bottom of the Layers tree. In other words, the layer at the top of the tree will always display above all other layers drawn in the map schematic.
The list of layers is provided in a Layers tree (first figure below). The Layers tree changes depending on the selected module (e.g., Water Quality module) and module data (e.g., GeometryData1, Geometry dataset in the figure above), and reflect the active datasets chosen to be shown in the map schematic.
To remove a displayed layer (e.g., RussianSubbasinsSimple.shp in the first figure below) from the map schematic, uncheck the checkbox from the Layers tree. To view a layer in the map schematic, from the Layers tree, check a checkbox for a map layer (e.g., RR_StreamAlignment.shp in first figure below) or dataset component layer (e.g., Mass Injections in the first figure below). In other words, check or uncheck a checkbox for a specific layer in the Layers tree to display or hide the layer in the map schematic, respectively.
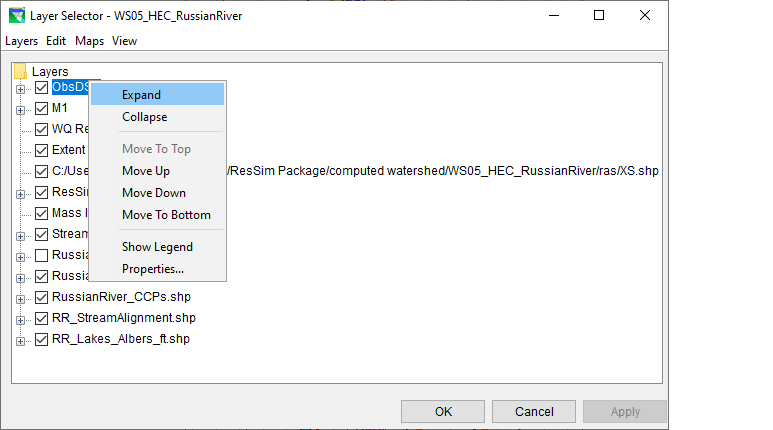
To open shortcut menu options for the selected layer, right-click on a layer, from the Layers tree (second figure below). In the table below provides a generalized list of the shortcut menu commands. Different options will be available and enabled or disabled in the shortcut menu, depending on the layer selected. In the example in the second figure below, the shortcut menu for the Observed Data layer, ObsDS1, includes Move To Top; however, this shortcut menu command is disabled because the layer is already at the top of the Layers tree.
Commands | Description |
|---|---|
Expand | Expands all nodes below the selected layer node. For example, right-click the ResSim layer and click Expand to view the Reaches, Diversions, Junctions and Reservoir layer components and the components' drawing properties. |
Collapse | Collapses all the expanded nodes below the selected layer's node. |
Move to Top | Moves the selected layer to the top of the Layers tree. Use this command to make a layer always draw on top of all other layers in the map schematic. In other words, the moved layer will always display above all other layers drawn in the map schematic. |
Move Up | Moves the selected layer up in the tree one step at a time. Moving a layer up the tree moves the layer above to draw the layer on top of all other layers listed below. |
Move Down | Moves the selected layer down one step at a time in the tree, which moves the layer down in the drawing sequence. |
Move to Bottom | Moves the Layer to the bottom of the map drawing layers. The layer will be the first to be drawn on the map panel and will always display behind other layers. |
Show Legend | Expands the layer node to display the layer drawing properties. |
Properties | Opens the Properties dialog for the selected map layer. Depending on the map layer selected, a different Properties dialog opens. In the example in Figure 2.23, if the Properties shortcut menu command for the Observed Data layer, ObsDS1, is selected, then the Water Quality Drawing Properties dialog (Figure 2.28) opens. |