Creating New Inundation Configurations
To create new inundation configurations:
From the Study Tree, which is in the Study Pane, right-click on the Inundation Data folder. From the shortcut menu, click New; the New Inundation Configuration wizard opens.

Figure: Inundation Data - Shortcut Menu Command
- The first step in the New Inundation Configuration wizard is to provide a name for the inundation configuration (Name box) and a description (Description box).
From the Hydraulic Data Type list, select the type of inundation configuration to create. There are four types available: CCPs only, Cross Sections Only, Grids Only, Grids and Cross Sections, and Holdouts. The holdouts hydraulic data type is a new option in HEC-FIA Version 3.1 for use with Flood Damages Reduced computes.
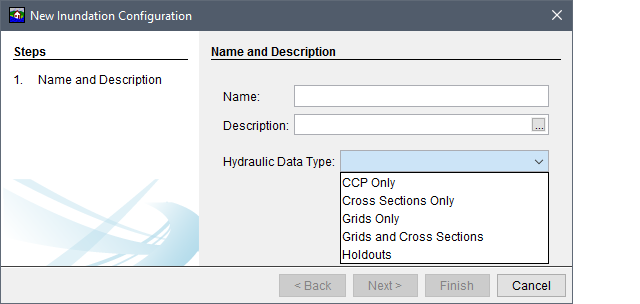
Figure: New Inundation Configuration Wizard - Step 1
- Once a hydraulic data type is selected, the New Inundation Configuration wizard asks for information specific to that hydraulic data type. The following sections describe the necessary steps and watershed configuration requirements for creating inundation configurations based on the type of hydraulic data used to describe the flood event(s).
CCP Only
CCP Only configurations are primarily used for setting up a simple watershed for evaluating a rough consequence analysis estimate. At minimum, to create a CCP only inundation configuration, the watershed configuration must contain a standard CCP set and a stream alignment. To create a CCP Only configuration:
From the New Inundation Configuration Wizard, enter a name in the Name box (e.g., CCP_Only). Enter a description in the Description box which is optional (but recommended). From the Hydraulic Data Type list, select CCP Only.

Figure: New Inundation Configuration Wizard - Step 1 - CCP Only
- Click Next, the second page of the New Inundation Configuration wizard for CCP Only displays. From the Watershed Configuration list the user selects a defined watershed configuration. Note, the list only provides valid watershed configurations for the selected hydraulic data type. In the case of CCPs only, valid watershed configurations are those which contain (at minimum) a stream alignment and standard CCPs. The Back button returns the user to first page of the New Inundation Configuration wizard for editing, if necessary.
Click Finish, the New Inundation Configuration wizard closes, and the new inundation configuration name (e.g., CCP_Only) appears under the Inundation Data folder on the Study Tree.

Figure: New Inundation Configuration Wizard - Step 2 - CCP Only
Cross Sections Only
To create a Cross Sections Only configuration a watershed configuration must contain a cross section set, a stream alignment and a terrain grid. Developing inundation configurations with cross section sets removes the need to have gridded data for each event, and relies on data out of a HEC-DSS file. Once the user has a watershed configuration setup created, the user can develop an inundation configuration and import events. To create a Cross Sections Only configuration:
From the New Inundation Configuration Wizard, enter a name in the Name box (e.g., CrossSectionsOnly). Entering a description in the Description box is optional. From the Hydraulic Data Type list, select Cross Sections Only.

Figure: New Inundation Configuration Wizard - Step 1 - Cross Sections Only
Click Next, the second page of the New Inundation Configuration wizard for Cross Sections Only displays. From the Watershed Configuration list, the user selects a defined watershed configuration. Note, the list only provides valid watershed configurations for the selected hydraulic data type. In the case of cross sections only, valid watershed configurations are those which contain (at minimum) a stream alignment, a terrain grid and a cross section set. The Back button returns the user to first page of the New Inundation Configuration wizard for editing, if necessary.

Figure: New Inundation Configuration Wizard - Step 2 - Cross Sections Only
- Click Finish, the New Inundation Configuration wizard closes, and the new inundation configuration name (e.g., XS_Only) appears under the Inundation Data folder on the Study Tree.
Grids Only
To create a Grids Only configuration a watershed configuration must (at minimum) contain a terrain grid. Once the user has a watershed configuration setup created, the user can develop an inundation configuration and import events. To create a Grids Only configuration:
- From the New Inundation Configuration Wizard, enter a name in the Name box (e.g., GridsOnly). Entering a description is optional and is done in the Description box. From the Hydraulic Data Type list, select Grids Only.
Click Next, the second page of the New Inundation Configuration wizard for Grids Only displays. Select the types of grids that to be used (e.g., Inundation Grid, Life Loss Arrival) by clicking on the appropriate grid type. Further, as noted in the wizard, for Reconstruction computes the required hydraulic data includes: arrival time, departure time, and the maximum depth of the flood. From the Watershed Configuration list, select a defined watershed configuration. Note, the list only provides valid watershed configurations for the selected hydraulic data type. The Back button returns the user to first page of the New Inundation Configuration wizard for editing, if necessary.

Figure: New Inundation Configuration Wizard - Step 1 - Grids Only
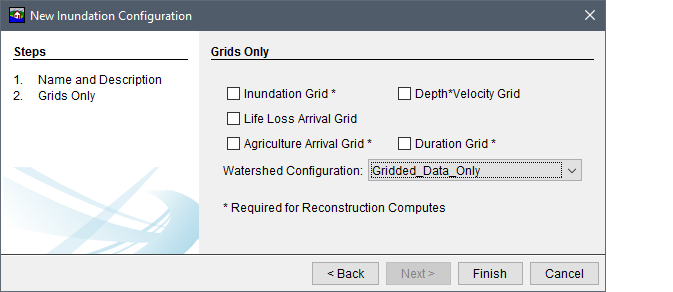
Figure: New Inundation Configuration Wizard - Step 2 - Grids Only
- Click Finish, the New Inundation Configuration wizard (Figure 7.8) closes and the new inundation configuration name (e.g., Grids_Only) appears under the Inundation Data folder on the Study Tree.
Grids and Cross Sections
The Grids and Cross Sections configuration allows users to use any grid combination to define the hydraulic event at a location, while still allowing the user to define warnings by evaluating a hydrograph at a cross section. To create a Grids and Cross Sections configuration:
From the New Inundation Configuration Wizard, enter a name in the Name box (e.g., Grids_and_XS). Enter a description in the Description box is optional. From the Hydraulic Data Type list, select Grids and Cross Sections.

Figure: New Inundation Configuration Wizard - Step 1 - Grids and Cross Sections
Click Next, the second page of the New Inundation Configuration wizard for Grids and Cross Sections displays. The user selects which types of grids to be used (e.g., Inundation Grid, Life Loss Arrival). From the Watershed Configuration list, the user selects a defined watershed configuration. Note, the list only provides valid watershed configurations for the selected hydraulic data type. In the case of grids and cross sections, valid watershed configurations are those which contain (at minimum) a stream alignment, a terrain grid and a cross section set. The Back button returns the user to first page of the New Inundation Configuration wizard for editing, if necessary.

Figure: New Inundation Configuration Wizard - Step 2- Grids and Cross Sections
- Click Finish, the New Inundation Configuration wizard closes and the new inundation configuration name (e.g., Grids_and_XS) appears under the Inundation Data folder on the Study Tree.
Holdouts Cross Sections
To create a Holdouts configuration for a Flood Damages Reduced compute, at minimum, the watershed configuration must contain a terrain grid, a stream alignment, a cross section set, and elements representing at least one project (either levees as storage areas, or reservoirs with holdout CCPs). Once the user has a setup created, the user can develop an inundation configuration and import events. To create a Holdouts configuration:
From the New Inundation Configuration Wizard, enter a name in the Name box (e.g., FDRed_Holdouts). Entering a description in the Description box is optional, but recommended. From the Hydraulic Data Type list, select Holdouts.
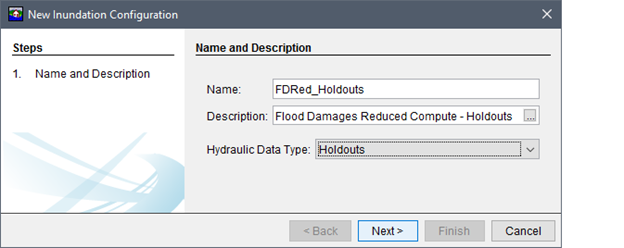
Figure: New Inundation Configuration Wizard - Step 1 - Holdouts
Click Next, the second page of the New Inundation Configuration wizard for Holdouts displays, From the Watershed Configuration list the user selects a defined watershed configuration. Note, the list only provides valid watershed configurations for the selected hydraulic data type. In the case of Holdouts Cross Sections, valid watershed configurations are those which contain (at minimum) a terrain grid, a stream alignment and cross sections. The Back button returns the user to first page of the New Inundation Configuration wizard for editing, if necessary.
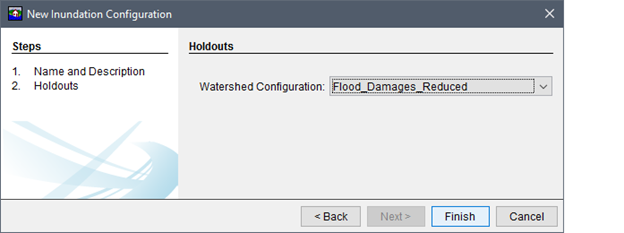
Figure: New Inundation Configuration Wizard - Step 2 - Holdouts
- Click Finish, the New Inundation Configuration wizard closes and the new inundation configuration name (e.g., FDRed_Holdouts) appears under the Inundation Data folder on the Study Tree.