Agricultural Grids
Agricultural data is not a required input in a consequence assessment; however, it may assist the user in understanding the amount and type of agriculture in the floodplain and potential flood impacts to it. Agricultural data can be a major component in Flood Damages Reduced calculations. As of HEC-FIA 3.4, agriculture data can be directly included in the RAS-HDF flood damages reduced compute type. Additionally, users may find it beneficial to download the urban areas and open water to utilize them to verify structure locations. Agriculture data can be downloaded from the U. S. Department of Agriculture (USDA) National Agricultural Statistics Service (NASS). Access and download the NASS Cropland Data Layer (CDL) from the following website https://nassgeodata.gmu.edu/CropScape/. NASS provides the CDL in GeoTiff (*.tif) format, where each cell represents a crop type.
Note: Currently downloading the CDL directly from the cropland website (https://croplandcros.scinet.usda.gov/) provides an incorrect projection of the data. It is recommended to download the CDL from https://nassgeodata.gmu.edu/CropScape/ instead.
Create an Agricultural Grid
Agricultural grids are generated from NASS CDL grids. To create an agricultural grid, from the Study Tree from the Inventory folder, right-click on Agricultural Grids. Point to Generate From NASS, click Load NASS CDL Grid, the Import Crop Data From NASS dialog box opens.
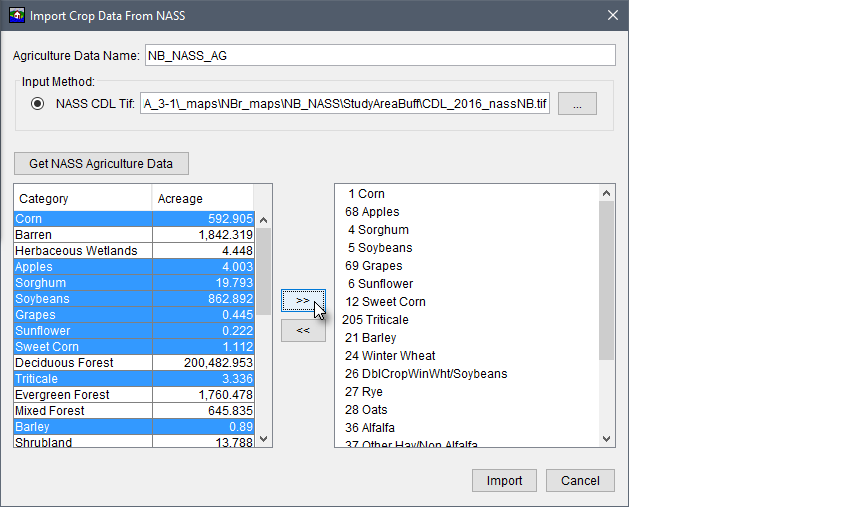
Figure: Import Crop Data From NASS Dialog Box
- Provide a name for the agricultural grid in the Agriculture Data Name box on the Import Crop Data From NASS dialog box.
- From the Input Method panel, click the
 button. The Select browser window opens for NASS CDL (.tif) file types. Browse to the location of the shapefile that represents the NASS dataset, select the filename, and click *Select. The Select browser window closes, and the NASS CDL Tif box lists the selected file.
 - Click the Get NASS Agriculture Data button, this retrieves the category and acreage information contained in the selected NASS CDL (*.tif) file.
- Once the data has been retrieved, the Category (category name) and Acreage table populates the crop information (crop name, acreage). From the table, select the crops/categories of interest and click the add category
 button to add the categorization code (e.g., 1) and land cover name (e.g., Corn) to the import selection box. Use the remove category
  button to select and remove crops/categories from the import selection box.
 - Specifically for Flood Damages Reduced computations, it is recommended to only import crops that are needed to calculate flood damages reduced. (For example importing land cover such as NLD-Mixed Forest may severely slow down computation times.
- Now that everything is defined, click Import. The Import Crop Data From NASS dialog box closes. HEC-FIA then filters the NASS CDL (*.tif) to only include cells with the crop/category types that were selected for import (e.g., Corn). Under the Agricultural Grids folder in the Study Tree, the name of the agricultural grid (NB_NASS_AG) appears.
Flood Damages Reduced - Agricultural Damages
As of HEC-FIA 3.4, agricultural data can be directly included in the RAS-HDF flood damages reduced compute type. Agricultural gridded data can be downloaded and defined the same way as a traditional HEC-FIA agriculture compute, and then assigned to be used in a RAS-HDF Flood Damages Reduced Alternative.
- Agricultural FDR Compute is only available for simulations that use the Holdout - RAS HDF Inundation Configuration
- To include in the Holdout -RAS HDF compute, in the Alternative Editor include an Agriculture Inventory and check the "Compute Agriculture" checkbox.
- To improve compute time, ensure that the agricultural grid is clipped to the project extents.
- When creating the Agricultural Grid within HEC-FIA, only import crops that are needed to calculate flood damages reduced. (For example importing land cover such as NLCD-Mixed Forest may severely slow down computation times).
- Additional Tabs including Acreage reduced have been added to the Flood Damage Reduction Aggregated Report
Agricultural Grid Shortcut Menu
Once an agricultural grid has been created there are several ways the grid can be manipulated from a shortcut menu. From the Study Tree, under the Structure Inventories folder, under the Agricultural Grids folder, right-click on the created agricultural grid name (e.g., NB_NASS_AG). From the shortcut menu seen in the figure below, the user can display/remove the agricultural grid from the active map window, edit the agricultural grid, save/save as, rename, delete/remove the agricultural grid from the study, and review properties of the agricultural grid file.
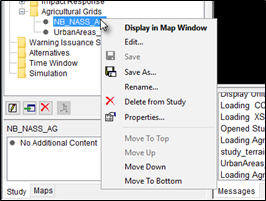
Figure: Agricultural Grids - Study Tree - Shortcut Menu
Edit
When completing an Agricultural Economic Loss assessment in HEC-FIA, Economic Guidance Memorandum (EGM) 14-02 states that current normalized agricultural prices can be found at the U.S. Department of Agriculture (USDA) website (References). The EGM also states that the USACE website will no longer disseminate this data but its location will be provided as a memorandum.
Each crop category in the imported agricultural grid needs the planting date information filled out, in addition to how much production costs are spent on the crop on a monthly basis. This information typically comes from a local land-grant university through an agricultural extension agency. Examples can be found through the USDA National Institute of Food and Agriculture's land-grant University directory. Additionally, price, yield, and harvest cost/date information need to be populated. This information typically comes from the agriculture extension service or from the NASS website.
To edit a defined agricultural grid, from the agricultural grid shortcut menu, click Edit, and the Crop Loss Editor opens. From the Crop Loss Editor, the user can select and edit specific crops via the navigation bar. The navigation bar allows users to move quickly between multiple crops in the selected agricultural grid. The navigation bar includes a dropdown list, which allows users to select a specific Crop (e.g., Alfalfa). Alternatively, users can navigate through the list of crops by clicking the navigation buttons.
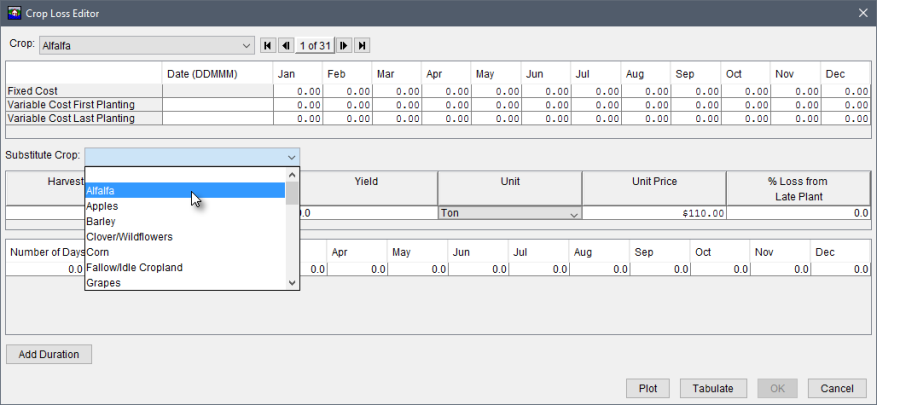
Figure: Crop Loss Editor - Example
There are three tables in the Crop Loss Editor dialog. The top table defines the cost to produce the crop, which is split into fixed costs and variable costs for the first and second planting. Each month can be assigned a different cost. The middle table contains information for harvest cost and the bottom table defines a damage curve. The damage curve defines the percentage of crop loss per month per flood duration (in days). The user can add damage curves by clicking the Add Duration button.
Save As
To create a copy of the agricultural grid, from the agricultural grid shortcut menu, click Save As, the Save Agricultural Grids As dialog box opens. In the Name box enter the name of new agricultural grid. The user can enter a description of the agricultural grid in the Description box. From the Directory box specify the location of the new agricultural grid. Click OK, the Save Agricultural Grids As dialog box closes, and the new agricultural grid is created.
Rename
To rename the agricultural grid, from the agricultural grid shortcut menu, click Rename, the Rename Agricultural Grids dialog box opens. In the Name box enter the new name of the agricultural grid. The user can enter a description of the agricultural grid in the Description box. Click OK, the Rename Agricultural Grids dialog box closes. The agricultural grid listed under the Structure Inventories folder, under the Agricultural Grids folder, in the Study Tree is renamed.
Delete from Study
To delete the agricultural grid and its associated files from the HEC-FIA project, from the agricultural grid shortcut menu, click Delete from Study, a Confirm Manager Delete message dialog opens. By clicking Yes, the Confirm Manager Delete message dialog closes, and the agricultural grid and its associated files are deleted from the HEC-FIA project.
Remove from Study
To remove the agricultural grid from the HEC-FIA project (does not delete files), from the agricultural grid shortcut menu, click Remove from Study; a Confirm Removal message dialog opens. By clicking Yes, the Confirm Removal message dialog closes, and the agricultural grid is removed from the HEC-FIA project.