Create a Structure Inventory
Structure inventories can be imported from a parcel shapefile, the National Structure Inventory (NSI), or a point based shapefile. To create a structure inventory:
- From the Study Tree, which is in the Study Pane, from Inventory folder, right-click on Structure Inventories. From the shortcut menu, point to Generate From and the submenu opens providing commands to import structure inventories as shown in the figure below.
In HEC-FIA, there are several options available for creating a structures inventory – parcel shapefile, National Structure Inventory (NSI), or point shapefile. The following sections describe each option for creating a structure inventory in HEC-FIA, which are accessed from the Structure Inventories shortcut submenu.
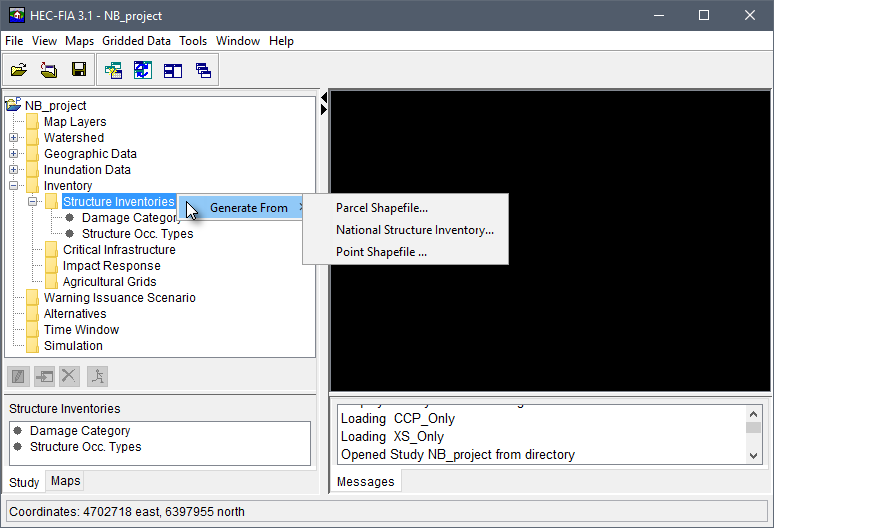
Figure: HEC-FIA Main Window - Structure Inventories -Shortcut Menu Commands
Generate Structures from a Parcel Shapefile
To import a structure inventory from a parcel shapefile, the requirements are the same as the point shapefile import. The only difference is that HEC-FIA calculates a centroid (center point) for each parcel record during the parcel shapefile import process; this center point is the defined location for each structure. To import from a parcel shapefile:
- From the Study Tree, from the Inventory folder, right-click on Structure Inventories. From the shortcut menu, point to Generate From, and click Parcel Shapefile. The Generate Structure Inventory from Parcel Shapefile dialog box opens shown in the figure below.
- Enter a unique name for the structure inventory in the Structure Inventory Name text box (e.g., SI_fromParcels from figure).
- The Shapefile box lists the available shapefiles that have been added as map layers. If a map layer that represents the parcel structure inventory has not been added to the HEC-FIA project, click the
 button. The Open browser window opens, shown in the figure below. Browse to the location of the shapefile that represents the parcel structure inventory shapefile (.shp), select the filename, and click *Open. The Open browser window closes, and the Shapefile box lists the selected file.
 Next, enter all of the information required to create a structure inventory from the parcel shapefile selected from the Shapefile list (e.g., parcelData.shp). Note, the Shapefile Field lists populate with the field names contained in the selected parcel shapefile.

Figure: Generate Structure Inventory from Parcel Shapefile Dialog Box

Figure: Open File Dialog to Select a Shapefile
From the First Floor Elevation Source panel, select the radio button for either First Floor Elevation, or Use Terrain + Foundation Height (default selection) to set the elevation of the first floor for all structures in the inventory. If the First Floor Elevation option is clicked then the user must select the Shapefile Field from the Data Assignments panel. Alternatively, if the Use Terrain + Foundation Height option is selected then the user may select the Shapefile Field that represents the foundation height attribute information from the Optional Data panel to define unique foundation heights for each structure. Note, the user may also add or edit the foundation height for individual structures or for structures within an occupancy type (refer to Section 8.3.1, for editing by structure; or Section 8.6.1, for editing by occupancy type).
From the Data Assignments panel, from the Shapefile Field lists, select the field which represents the Inventory Field attributes. For example, for the Replacement Value the selected shapefile field name (e.g., val_struct) represents the structure value attribute in the selected parcel shapefile.
From the Optional Data panel, the user can select any field from the Shapefile Field list (e.g., ht_found) that corresponds to a field selected from the available Inventory Field list (i.e., Foundation Height).- Once all of the parcel structure information is entered, click OK, and the Generate Structure Inventory from Parcel Shapefile dialog box closes. A Progress message dialog opens providing the user with information on the importing of the structures.
- Once the import is finished, the Progress message dialog closes, under the Structure Inventories folder in the Study Tree the new structure inventory name (e.g., SI_fromParcels) appears.
Generate Structures from National Structure Inventory
The user can import structure inventories from the National Structure Inventory (NSI) either externally from the NSI's website (by clicking here) or internally to HEC-FIA. The point shapefiles are extracted from the NSI base layer which represents modified data from the 2010 HAZUS dataset. The NSI's database can only be accessed if the user is connected to the internet behind the USACE firewall.
To generate structure inventories for shapefiles exported from the NSI's website, or internally to HEC-FIA:
- From the Study Tree, from the Inventory folder, right-click on Structure Inventories. From the shortcut menu, point to Generate From, click National Structure Inventory; and the Import National Structure Inventory dialog box opens, shown in the figure below.
In the Structure Inventory Name box enter a name for the structure inventory (e.g., NB_NSI in the figure below).

Figure: Import National Structure Inventory Dialog Box
The Study Area Polygon provides a list of the available polygon shapefiles that have been added as map layers. If a map layer that represents the study area polygon has not been added to the HEC-FIA project, click the
button. The Select browser window opens. Browse to the location of the shapefile that represents the study area shapefile (.shp), select the filename, and click *Select. The Select browser window closes, and the Study Area Polygon lists the selected file. Note: Importing NSI data first requires that a study coordinate system be set for the HEC-FIA project (review Chapter 4 of this manual); moreover, the selected polygon shapefile must have a projection in order to properly clip and import the NSI base layer.
Figure: Select Browser Window - Study Area Polygon Selection
- From the Input Method box, choose which method to use for creating a structure inventory by selecting the radio button for either User Defined, or NSI Generated.
The User Defined option requires the user to select an NSI shapefile (downloaded externally from HEC-FIA). Information from the user-defined NSI shapefile is used to clip structures that are only within the Study Area Polygon shapefile during the import process.
The NSI Generated option is where HEC-FIA sends a web call to the National Structure Inventory database for a base layer of structures. The NSI base layer represents modified data from the 2010 HAZUS dataset. The HEC-FIA import process downloads the structures, and then clips only the structures that exist within the user-specified Study Area Polygon. - Click OK, the Import National Structure Inventory dialog box closes. A Progress message dialog opens providing the user with information on the importing of the structures.
- Once the import is finished, the Progress message dialog closes, under the Structure Inventories folder in the Study Tree the new structure inventory name appears (e.g., NB_BaseNSI in the figure).
Generate Structures from a Point Shapefile
Users can create structure inventories using external software and import the inventory as a point structure inventory. A few required and optional fields are imported during creation of such an inventory. To generate a structure inventory using a point structure inventory (a point shapefile must be loaded for the HEC-FIA project):
- From the Study Tree, from the Inventory folder, right-click on Structure Inventories. From the shortcut menu, point to Generate From, click Point Shapefile. The Generate Structure Inventory from Point Shapefile dialog box opens, shown in the figure below.
- Enter a unique name for the structure inventory in the Structure Inventory Name text box.
- The Shapefile box lists the available shapefiles that have been added as map layers. If a map layer that represents the point structure inventory has not been added to the HEC-FIA project, click the button. The Open browser window opens. Browse to the location of the shapefile that represents the point structure inventory shapefile (.shp), select the filename, and click *Open. The Open browser window closes, and the Shapefile box lists the selected file.
- Next, enter all of the information required to create a structure inventory from the point shapefile selected from the Shapefile list. Note, the Shapefile Field lists populate with the field names contained in the selected point shapefile. As explained in Step 4 of Section 8.2.1, the required fields that must be completed (from the First Floor Elevation Source and Data Assignments panels) are the source of the first floor elevation, the unique name of each structure, a damage category, an occupancy type, and the value of the structure. Further, from the Optional Data panel, the user can select any field from the lists provided; of particular note are the population fields and the number of stories, since those are used in the life loss compute process.
- Click OK, the Generate Structure Inventory from Point Shapefile dialog box closes. A Progress message dialog opens providing the user with a green import progress bar.
Once the import is finished, the Progress message dialog closes, and under the Structure Inventories folder in the Study Tree the new structure inventory name appears.

Figure: Generate Structure Inventory from Point Shapefile Dialog Box