Critical Infrastructure
Critical infrastructure includes structures in the floodplain that are critical to the nation or a particular region, but are not part of a traditional structure inventory. These critical infrastructure elements may be elements that have tremendous service value such as utilities or bridges, or they may also pose risks to the population due to the presence of hazardous materials such as chemical facilities. It can be difficult to assign a dollar value to these structures or describe the impacts to the economy based on inundation.
However, it is critical to describe when these locations are inundated and the duration of flooding. HEC-FIA does not evaluate economic losses at critical infrastructure elements. Instead it tracks and reports hydraulic event parameters using a shapefile format. This allows the user to identify timing, depth and durations of flooding at the critical infrastructure. The import process via point shapefile is similar to the structure inventory import process.
To create a critical infrastructure inventory:
- From the Study Tree, from the Inventory folder, right-click on the Critical Infrastructure folder. From the shortcut menu, click Import; the Import Critical Infrastructure dialog box opens.
- Provide a name for the critical infrastructure in the Name box on the Import Critical Infrastructure dialog box.
- The Shapefile box lists the available shapefiles that have been added as map layers. If a map layer that represents the critical structure inventory has not been added to the HEC-FIA project, click the
 button. The Open browser window opens. Browse to the location of the shapefile that represents the critical structure inventory shapefile (*.shp), select the filename, and click Open. The Open browser window closes, and the Shapefile box lists the selected file.
 - In the Required Fields panel, the user needs to provide information from the shapefile fields for Name, Sector (damage category), and Sub Sector (structure occupancy type).
- From the Ground Elevation subpanel, click the radio button to either have HEC-FIA calculate the ground elevation from the terrain grid (Let FIA add ground elevation column) or to select the attribute (Select Attribute) from the selected shapefile that best describes the ground elevation.
Note: Some elements (i.e., bridges) do not provide good values from the terrain grid if the terrain represents the river surface rather than the bridge surface, so if HEC-FIA adds the ground elevation, make sure to enter an override elevation for elevations that describe when damages would begin to occur. - Optional information can be provided from the Optional Fields panel. Suggested optional fields are Description, Street Address, City, State, Zip Code, and Telephone Number. To include optional information select any field from the Fields in the Shape list (e.g., DESC1_F) that corresponds to a field selected from the available Fields in HEC-FIA list (i.e., Description).
Once everything is defined, click OK. The Import Critical Infrastructure dialog box closes, under the Critical Infrastructure folder in the Study Tree, the name of the imported critical infrastructure (NB_CI) appears.
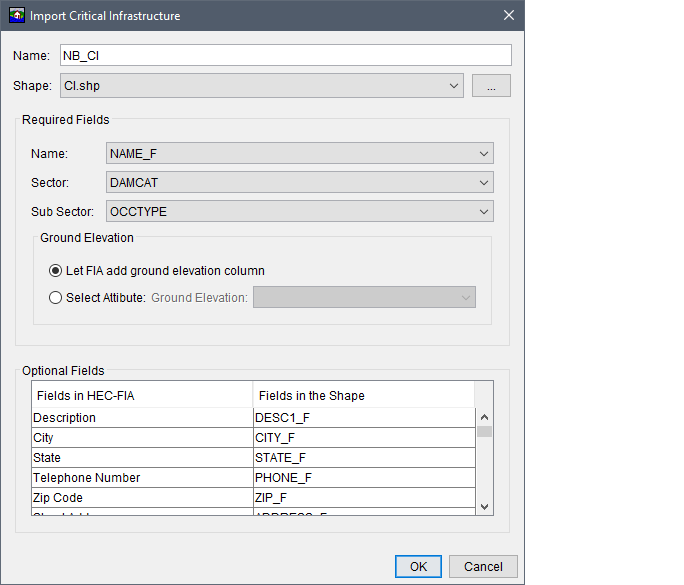
Figure: Import Critical Infrastructure Dialog Box - Example
Critical Infrastructure Shortcut Menu
Once a critical infrastructure inventory has been created there are several ways a user can manipulate the critical infrastructure from a shortcut menu. From the Study Tree, under the Critical Infrastructure folder, right-click on the created critical infrastructure (e.g., NB_CI). From the shortcut menu the user can display/remove the critical infrastructure from the active map window, edit the critical infrastructure, save/save as, rename, delete/remove the critical infrastructure from the HEC-FIA project, and review properties of the critical infrastructure file.
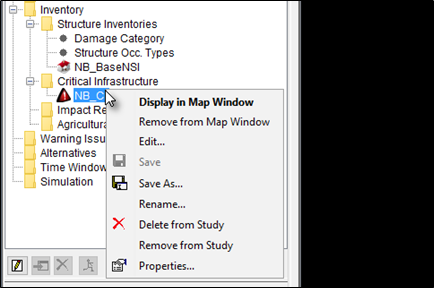
Figure: Critical Infrastructure - Study Tree - Shortcut Menu Options
Display in Map Window
To display the critical infrastructure locations in the HEC-FIA project, from the critical infrastructure shortcut menu, click Display in Map Window. The map window now includes the critical infrastructure locations. To turn off the critical infrastructure locations in the HEC-FIA project, from the critical infrastructure shortcut menu click Remove from Map Window.
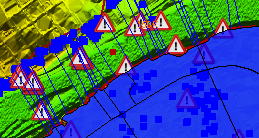
Figure: Map Window - Critical Infrastructure Locations
Edit
To edit a defined critical infrastructure, from the critical infrastructure shortcut menu, click Edit, the Edit Critical Infrastructure dialog box opens. If the user wants to override the terrain model elevation for the critical infrastructure element, uncheck the Use Terrain Model checkbox and define the ground elevation in the appropriate text box. Click the Apply button to save changes and continue editing, or click Ok to save changes and close the editor.
Within the Edit Critical Infrastructure, there is a navigation bar. The navigation bar allows users to move quickly between multiple critical structures. The navigation bar includes a dropdown list, which allows users to select a specific critical structure by Name. Alternatively, users can navigate through the list by clicking the navigation buttons.
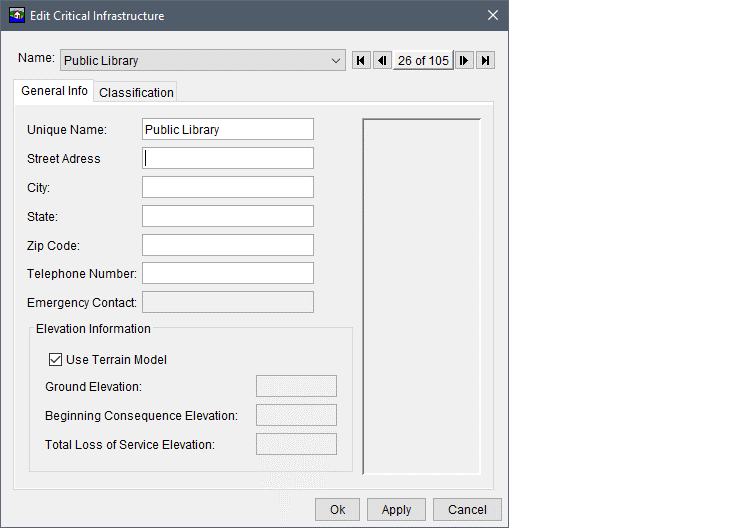
Figure: Edit Critical Infrastructure Dialog Box - General Info Tab
Save As
To create a copy of a critical infrastructure, from the critical infrastructure shortcut menu, click Save As, the Save Critical Infrastructure As dialog box opens. In the Name box enter the name of new critical infrastructure. The user can enter a description of the critical infrastructure in the Description box. Click OK, the Save Critical Infrastructure As dialog box closes, and the new critical infrastructure is created.
Rename
To rename the critical infrastructure, from the critical infrastructure shortcut menu, click Rename, the Rename Critical Infrastructure dialog box opens. In the Name box enter the new name of critical infrastructure. The user can enter a description of the critical infrastructure in the Description box. Click OK, the Rename Critical Infrastructure dialog box closes, and the critical infrastructure has been renamed.
Delete from Study
To delete the critical infrastructure and its associated files from the HEC-FIA project, from the critical infrastructure shortcut menu, click Delete from Study, a Confirm Manager Delete message dialog opens. By clicking Yes, the Confirm Manager Delete message dialog closes, and the critical infrastructure and its associated files are deleted from the HEC-FIA project.
Remove from Study
To remove the critical infrastructure from the HEC-FIA project (does not delete files), from the critical infrastructure shortcut menu, click Remove from Study; a Confirm Removal message dialog opens. By clicking Yes, the Confirm Removal message dialog closes, and the critical infrastructure is from the HEC-FIA project.