Structure Inventory Shortcut Menu
Once a structure inventory has been created there are several ways to manipulate the inventory. From the Study Tree, from the Inventory folder, from the Structure Inventories folder, right-click on an imported structure inventory name (e.g., NB_BaseNSI in figure below). From the shortcut menu the user may: display/remove the structure inventory from the active map window; edit the structure inventory; import additional structures; delete all structures; export structures to a shapefile; import population data; save as, rename, delete and/or remove the structure inventory from the study; and review properties of the structure inventory file. 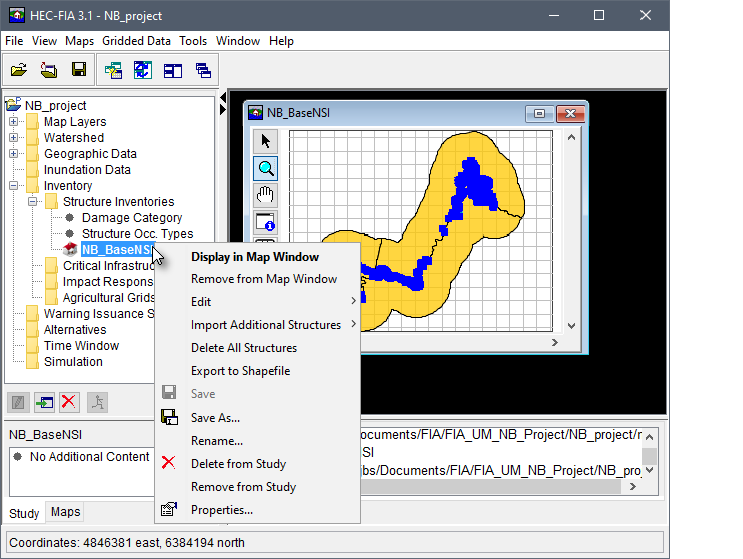
Figure: Structure Inventory -Study Tree - Shortcut Menu Options
Structure Inventory – Form Editor
From HEC-FIA the user may edit the structure inventory from the Structure Editor (table view), or from the Structure Editor (form view) on a structure by structure basis. From the structure inventory shortcut menu , point to Edit, click Form Editor, the Structure Editor – "Name of Structure Inventory" opens. Note: Click the Apply button to save changes and continue editing, or click OK to save changes and close the editor. 
Figure: Structure Editor - Location Tab
Navigation Bar
Within the Structure Editor (Form), there is a navigation bar. The navigation bar allows users to move quickly between multiple structures.

Figure: Navigation Bar
The navigation bar includes a dropdown  list, which allows users to select a specific structure by Name. Alternatively, users can navigate through the list of structures by clicking the navigation buttons. From left to right the navigator buttons are:
- First Record
 button – moves directly to the top structure in the list.
 - Last Record
 button – moves directly to the bottom structure in the list.
 - Previous Record
 button – moves forward through the list one structure at a time.
 - Next Record
 button – moves backward through the list one structure at a time.
Note, the text at the center of the navigation buttons (e.g., 1 of 5678 in above figure) indicates the total number of records in the list (e.g., 5678 total number of structures in the structure inventory) and the structure currently being accessed (e.g., 1, or the first structure in the alphabetized list).
Location Tab
The Structure Editor (Form) automatically opens to the Location tab. This tab is informational only, and provides the user with the location of the structure, its ground elevation, and the coordinates of the structure. As the text at the bottom of the Location tab indicates, the user can determine the stream, stream station number, and ground elevation by selecting a Watershed Configuration from the list of created configurations and clicking the Preview button.
Classification Tab
From the Classification tab of the Structure Editor (Form), the user can view and/or edit the damage category, structure occupancy type, and the depth-damage functions (for the structure, content, other, and/or car) that have been assigned to the selected structure (e.g.,RES1-2SNB 24001 00015380 in the figure below). To enter/modify depth-damage function curves, from the Function Name box, select the function of interest (e.g., Structure in the figure below), and enter the values in the table. The provided depth-damage graph updates automatically. Note: If any depth-damage function values have associated errors then the value in error will be highlighted in red; further, if the user hovers over the highlighted error, a tooltip will appear providing an explanation.
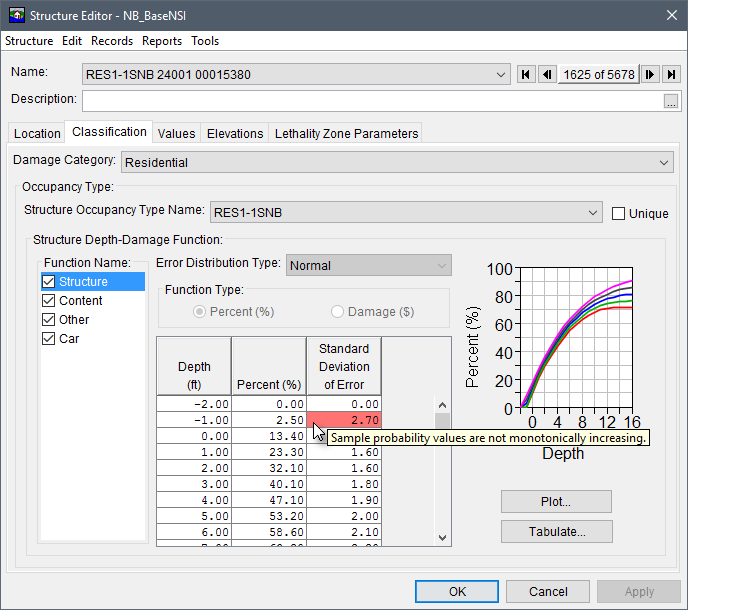
Figure: Structure Editor Form - Classification Tab
Values Tab
From the Values tab of the Structure Editor (Form), for the selected structure (e.g., RES1-2SNB 24001 00015380) the user can view the structure/content/other/car values, the year the structure was put in service, number of stories the structure has, the number of cars at the structure and the number of people that can fit into the cars. From the Values tab, the user can also enter information about the people that use the structure such as the number of people at the structure at 2AM and 2PM. All other times of the day are interpolated between those two times and cannot be edited.
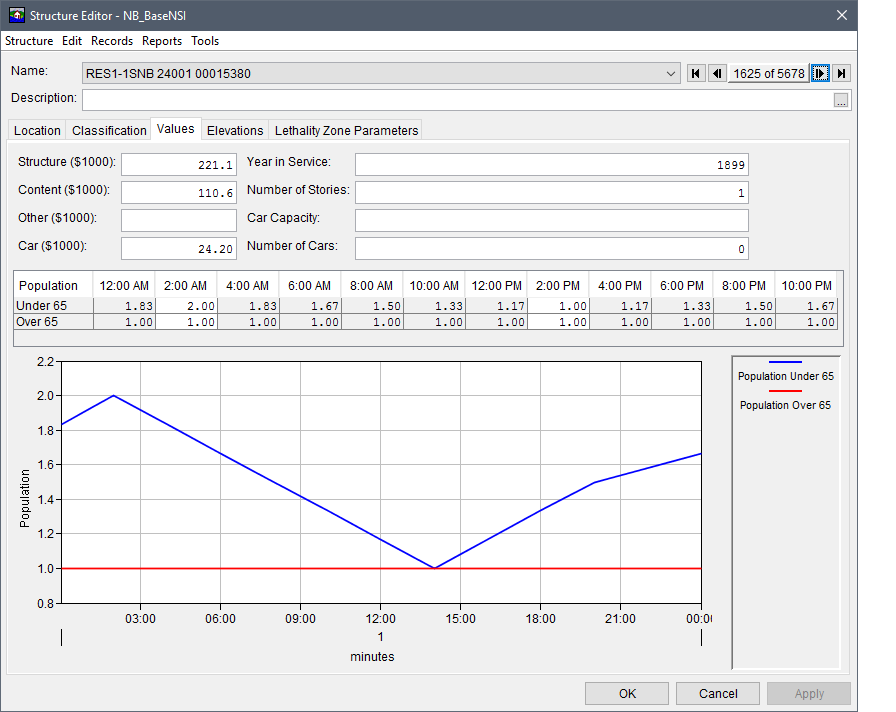
Figure: Structure Editor (Form) - Values Tab
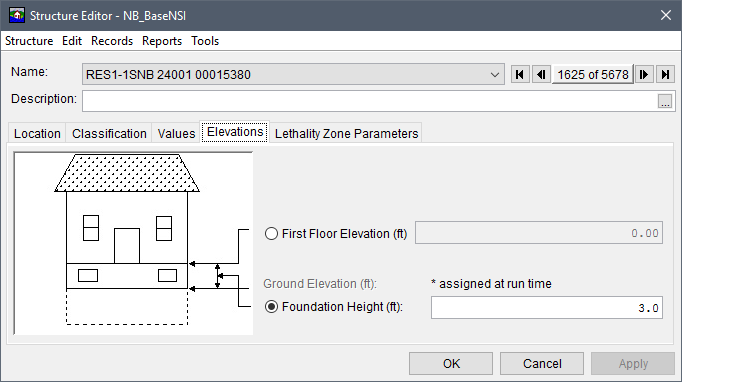
Elevations Tab
From the Elevations tab of the Structure Editor (Form), users can view elevation information concerning a selected structure (e.g., RES1-2SNB 24001 00015380). The First Floor Elevation and the Foundation Height can be changed. The Ground Elevation is computed by HEC-FIA and is not editable. To select either the First Floor Elevation or the Foundation Height and click the radio ![]() button next to the desired option; and enter the value in the box provided (in feet).
button next to the desired option; and enter the value in the box provided (in feet).
Structure Editor Form- Elevations Tab
Lethality Zone Parameters Tab
From the Lethality Zone Parameters tab of the Structure Editor (Form), users can view information about lethality zones concerning a structure. From the Lethality Zone Parameters tab, the user can change the Foundation Type and the Construction Type by selecting any option from the lists provided. Once either item has been changed, click Update. The other values on the tab are updated automatically.
Note: The user cannot modify the lethality zone parameters from the Structure Editor (Form). However, the depth thresholds or depth*velocity thresholds for each individual structure occupancy type can be edited from the Structure Occupancy Type Editor (Form) dialog.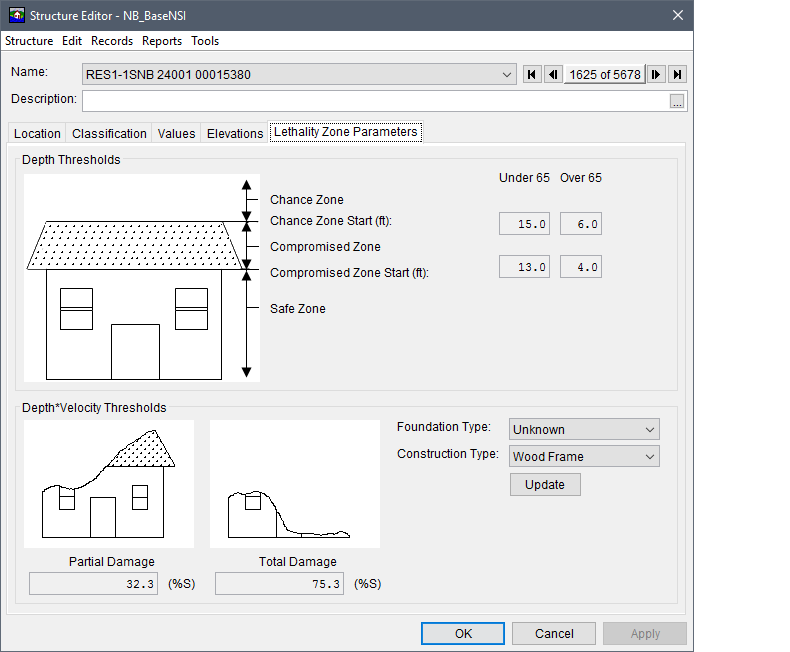
Figure: Structure Editor (Form) - Lethality Zone Parameters Tab
Structure Inventory – Table Editor
In the HEC-FIA interface, users can edit the structure inventory from the Structure Editor (Table) in a table form that allows users to edit the entire structure. From the structure inventory shortcut menu, point to Edit, click Table Editor, the Structure Editor – "Name of Structure Inventory" opens below.
From the Structure Editor (Table) users can edit the structure name, change the damage category, and/or change the occupancy type associated with the structure. From the table users can make changes easily to multiple structures, and filters are available that can make changing entire groups of structures easy. When finished, click OK, and all changes are automatically made to the selected structure inventory.
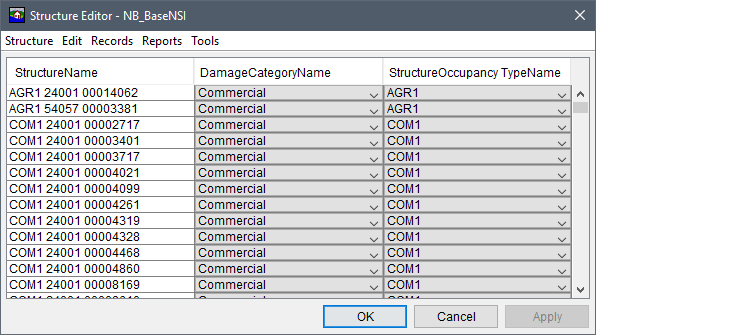
Figure: Structure Editor (Table)
Importing Additional Structures
Once the user has created a structure inventory, additional structures can be added to an existing inventory using the same methods that were used to create the original structure inventory (Create a Structure Inventory). From the structure inventory shortcut menu , point to Import Additional Structures, and from the submenu click on the method to use for importing additional structures (parcel shapefile or point shapefile). These structures are added to the existing structure inventory; therefore, be sure not to import new structures in the same geographic location, as this could result in duplication of structures.
Delete All Structures
To delete all structures in a structure inventory, from the Structure Inventory Shortcut Menu, click Delete All Structures. A Warning dialog box opens. Click Yes if all structures are to be deleted from the selected structure inventory. 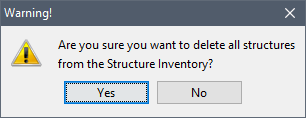
Figure: Warning Dialog Box - Delete All Structures
Export to Shapefile
HEC-FIA can create (export) a shapefile of the active structure inventory. From the Structure Inventory Shortcut Menu, click Export to Shapefile, the Export Structure Inventory to Shapefile dialog box opens.
- Click
 , a Save browser window opens. Select the location where the shapefile is to be exported (created). Enter a name in the File name box, and click Save. The Save browser window closes and the name and path of the shapefile is displayed in the Shapefile box.
 - Define the projected coordinate system of the shapefile. From the Default Projection panel, select the radio
 button to either Study Projection (which is the project of the current HEC-FIA project), or User Defined (which allows the user to set the projection from a projection *.prj file). When User Defined is selected, the Load from file button becomes available. The Load from file button opens an Open browser window. The file type is set to *.prj, browse to the location of the shapefile that contains the correct projection. Click Open, the Open browser window closes.
 Define the fields that the exported shapefile should contain from the Optional Data panel. The dropdown
lists contain the fields that are available for selection. From the Optional Data panel, the user can select any available field from the Shapefile Field list (e.g., Foundation Height).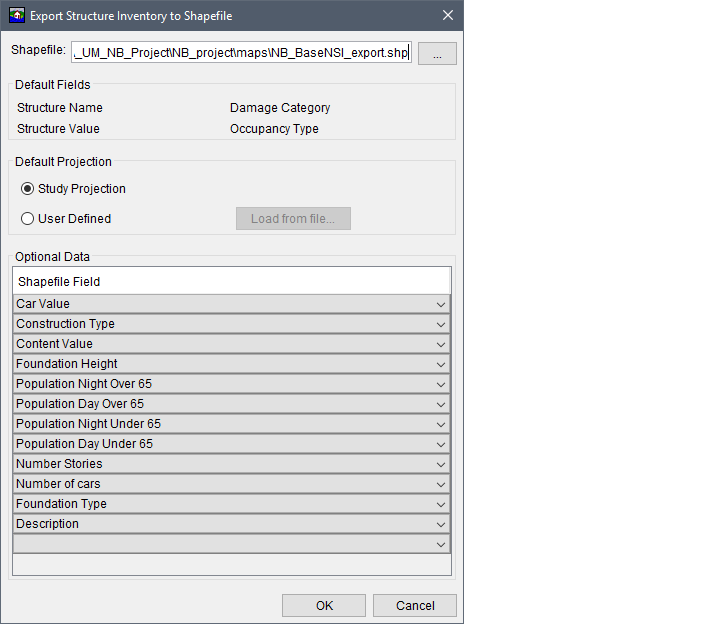
Figure: Export Structure Inventory to Shapefile Dialog Box

Figure: Save Browser Window - Export Structure Inventory to Shapefile
- Click OK, the Export Structure Inventory to Shapefile dialog box closes. A Progress message dialog opens providing the user with a green export progress bar, and once the export is finished, the Progress message dialog closes. The shapefile (i.e., NB_BaseNSI_export.shp) and all of the associated files are created at the specified location.
Save
From the Structure Inventory Shortcut Menu, click Save to save the structure inventory. The Save command updates the inventory's database (*.dbf) file for the selected structure inventory in the study directory.
Save As
To create a copy of the structure inventory, from the Structure Inventory Shortcut Menu, click Save As, and the Save Structure Inventories As dialog box opens. In the Name box enter the name of new structure inventory. A description of the structure inventory can be entered in the Description box. Click OK, the Save Structure Inventories As dialog box closes, and the new structure inventory is created and listed under the Structure Inventories folder in the Study Tree.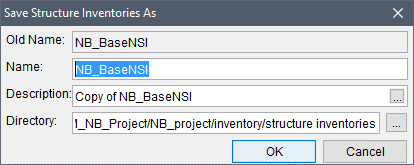
Figure: Save Structure Inventories As Dialog Box
Rename
To rename the structure inventory, from the Structure Inventory Shortcut Menu, click Rename, the Rename Structure Inventories dialog box opens. In the Name box enter the name of new structure inventory. A description of the structure inventory can be entered in the Description box. Click OK, and the Rename Structure Inventories dialog box closes. The structure inventory listed under the Structure Inventories folder in the Study Tree is renamed.
Note: Caution should be taken when renaming structure inventories selected in exiting alternatives as the user must select the renamed structure inventory from the Edit Alternative dialog box (review Alternatives). 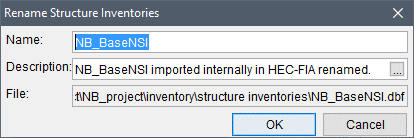
Figure: Rename Structure Inventories Dialog Box
Delete from Study
To delete a structure inventory and its associated files from the HEC-FIA project, from the Structure Inventory Shortcut Menu, click Delete from Study, a Confirm Manager Delete dialog box opens. By clicking Yes, the Confirm Manager Delete dialog box closes, and the selected structure inventory and associated (.dbf and .mdx) files are deleted from the HEC-FIA project and study directory. 
Figure: Confirm Manager Delete Dialog Box
Remove from Study
To remove the structure inventory from the HEC-FIA project (does not delete associated .dbf and .mdx files), from the Structure Inventory Shortcut Menu, click Remove from Study; a Confirm Removal dialog box opens. By clicking Yes, the Confirm Removal dialog box closes, and the structure inventory is removed from the HEC-FIA project. 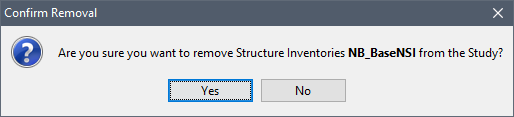
Figure: Confirm Removal Dialog Box