Download PDF
Download page Creating and Linking Terrain Data into a Basin Model.
Creating and Linking Terrain Data into a Basin Model
Last Modified: 2025-01-27 15:36:25.693
Software Version
HEC-HMS version 4.14 beta 4 was used to create this tutorial. You will need to use HEC-HMS version 4.13 beta 4, or newer, to open the project files.

Overview
In this tutorial you will create a new HEC-HMS project, create a terrain dataset, and load the terrain dataset into a Basin Model. As shown in the steps below, best practice is to copy all external files, including GIS data layers, into the HEC-HMS project directory.
Import a Digital Elevation Model (DEM)
- Start HEC-HMS and create a new project. Name the project Punxsutawney and set the Default Unit System to U.S. Customary.

- Use File Explorer to copy the GIS Data folder (contained in the "Initial_Creating_Linking_Terrain" zip file) into the …\Punxsutawney\data directory. Now, the external GIS files are local in the project directory.
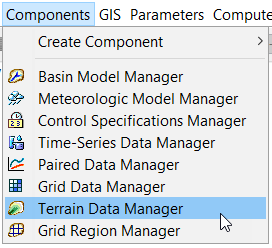
- From the Components menu, select Terrain Data Manager.
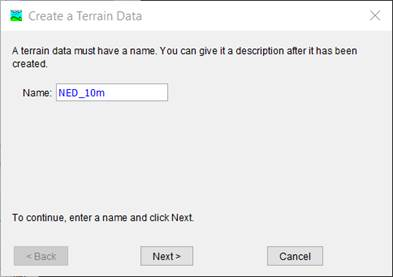
- Within the Terrain Data Manager, Click New… and name the terrain data "NED_10m".
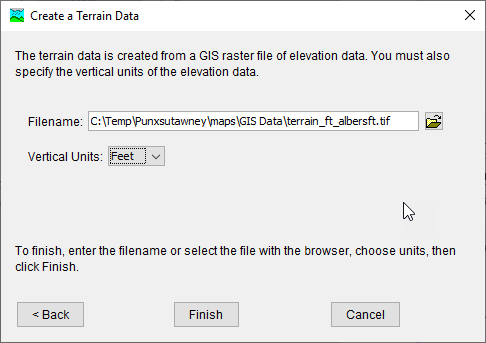
- In the next step, select the terrain file and choose the vertical units. Within the Filename entry, select the folder icon and navigate to the "terrain_ft_albersft.tif" file (should be in the …\Punxsutawney\data\GIS Data folder). Set the Vertical Units to Feet.
- Click the Finish button. A new element is added to the Watershed Explorer, in the Terrain Data folder.
Link the Terrain dataset to a Basin Model
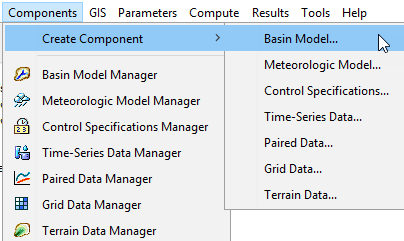
- In order to delineate subbasins and reaches, the terrain will need to be associated with a basin model. Create a new Basin Model for the project. From the Components menu select Create Component | Basin Model.
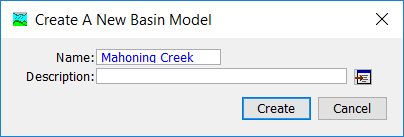
- Within the Basin Model Manager, click New… and name the basin model Mahoning Creek.
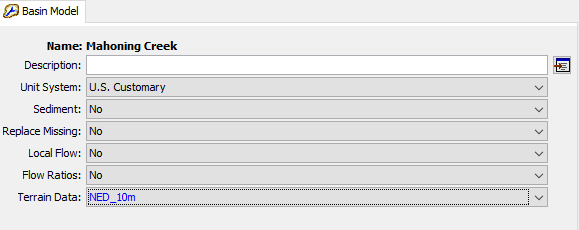
- From the Watershed Explorer, expand the Basin Model node and select the Mahoning Creek basin model. In the Basin Model's Component Editor, select NED_10m for the Terrain Data.
- Click the Save Project button.
- You will be prompted to select a coordinate system for the Mahoning Creek Basin Model.
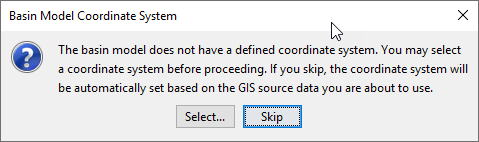
Press Skip and the program will set the Basin Model's coordinate system based on the terrain data. - The terrain data will now appear in the map window. Note: To access map layer controls (e.g. visibility, color scales, etc.), select View | Map Layers, highlight the desired layer, and select Draw Properties. This will allow display modifications to be made to the selected layer.
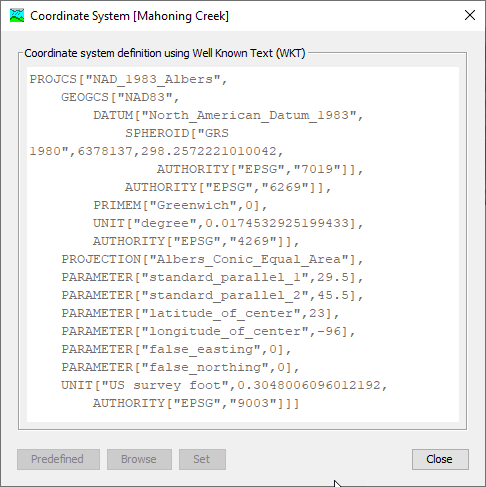
- Check the coordinate system of the basin model by selecting the GIS | Coordinate System menu option.
- Load additional map layers into the basin model. Select the View | Map Layer menu option to open the Map Layers window. Use the Add button to select the rain_gages_albersft, NHD_River_albersft, and flow_gage_albersft shapefiles in the …\Punxsutawney\data\GIS Data folder.
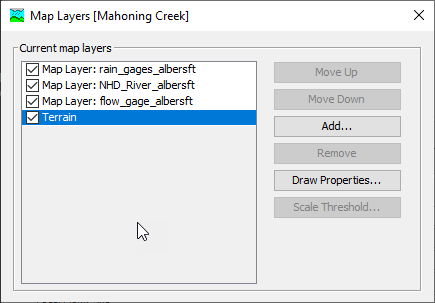
- Modify the draw properties for the three shapefiles so the Basin Model Map looks similar to the following figure.

- Save the project.
Questions:
1) What happens if the basin model coordinate system is already set before the terrain dataset is linked/added to the basin model?
HEC-HMS will project the terrain data into the basin model's projection. All GIS layers created during the delineation process will be created in the basin model's projection.
2) How do you identify elevation values in the terrain model?
Make sure the terrain dataset is selected in the Map Layers editor window, which can be accessed by selecting the Map Layers... option on the View menu. Then hover the mouse over the terrain in the Basin Model Map. The cursor tool tip will show elevation values from the terrain dataset.
Continue to Preprocessing Terrain Data to Delineate Subbasin and Reach Elements