Download PDF
Download page Normalizer.
Normalizer
The normalizer tool can be used to adjust grid cell values in one grid with information in another grid. A common application is to adjust, or scale, precipitation values in a gridset that has values at a short time interval, like every 1 hour, with gridded precipitation information from a gridset that has data at longer durations.
Theory
Equation
For each grid cell, the value at the source grid time interval is scaled by the ratio of the value of the accumulated normals grid cell value over the normalization period, divided by the value of the accumulated source grid cell value over the normalization period.
P_{c} = \frac{V_{n}}{V_{s}} \times P_{s}
Definitions
- Pc corrected precipitation for the source interval
- Vn normals grid cell accumulated volume over the normalization interval
- Vs source grid cell accumulated volume over the normalization interval
- Ps volume of source grid cell over the source interval
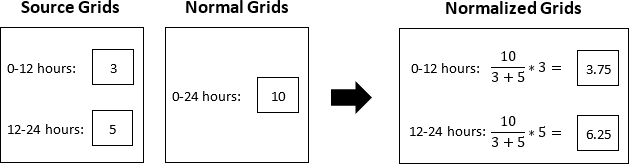
Example 1
In Example 1, the source and normal grids consist of a single grid cell. The source grids are 12 hours, beginning at time 0000, and the normal grids are 24 hours, beginning at time 0000. The user has selected a Normalization Interval of 1 day.
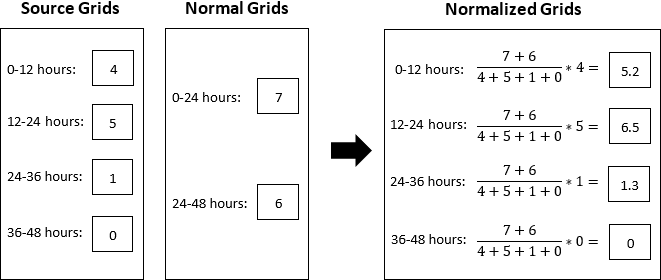
Example 2
In Example 2, the source and normal grids consist of a single grid cell. The source grids are 12 hours, beginning at time 0000, and the normal grids are 24 hours, beginning at time 0000. The user has selected a Normalization Interval of 2 days.
Example 3
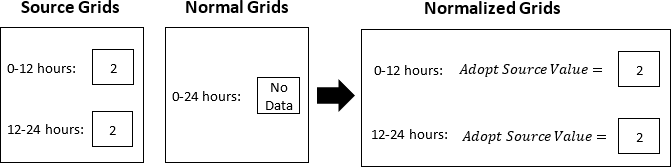
In Example 3, the source and normal grids consist of a single grid cell. The source grids are 12 hours, beginning at time 0000, and the normal grids are 24 hours, beginning at time 0000. The user has selected a Normalization Interval of 1 day. The 0-12 hour source cell has No Data.
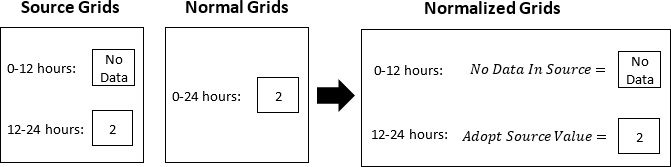
If no data exists for the source grid cell, the normalized grid cell also contains no data. If no data exists for the normal grid cell, the value of the source grid cell is adopted in the normalized grid.
Example 4
In Example 4, the source and normal grids consist of a single grid cell. The source grids are 12 hours, beginning at time 0000, and the normal grids are 24 hours, beginning at time 0000. The user has selected a Normalization Interval of 1 day. The 0-24 hour normal cell has No Data.
Usage
The Normalizer utility is launched from the Tools | Data | Normalizer menu in HEC-HMS.
A project does not have to be open to access the Normalizer.
Step 1: Select Source Variables
Select a source grid file using the file browse button (1). When a source file is selected, its variables will be displayed in the available variables column (2). Variables can be moved from the available variables column to the selected variables column (2 to 3) by double-clicking the variable or using the arrows to move the selected variable.
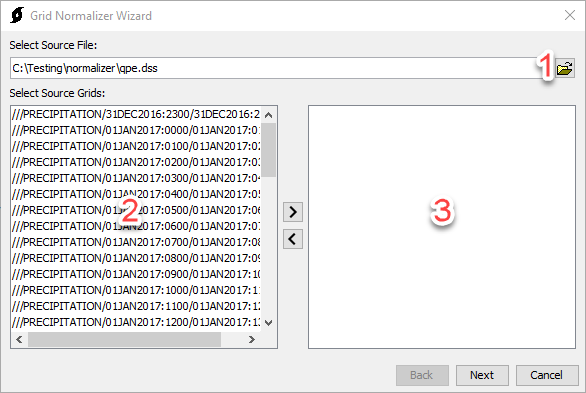
At least one variable must be selected to proceed.
Step 2: Select Normal Variables
Select a normal grid file using the file browse button (1). When a normal file is selected, its variables will be extracted to (2) the available variables column. Variables can be moved from the available variables column to the selected variables column (2 to 3) by double-clicking the variable or using the arrows to move the selected variable.
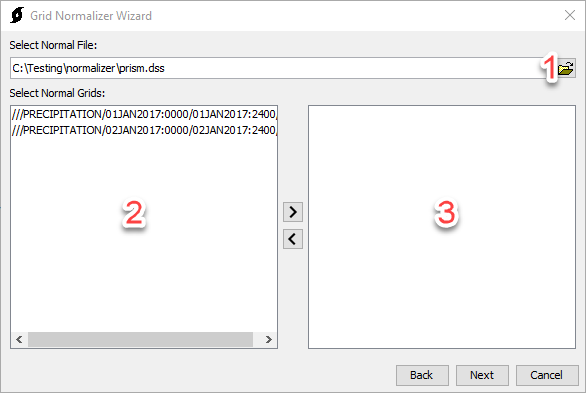
At least one variable must be selected to proceed.
Step 3: Set Normalization Period & Normalization Interval
The start/end date for the normalization period can be set at (1). The format for the date is: [m/d/yyyy]
The start/end time for the normalization period can be set at (2). The format for the time is: [hhmm]
The normalization interval can be set at (3).
The time unit for the normalization interval can be set at (4). Time unit options include: Days, Hours, Minutes, Seconds.

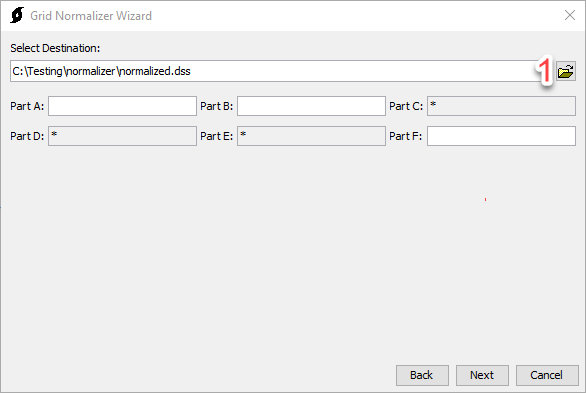
Step 4: Select Destination
The file browse button (1) can be used to browse to a destination file. If the destination file is HEC-DSS format, additional options are presented for specifying pathname parts. Some pathname parts can not be edited. These will be populated automatically.
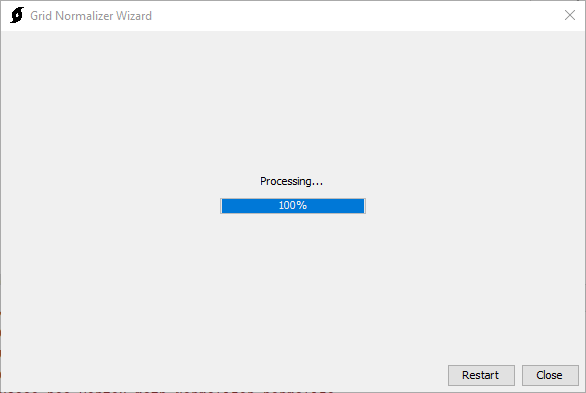
Step 5: Processing
After Next has been selected in Step 4, a progress bar will display, indicating the progress of the operation. When the progress reaches 100%, the Restart and Close buttons will be enabled. The gridded data will be saved to the user selected DSS file (chosen in step 4). The user will need to create a gridded data object within the HEC-HMS project and link the object to one of the grid data records in the DSS file in order to use the gridded data within an HEC-HMS simulation.