Download PDF
Download page Zones.
Zones
Zones provide a way to group together elements with similar properties. The grouping could be performed spatially so that a large watershed is subdivided with a separate zone for each tributary. Another way to subdivide spatially is to group all subbasins between upstream and downstream gage locations. Alternatively, the grouping could be performed parametrically so that a watershed is subdivided with a separate zone for each type of land use. The properties used to group elements into zones are defined by the user and may use any meaningful criteria. Zones are defined and managed as part of the basin model. Once defined, the primary use of zones is for setting parameter values within the Forecast Alternative, described fully in a later chapter. In brief, during a forecast it becomes possible to set parameter values once and have them immediately applied to all subbasins in a zone.
There are three organizational levels to the use of zones. The lowest organizational level is individual elements (subbasins or reaches). The elements contain the actual parameter data and are located within the watershed. The middle organizational level is a Zone. Each Zone contains one or more elements. Elements are grouped into zones using one of the schemes described in the previous paragraph. The highest level is a Zone Configuration. Each Zone Configuration includes one or more Zones. A Basin Model may include multiple configurations.
Creating a New Zone Configuration
A new zone configuration is created using the Zone Configuration Manager. To access the manager, click on the Parameters menu and select the Zone Configuration Manager command. The manager will open and show all of the zone configurations currently in the basin model (Figure 1). The manager can remain open while you manage the zone configurations or while you perform tasks elsewhere in the program. You can close the manager using the X button in the upper right corner. The buttons to the right of the zone configuration list can be used to manage existing configurations or create a new one. To create a new zone configuration, press the New… button. After you press the button a window (Figure 2) will open where you can name and describe the new zone configuration that will be created. A default name is provided for the new configuration; you can use the default or replace it with your own choice. A description can also be entered. If the description is long, you can press the button to the right of the description field to open an editor. The editor makes it easier to enter and edit long descriptions. A zone configuration may contain subbasin or reach elements, but it cannot contain both types of elements. Other types of elements cannot be included in a zone configuration. Select the type of element that will be included in the zone configuration. When you are satisfied with the name, description, and element type, press the Create button to finish the process of creating the new zone configuration. You cannot press the Create button if no name is specified for the new configuration. If you change your mind and do not want to create a new zone configuration, press the Cancel button or the X button in the upper right to return to the Zone Configuration Manager window.
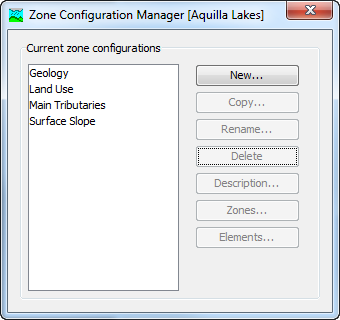
Figure 1. The Zone Configuration Manager showing four configurations with schemes for grouping elements.
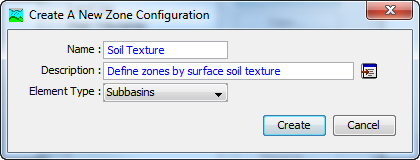
Figure 2. Creating a new zone configuration. This was accessed by opening the Zone Configuration Manager from the Parameters menu, and then pressing the New… button.
Copying a Zone Configuration
Copy a zone configuration using the Zone Configuration Manager, which is accessed from the Parameters menu. Select the zone configuration you wish to copy by clicking on it in the list of current configurations. The selected configuration is highlighted after you select it. After you select a configuration you can press the Copy… button on the right side of the window. A new Copy Zone Configuration window (Figure 3) will open where you can name and describe the copy that will be created. A default name is provided for the copy; you can use the default or replace it with your own choice. A description can also be entered; if it is long you can use the button to the right of the description field to open an editor. When you are satisfied with the name and description, press the Copy button to finish the process of copying the selected basin model. You cannot press the Copy button if no name is specified. If you change your mind and do not want to copy the selected zone configuration, press the Cancel button or the X button in the upper right to return to the Zone Configuration Manager window.
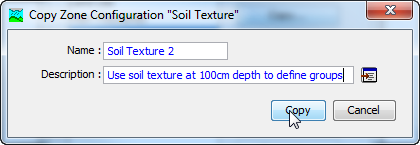
Figure 3. Creating a copy of a zone configuration. This was accessed from the Zone Configuration Manager.
Renaming a Zone Configuration
Rename a zone configuration using the Zone Configuration Manager, which is accessed from the Parameters menu. Select the zone configuration you wish to rename by clicking on it in the list of current configurations. The selected configuration is highlighted after you select it. After you select a configuration you can press the Rename… button on the right side of the window. A new Rename Zone Configuration window (Figure 4) will open where you can provide the new name. If you wish you can also change the description at the same time. If the new description will be long, you can use the button to the right of the description field to open an editor. When you are satisfied with the name and description, press the Rename button to finish the process of renaming the selected zone configuration. You cannot press the Rename button if no name is specified. If you change your mind and do not want to rename the selected zone configuration, press the Cancel button or the X button in the upper right of the Rename Zone Configuration window to return to the Zone Configuration Manager window.
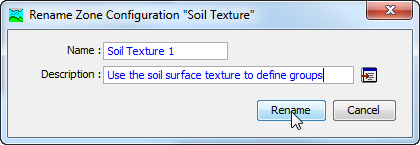
Figure 4. Renaming a zone configuration. This was accessed from the Zone Configuration Manager.
Deleting a Zone Configuration
Delete a zone configuration using the Zone Configuration Manager, which is accessed from the Parameters menu. Select the zone configuration you wish to delete by clicking on it in the list of current configurations. The selected configuration is highlighted after you select it. Press the Delete button on the right side of the window to delete the selected zone configuration (Figure 5). A window will open where you must confirm that you wish to delete the selected configuration. Press the OK button to delete the configuration. If you change your mind and do not want to delete the selected zone configuration, press the Cancel button or the X button in the upper right to return to the Zone Configuration Manager window.
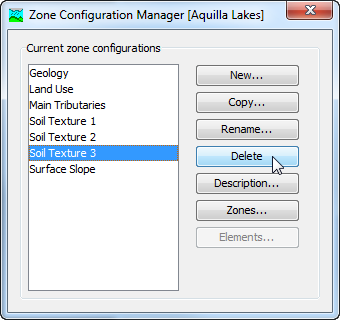
Figure 5. Preparing to delete a zone configuration from the Zone Configuration Manager.
Creating a Zone in a Configuration
Create a new zone from the Zones window, accessed directly from the Zone Configuration Manager. To begin, open the zone configuration manager by clicking on the Parameters menu and selecting the Zone Configuration Manager command. Next select the zone configuration to which you will add a new zone by clicking on the configuration in the list of available configurations. The selected zone configuration is highlighted after you click on it. After you select a zone configuration you can press the Zones… button to open the Zones window (Figure 6). Finally, press the New… button in the Zones window to begin creating a new zone. After you press the button a window (Figure 7) will open where you can name and describe the new zone that will be added to the selected zone configuration. A default name is provided for the new zone; you can use the default or replace it with your own choice. A description can also be entered. If the description is long, you can press the button to the right of the description field to open an editor. The editor makes it easier to enter and edit long descriptions. When you are satisfied with the name and description, press the Create button to finish the process of creating the new zone. You cannot press the Create button if no name is specified for the new zone. If you change your mind and do not want to create a new zone, press the Cancel button or the X button in the upper right to return to the Zones window.
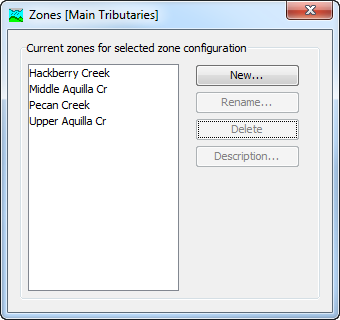
Figure 6. Managing the zones in a zone configuration.

Figure 7. Creating a new zone.
Renaming a Zone in a Configuration
Rename a zone from the Zones window, accessed directly from the Zone Configuration Manager. To begin, open the zone configuration manager by clicking on the Parameters menu and selecting the Zone Configuration Manager command. Next select the zone configuration that contains the zone you wish to rename by clicking on the configuration in the list of available configurations. The selected zone configuration is highlighted after you click on it. After you select a zone configuration you can press the Zones… button to open the Zones window (Figure 6). Finally, select the zone you wish to rename by clicking on it in the list of zones and then press the Rename... button on the right side of the Zones window. A new Rename Zone window (Figure 8) will open where you can provide the new name. If you wish you can also change the description at the same time. If the new description will be long, you can use the button to the right of the description field to open an editor. When you are satisfied with the name and description, press the Rename button to finish the process of renaming the selected zone. You cannot press the rename button if no name is specified. If you change your mind and do not want to rename the selected zone, press the Cancel button or the X button in the upper right of the Rename Zone window to return to the Zones window.
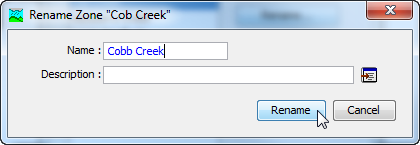
Figure 8. Renaming a zone.
Deleting a Zone from a configuration
Delete a zone from the Zones window, accessed directly from the Zone Configuration Manager. To begin, open the zone configuration manager by clicking on the Parameters menu and selecting the Zone Configuration Manager command. Next select the zone configuration that contains the zone you wish to delete by clicking on the configuration in the list of available configurations. The selected zone configuration is highlighted after you click on it. After you select a zone configuration you can press the Zones… button to open the Zones window (Figure 6). Finally, select the zone you wish to delete by clicking on it in the list of zones and then press the Delete... button on the right side of the Zones window, as shown in Figure 9. A window will open where you must confirm that you wish to delete the selected zone. Press the OK button to delete the zone. If you change your mind and do not want to delete the selected zone, press the Cancel button or the X button in the upper right to return to the Zones window.
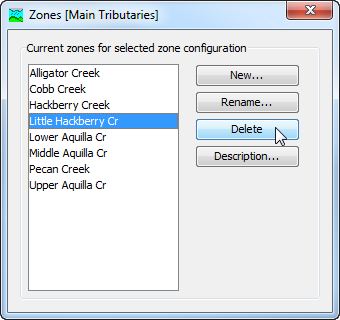
Figure 9. Preparing to delete a zone from a zone configuration. A confirmation will be required after pressing the Delete button.
Adding Elements to a Zone
Add an element to a zone using the Elements window, accessed directly from the Zone Configuration Manager. To begin, open the zone configuration manager by clicking on the Parameters menu and select the Zone Configuration Manager command. Next select the zone configuration that contains the zone to which elements will be added. Click on the configuration in the list of available configurations to select it. The selected zone configuration is highlighted after you click on it (Figure 5). After you select a zone configuration you can press the Elements… button to open the Elements window.
The left side of the Elements window shows all elements that have not been assigned to a zone (Figure 10). The zones selector at the upper right of the window can be used to switch between zones in the selected zone configuration. You must select the zone to which you wish to add elements. The right side of the Elements window shows all elements that have been added to the selected zone.
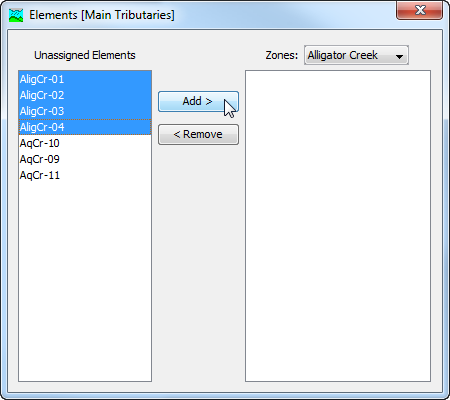
Figure 10. Elements are added to the selected zone "Alligator Creek" by pressing the Add button. Multiple elements were selected by holding the control key and clicking each desired element. Elements can also be added by double-clicking each one in the left panel.
There are two ways to add an element to the selected zone. The first way is to click on an unassigned element in the left side of the Elements window. You may hold the control key and click on additional elements to add more than one element at a time. The selected elements are highlighted after clicking. Press the Add button to add the selected elements to the selected zone.
The second way to add an element to the selected zone is to double-click it in the list of unassigned elements. When an element is double-clicked, it will be added to the currently selected zone and removed from the list of unassigned elements.
Removing Elements from a Zone
Remove an element from a zone using the Elements window, accessed directly from the Zone Configuration Manager. To begin, open the zone configuration manager by clicking on the Parameters menu and select the Zone Configuration Manager command. Next select the zone configuration that contains the zone from which elements will be removed. Click on the configuration in the list of available configurations to select it. The selected zone configuration is highlighted after you click on it. After you select a zone configuration you can press the Elements… button to open the Elements window (Figure 11).
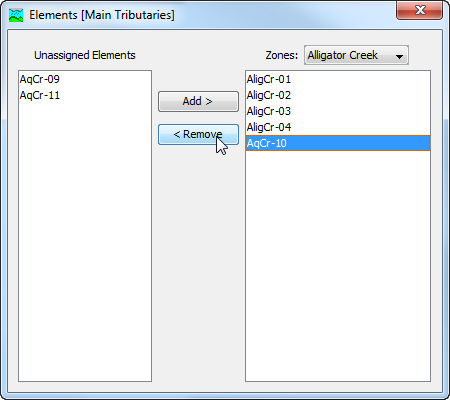
Figure 11. Elements are returned from the selected zone "Alligator Creek" to the unassigned elements by pressing the Remove button. Elements can also be removed by double-clicking each one shown in the right panel.
The right side of the Elements window shows all elements that have been assigned to a zone. The zones selector at the upper right of the window can be used to switch between zones in the selected zone configuration. You must select the zone from which you wish to remove elements. The left side of the Elements window shows all elements have not been assigned to a zone.
There are two ways to remove an element from the selected zone. The first way is to click on an element in the right side of the Elements window. You may hold the control key and click on additional elements to remove more than one element at a time. The selected elements are highlighted after clicking. Press the Remove button to return the selected elements to the list of unassigned elements.
The second way to remove an element from the selected zone is to double-click it in the list of zone elements. When an element is double-clicked, it will be removed from the currently selected zone and placed on the list of unassigned elements.
Selecting a Current Zone Configuration
A zone configuration can be selected to be active in the Basin Model Map window, global editors, and results accessed through the map. There are two ways to select the current zone configuration. The first way is to click on the Parameters menu and select a zone configuration with the Select Zone Configuration command. The command shows all zone configurations that have been established in the basin model. The Select Zone Configuration command indicates the selected configuration with a check mark.
The second way to select the current zone configuration is with the selection box on the toolbar. The selection box shows all zone configurations that have been established in the basin model. Use the selection box to choose a zone configuration.
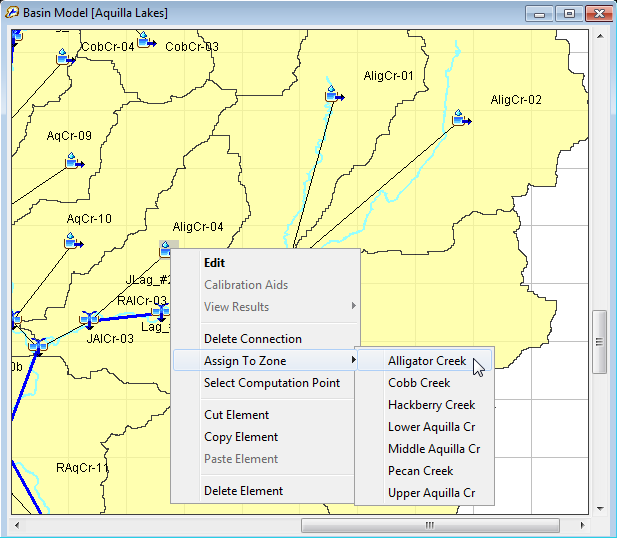
Figure 12. Assigning the "AligCr-04" subbasin to the "Alligator Creek" zone in the current zone configuration.
Elements can be added to a zone or moved between zones using the Basin Model Map window once a current zone configuration is selected. To assign or change the assignment of an element, click on the element in the Basin Model Map window using the right mouse button. The Assign To Zone command shows the zones available for assignment (Figure 12). If the element is not assigned to a zone, it will be assigned to the selected zone. If the element is already assigned, it will be automatically removed from its current zone and assigned to the newly selected zone. Elements assigned to a zone through the map must be assigned one at a time.
Global editors include additional features when there is a current zone configuration. As shown in Figure 13, the global editor can display all elements in the basin model or can be switched to display only the elements in a zone of the current zone configuration. All of the zones are shown in the selection list with a prefix of Z: indicating status as a zone. Additional selection items may also be included on the list and are shown with a different prefix.
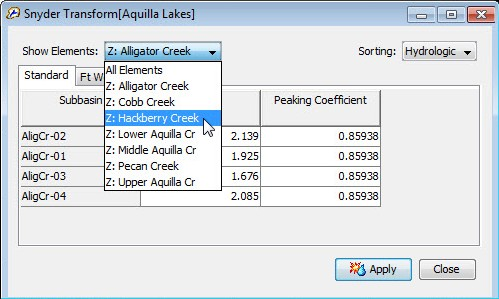
Figure 13. Viewing the parameter data for subbasins assigned to zone "Alligator Creek" in the global editor, and preparing to view the subbasins assigned to zone "Hackberry Creek."
The Global Summary Table also includes additional features when there is a current zone configuration. The global summary table can display all elements in the basin model or can be switched to display elements in a particular zone (Figure 14). All of the zones are shown in the selection list with a prefix of Z: indicating status as a zone. Additional selection items may also be included on the list and are shown with a different prefix.
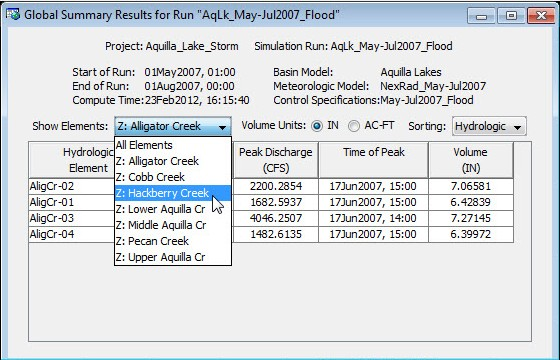
Figure 14. Viewing the results for subbasins assigned to zone "Alligator Creek" in the global summary table, and preparing to view subbasins assigned to zone "Hackberry Creek."