Download PDF
Download page Depth-Area Analyses.
Depth-Area Analyses
A Depth-Area Analysis is designed to assist in the process of developing peak flows in a watershed due to frequency precipitation. For example, it may be the goal to compute the streamflow expected to result from the storm with 1% exceedance probability. The usual assumption is that the 1% precipitation will result in the 1% flow, and that the hydrology model can accurately simulate the conversion of precipitation to flow. Developing the flow values throughout a watershed for a specific exceedance probability is a key step in developing flow frequency curves.
Storm area is a key component of both the frequency storm and hypothetical storm precipitation methods. The area is used to determine the appropriate depth-area reduction factor. The depth-area reduction factor is used to account for the observation from empirical data that average precipitation intensity decreases as the area of a storm increases. Thus the average precipitation intensity of a 200 km2 storm is generally much less than the intensity of a 10 km2 storm. Proper determination of the flow at a given evaluation point in the watershed requires that the frequency storm or hypothetical storm have an area equal to the drainage area at that point. Failure to match the storm area to the drainage area can result in significant under or over estimation of the flow. It is simple enough to setup a simulation run with the Meteorologic Model set to compute flow at a particular evaluation point. However, it is often the case that the flow must be estimated at many points in the watershed.
The Depth-Area Analysis automates the process of developing a separate frequency storm or hypothetical storm for each evaluation point. The analysis requires the specification of an underlying Basin Model and a Meteorologic Model. The Meteorologic Model must be set to use the Frequency Storm or Hypothetical Storm Precipitation Methods. The analysis also includes the listing of various analysis points where the flow should be evaluated. When the analysis computes, it automatically generates frequency storms based on the one specified in the Meteorologic Model but with appropriate storm area for each analysis point. The instantaneous peak flows at each analysis point are automatically collected and available in a tabular display.
Depth-Area Analyses are one of the components that can compute results. Each Depth-Area Analysis is based on a Basin Model and a Meteorologic Model. The Meteorologic Model selected must use the Frequency Storm or Hypothetical Storm Precipitation Methods. The analysis also includes the definition of the Simulation Time Window and Simulation Time Step, and the selection of Evaluation Points within the Basin Model. A Summary Table with the key flow information necessary for constructing a flow-frequency curve is available from the Watershed Explorer.
Creating a New Depth-Area Analysis
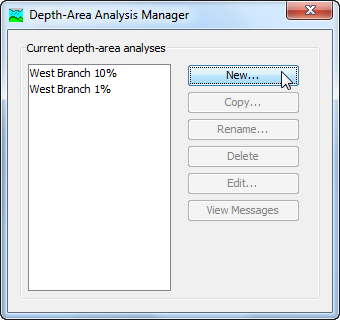
A new Depth-Area Analysis is created using a wizard that helps you navigate the steps to creating a new analysis. There are two ways to access the wizard. The first way to access the wizard is to click on the Compute menu and select the Create Compute | Depth-Area Analysis command; it is only enabled if at least one Basin Model and Meteorologic Model exists. The wizard will open and begin the process of creating a new Depth-Area Analysis. The second way to access the wizard is from the Depth-Area Analysis Manager. Click on the Compute menu and select the Depth-Area Analysis Manager command. The Depth-Area Analysis Manager will open and show any analyses that already exist. Press the New button to access the wizard and begin the process of creating a Depth-Area Analysis, as shown in the following figure.
The first step of creating a Depth-Area Analysis is to provide the name for the new analysis. A default name is provided for the new analysis; you can use the default or replace it with your own choice. After you finish naming the analysis you can add a description to it. If you change your mind and do not want to create a new Depth-Area Analysis, you can press the Cancel button at the bottom of the wizard or the X button in the upper right corner of the wizard. The Cancel button can be pressed at any time you are using the wizard. Press the Next button when you are satisfied with the name you have entered and are ready to proceed to the next step.
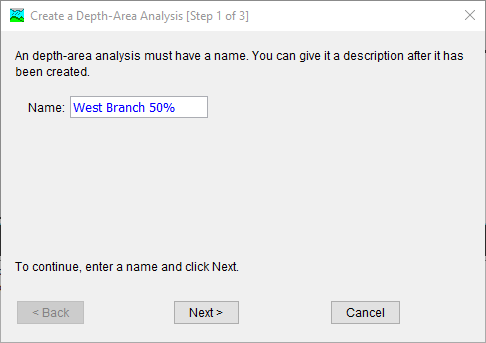
The second step of creating a Depth-Area Analysis is to select a Basin Model. The third step of creating a Depth-Area Analysis is to select a Meteorologic Model. All of the Meteorologic Models in the project are contained in the list of Meteorologic Model. The Meteorologic Model should include the Frequency Storm or Hypothetical Storm Precipitation Methods. By default, the Basin Model and Meteorologic Model are selected in steps 2 and 3. You can use your mouse to select a different basin or Meteorologic Model by clicking on the component in the table of available choices. You can also use the arrow keys on your keyboard to select a different basin or Meteorologic Model. Press the Finish button when you are satisfied with the name you have entered and the Basin and Meteorologic Models you have selected, and are ready to create the Depth-Area Analysis. Press the Back button if you wish to return to the previous step.
Copying a Depth-Area Analysis
There are two ways to copy a Depth-Area Analysis. Both methods for copying an analysis create an exact duplicate with a different name. Once the copy has been made it is independent of the original and they do not interact.
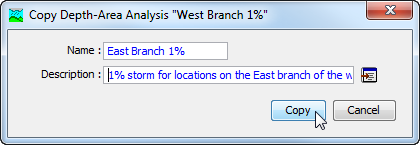
The first way to create a copy is to use the Depth-Area Analysis Manager, which is accessed from the Compute menu. Select the Depth-Area Analysis you wish to copy by clicking on it in the list of current analyses. The selected analysis is highlighted after you select it. After you select an analysis you can press the Copy button on the right side of the window. The Copy Depth-Area Analysis window (shown in the following figure) will open where you can name and describe the copy that will be created. A default name is provided for the copy; you can use the default or replace it with your own choice. A Description can also be entered; if it is long you can use the button to the right of the description field to open an editor. When you are satisfied with the name and description, press the Copy button to finish the process of copying the selected Depth-Area Analysis. You cannot press the Copy button if no name is specified. If you change your mind and do not want to copy the selected Depth-Area Analysis, press the Cancel button or the X button in the upper right to return to the Depth-Area Analysis Manager window.
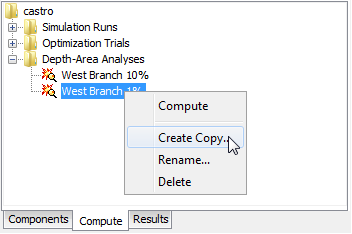
The second way to copy is from the Compute tab of the Watershed Explorer. Move the mouse over the Depth-Area Analysis you wish to copy and press the right mouse button (shown in the following figure). A context menu is displayed that contains several choices including Copy. Click the Create Copy command. The Copy Depth-Area Analysis window will open where you can name and describe the copy that will be created. A default name is provided for the copy; you can use the default or replace it with your own choice. A description can also be entered; if it is long you can use the button to the right of the description field to open an editor. When you are satisfied with the name and description, press the Copy button to finish the process of copying the selected Depth-Area Analysis. You cannot press the Copy button if no name is specified. If you change your mind and do not want to copy the selected Depth-Area Analysis, press the Cancel button or the X button in the upper right of the Copy Depth-Area Analysis window to return to the Watershed Explorer.
Renaming a Depth-Area Analysis
There are two ways to rename a Depth-Area Analysis. Both methods for renaming an analysis change its name and perform other necessary operations.
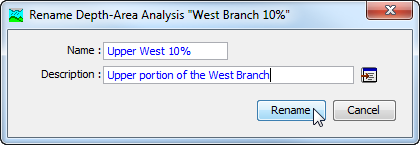
The first way to perform a rename is to use the Depth-Area Analysis Manager, which you can access from the Compute menu. Select the Depth-Area Analysis you wish to rename by clicking on it in the list of current analyses. The selected analysis is highlighted after you select it. After you select an analysis you can press the Rename button on the right side of the window. The Rename Depth-Area Analysis window (shown in the following figure) will open where you can provide the new name. If you wish you can also change the description at the same time. If the new description will be long, you can use the button to the right of the description field to open an editor. When you are satisfied with the name and description, press the Rename button to finish the process of renaming the selected Depth-Area Analysis. You cannot press the Rename button if no name is specified. If you change your mind and do not want to rename the selected Depth-Area Analysis, press the Cancel button or the X button in the upper right of the Rename Depth-Area Analysis window to return to the Depth-Area Analysis Manager window.
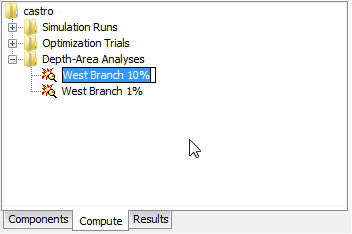
The second way to rename is from the Compute tab of the Watershed Explorer. Select the Depth-Area Analysis you wish to rename by clicking on it in the Watershed Explorer; it will become highlighted. Keep the mouse over the selected analysis and click the left mouse button again. The highlighted name will change to editing mode (shown in the following figure). You can then move the cursor with the arrow keys on the keyboard or by clicking with the mouse. You can also use the mouse to select some or all of the name. Change the name by typing with the keyboard. When you have finished changing the name, press the Enter key to finalize your choice. You can also finalize your choice by clicking elsewhere on the Compute tab. If you change your mind while in editing mode and do not want to rename the selected Depth-Area Analysis, press the Escape key.
Deleting a Depth-Area Analysis
There are two ways to delete a Depth-Area Analysis. Both methods for deleting an analysis remove it from the project and automatically delete previously computed results. Once an analysis has been deleted it cannot be retrieved or undeleted.
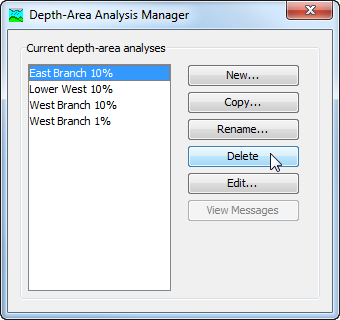
The first way to perform a deletion is to use the Depth-Area Analysis Manager, which you can access from the Compute menu. Select the Depth-Area Analysis you wish to delete by clicking on it in the list of current analyses. The selected analysis is highlighted after you select it. After you select an analysis you can press the Delete button on the right side of the window. A window will open where you must confirm that you wish to delete the selected analysis as shown in the following figure. Press the OK button to delete the analysis. If you change your mind and do not want to delete the selected Depth-Area Analysis, press the Cancel button or the X button in the upper right to return to the Depth-Area Analysis Manager window.
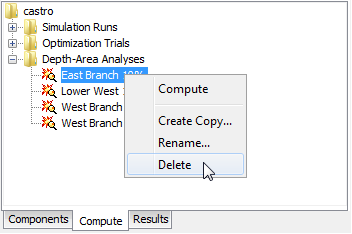
The second way to delete is from the Compute tab of the Watershed Explorer. Select the Depth-Area Analysis you wish to delete by clicking on it in the Watershed Explorer; it will become highlighted (shown in the following figure). Keep the mouse over the selected analysis and click the right mouse button. A context menu is displayed that contains several choices including delete. Click the Delete command. A window will open where you must confirm that you wish to delete the selected analysis. Press the OK button to delete the analysis. If you change your mind and do not want to delete the selected Depth-Area Analysis, press the Cancel button or the X button in the upper right to return to the Watershed Explorer.
Selecting Components
One of the principal tasks when creating a Depth-Area Analysis using the wizard is the selection of the components that will be used to compute analysis results. The components include the Basin Model and the Meteorologic Model. These components are selected when creating a new Depth-Area Analysis with the wizard. However, you can change the Basin Model and Meteorologic Model you wish to use at any time. Selecting the Basin Model for a Depth-Area Analysis after it has been created is accessed from the Compute tab of the Watershed Explorer. Click on the Analysis node to display the Component Editor for the Depth-Area Analysis. You may need to first click on the Analyses folder to expand it, then click on Depth-Area Analyses folder. The Depth-Area Analysis tab is shown along with the Analysis Points tab, as shown in the following figure. The selection list shows all of the Basin Models within the project. You can also press the Basin Model button next to the selection list to bring up a chooser. The chooser helps to make a selection by showing the description of Basin Model.
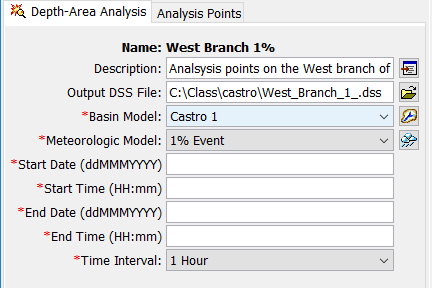
Selecting the Meteorologic Model for a Depth-Area Analysis after it has been created is accessed from the Compute tab of the Watershed Explorer. Click on the analysis node to display the Component Editor for the Depth-Area Analysis. You may need to first click on the Analyses folder to expand it, then click on Depth-Area Analyses folder. The Depth-Area Analysis tab is shown along with the Analysis Points tab, as shown in the previous figure. The selection list shows all of the Meteorologic Models within the project. You can also press the Meteorologic Model button next to the selection list to bring up a chooser. The chooser helps to make a selection by showing the description of Meteorologic Model.
Entering a Time Window and Time Interval
You must enter a Start Date and Time and an End Date and Time for the Depth-Area Analysis. The time control information is not specified in the wizard used to create the Depth-Area Analysis. The time control information must be entered after the analysis is created using the Component Editor for the Depth-Area Analysis. Enter the start date using the indicated format for numeric day, abbreviated month, and four-digit year. Enter the end date using the same format. The start time and end time are entered using 24-hour time format. The simulation time interval is required as well. Choose a time interval from the available options which range from 1 minute up to 1 day. Finally, the start time and end time must each be an integer number of time intervals after the beginning of the day. A default time interval of 1 Hour is selected when the analysis is created.
Selecting Analysis Points
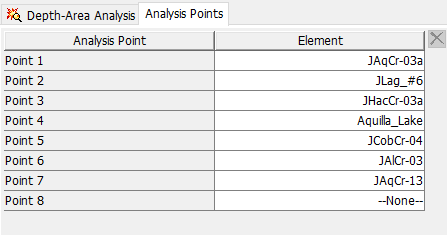
Selecting Analysis Points is done after a Depth-Area Analysis has been created using the wizard. Access the Component Editor for the analysis points from the Compute tab of the Watershed Explorer. Click on the analysis node to display the Analysis Points tab (shown in the following figure). You may need to first click on the Analyses folder to expand it, and then click on the Depth-Area Analyses folder. The analysis points are selected in a table. All elements in the Basin Model are available for selection. Select as many points as necessary by selecting from the list for each point. The drop-down list has options to select All Subbasins, All Junctions, or All Elements. To discontinue using a specific point, change the selection for that point to None. One or more points may be removed by selecting the points to remove and clicking on the 'X' in the upper right corner of the Component Editor.
A tutorial and guide demonstrating the use of a Depth-Area Analysis can be found here: Applying the Depth Area Analysis Simulation Type.