Download PDF
Download page Temporal Transformation Tool.
Temporal Transformation Tool
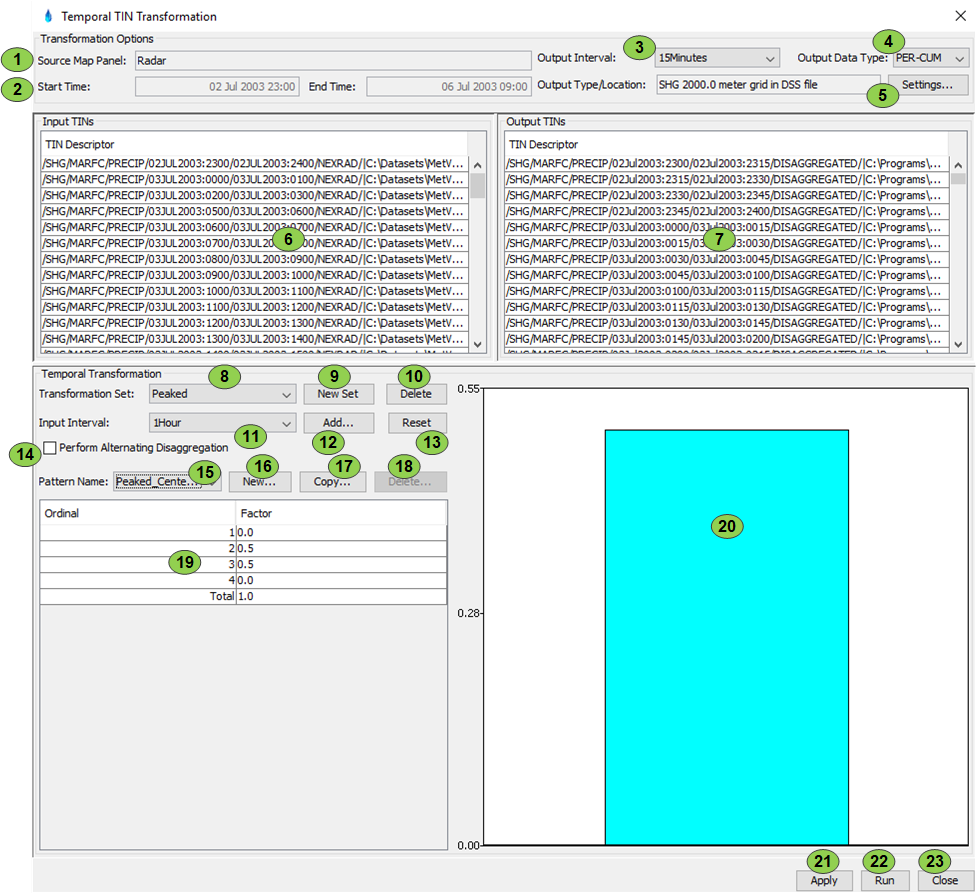
The Temporal TIN Transformation tool allows for converting input data into a different output time interval. Common applications are dis-aggregating precipitation from daily or 6hourly to hourly time interval, or interpolating temperature grids to a shorter time interval. In the tool shown below, the Input TINs are the TINs loaded into the Source Map Window. Note that it's acceptable for these to have different input intervals. The input data will be converted to a single output interval and data type, which is selected by the user. The rules for transformation are described in Temporal Transformation Rules. Also, there is another version of this tool when the input data is INST-VAL or PER-AVER, which is described in Interpolation and Average Temporal Transformation.

| Item | Description |
|---|---|
| 1 | The name of the Map Window that is providing the input data. |
| 2 | Start and End time of the input data. |
| 3 | The selected output interval. It's possible to select a time interval that is more, or less, than the input time interval. |
| 4 | Output Data Type selection:
|
| 5 | Output Type/Location allows for selection of the output TIN/Grid saving information. |
| 6 | Listing of the Input TIN descriptors. |
| 7 | Listing of the resultant output TIN descriptors. |
| 8 | Selection of the transformation set. A transformation set is a set of transformation definitions to convert from input intervals to the output interval. |
| 9 | Create a new transformation set. See Creating Transformation Set. |
| 10 | Delete the current transformation set. |
| 11 | Selection of the input interval, to define the transformation settings for that particular input interval. Note that this input interval does not necessarily exist in the input data. Since a mix of input intervals is possible, any number of input intervals can have custom transformation settings. |
| 12 | Add another input interval for defining custom transformation settings. This will bring up the Add Input Interval Dialog. |
| 14 | Converts the currently selected transformation settings back to default (uniform). |
| 15 | Selection of a predefined pattern. There are several built in transformations, and the user can define custom transformations. a transformation must have the appropriate number of ordinates to convert the selected input interval to the output interval. For example, if the input interval (item 11) is 1Hour, and the output interval is 15Minutes, then the transformation pattern must have 4 ordinates, to convert 1Hour data to 15Minute data. The built-in transformation patterns have predefined distributions that are scaled to the necessary number of ordinates, but keep the total weight to 1, therefore ensuring conservation of mass when dis-aggregating precipitation data. The default options in this drop down are shownin the Pattern selection drop down menu. |
| 16 | Create a new transformation pattern, so that a custom pattern can be defined. This will bring up the Create new transformation pattern dialog. |
| 17 | Copy the current transformation pattern. |
| 18 | Deleted the current transformation pattern. |
| 19 | The transformation pattern table. This can be used to define how the input data will be transformed. When dis-aggregating, the factors will be applied to the input value when creating values for the specific ordinate. In this example, each 1Hour precipitation grid will be converted into 4 15Minute precipitation grids. Within a single input hour, there will be 4 output grids, with the first and last of those 4 output grids being zero, and the middle two grids being half the precipitation in the input grid. When aggregating, there will always be a single weight, and that weight can scale up or down the aggregated values. For example, if the input interval is 1Hour, but the output interval is 6Hour, each output 6Hour grid will be the sum of the six 1Hour grids within that output interval, multiplied by the specified factor. |
| 20 | Figure showing the pattern of the weights for visual inspection. This is purely for information. |
| 21 | Apply the current settings, and save to the project file. This is useful when a specific set of settings will be reused on different data (Most useful when used in conjunction with HEC-RTS). |
| 22 | Runs the transformation, and writes out the results. |
| 23 | Closes the editor. |