Download PDF
Download page HOW TO Add Reservoirs to the Configuration AFTER you've already added them to a Network.
HOW TO Add Reservoirs to the Configuration AFTER you've already added them to a Network
These instructions assume the following:
- Your watershed has at least one watershed configuration defined in it.
- Your reservoir network was created based on a watershed configuration.
- Your reservoir network has more reservoirs in it than are in your configuration.
- You want to correct the configuration and network so that they are back in sync.
If any of these assumptions are not true, these instructions are not for you.
Before making any further changes to the watershed
- Close ResSim.
- Copy your watershed to a new location on your computer. Later, you will use the copy as the source watershed for importing.
For example, if your watershed currently exists in C:\MyWatersheds, then create another folder to put the copy into such as C:\MyWatersheds\MyCopies
- Backup your watershed. I prefer to do this by simply zipping up the whole watershed tree and giving the zip file a descriptive name. For detailed instructions, see the paper: "How to backup your watershed" at https://www.hec.usace.army.mil/software/hec-ressim/documentation/
NOTE: You may be thinking that the copy of the watershed constitutes a backup so you don't need to perform this step. You're right but humor me and create the zip file anyway – it can't hurt.)
Prepare the Watershed
- Open ResSim. Open your watershed (not the copy).
- From the Tools menu, select Options...
- In the Options editor, select the Shortcuts (or Watershed Locations) tab. Create a new entry, give it a name like "Copies", and set its location to the full path where you put the COPY of your watershed – e.g., C:\MyDocuments\MyBackups. Close the Options editor.
- Go to the Simulation module. Open an existing simulation in which you could run an alternative that uses the network you are about to change.
- In the Simulation Control panel at right, hover your cursor over one of the dates (or date labels) for the simulation time window, then right-click and select Copy TimeWindow.
- From the Simulation menu, select New.
- In the Simulation Editor, hover your cursor over any of the date labels in the Simulation Times section and select Paste TimeWindow.
- Select all the alternatives that use the network you are about to edit (that you can run for the selected time window).
- Give the simulation a new name – e.g., Test my Revised Alts – and click OK.
- Compute the alternatives.
- Save the watershed.
- Using a file browser, navigate to the simulation folder for the simulation you just created and make a copy of the simulation.dss file. Name the copy Original_Results.dss.
Revise the Watershed Configuration
- Go to the Watershed Setup module.
- Select the configuration from the Configuration selector in the module toolbar.
- Draw in the "new" reservoir(s) using the reservoir tool.
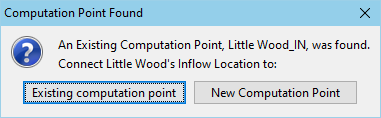
- If you already have the inflow and outflow computation points defined for the reservoir you are about to draw, use (click on) them when drawing in the reservoir and select Existing Computation Point when queried about connecting the reservoir to "Existing" computation points or New ones.
- If you do NOT already have the inflow and outflow computation points in your watershed, they will be created with default names when you draw in the reservoir. Be sure to rename these computation points, per your naming convention, as soon as you finish creating each reservoir.
- When finished adding the new reservoirs, open the Configuration Editor from the Watershed menu. Verify that the reservoirs are shown in the Projects list for the configuration. If not, Edit the Project List.. as needed.

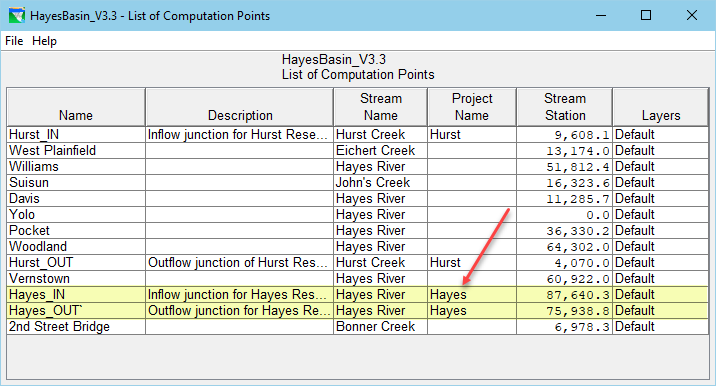
- Verify that any existing computation points you connected the reservoir(s) to have been associated with the reservoir by opening the List of Computation Points report and checking that the Project name column displays the associated reservoir name for each "existing" computation point you think you connected your reservoirs to.
- Save the configuration. Save the watershed.
- If all is well, close ResSim and backup the watershed again.
Update the Network
- Open ResSim and go to the Reservoir Network module.
- Open the network. Verify that the network was created based on the configuration you just got done revising. If they are different, then you edited the wrong configuration…
- go back to the watershed setup module
- edit the correct configuration's project list so that it includes the new reservoirs
- save the configuration and return here.
- Using the reservoir tool, Delete the reservoirs that you created in this network for which you just created reservoirs in the configuration. Yeah, I know this hurts, but we'll import the reservoir data from the copy of the watershed.
- If you created new inflow and outflow computation points when you added the new reservoirs to your configuration in Watershed Setup, then you will need to delete the reaches just upstream and just downstream of the reservoirs you deleted. And, the reservoirs' inflow and outflow junctions will need to be deleted, too.
- From the Network menu, select Update Network from Configuration. Read the warning, then click Yes.
- You should see new reservoirs appearing in your network where you just deleted the old ones.
- If you deleted any reaches and computation points, then the new inflow and outflow junctions for the new reservoirs should appear as well. Now, you need to use the reach tool to re-draw the reaches just upstream and downstream of the new reservoirs. Be sure to enter appropriate reach names, per your naming convention.
- Double-check the network connectivity by selecting the connectivity tool (Last tool in the left-hand toolbar) and then clicking on each reservoir. The reservoir and all the elements above and below it should all turn yellow if the connectivity is "good".
- If the connectivity looks good, save the network. If not, the network connectivity report is a valuable tool for figuring out what's wrong. Fixing it may not be obvious, but it usually involves deleting and re-creating the problem elements until the connectivity is complete.
Import Element Properties
Now we're getting to 'the hard part', getting the reservoir data back. This is actually quite easy if your reservoir operations are still simplistic. The more complicated your operations, the harder this gets…
- From the Edit menu, select Import Element Properties. An Import… Wizard will open to step you through the process of importing information from one network into another.
- Step 1 instructs you to Select Network Elements. That means that you must identify the elements in your current network that you want to import data INTO.
- Start by sorting the list by element type by clicking on the Element Type column header.
- Find the reservoirs you just re-created in your network and select them by clicking in the Import checkbox next to each reservoir.
- If you created new junctions and reaches in the previous section, select those new reaches and junctions as well.
- Step 2 instructs you to Select the Watershed. This means that you need to find and select the source watershed which holds the network from which you want to import data into the selected elements in your current network. This step requires that the source watershed be located in one of your pre-defined Watershed Locations or Shortcuts, that's why you created that "Copies" shortcut in the Options editor early in these instructions. Select the "Copies" Watershed Location (shortcut) from the list at the left, then select the copy of your watershed from the list at the right. Click Next.
- Step 3 instructs you to Select the Network to Import Elements from. Select the appropriate network from the list provided, then click Next.
- Step 4 instructs you to Assign Network Elements. That means that you need to associate the elements in your current network with elements in the source network. The Importer tries to perform this association for you through name matching. If the names don't match, you will have to help it along by selecting the appropriate source element from the selection list in each Import From cell. When you have finished identifying all the source elements, click Next.
- Step 5 is Resolve Network Connectivity. What this really means is that whenever a rule or element thinks it needs information from another element, there is a connection or dependency created. The importer tries to resolve these dependencies through name and ID number matching but it is not always successful It has the hardest time with Model Variable and State Variable dependencies or "connections". if successful, the Import From cell will show the element name and parameter that was found, if not successful, the Import From cell will be blank. If the operations in your network are very simple, there may not be any connections to be "resolved". Usually, the easiest connections for you to resolve are for the downstream control rules, since most of the elements that were originally identified in these rules will be in the current network. If your elements, zones, rules or IF-Block conditional expressions refer to model variables or state variables, you can attempt to identify the model element or state variable that should provide the needed input; however, if the needed element and variable are unavailable in the selection list, select something else from the list and make a note regarding what the link SHOULD have been so that you can correct it after the import is complete. If you leave the link blank, the rule or if block may not be imported at all. When you have completed the connectivity to the best of your ability and made notes about the rest, click Next.
- Step 6 is the last step before the import actually happens. This step is labeled Import Summary, but it is actually a verification step. The Importer shows you a report that lists out all your decisions and selections. If it all looks like what you intended, then select Finish to proceed with the import. However, if something isn't quite right, you can use the Back button to return to a prior step or the Cancel button to exit the Importer without importing anything.
- If you clicked Finish, you will be asked if you want to proceed with the import. Yes will perform the import and then provide a report on its success and No will return you back to Step 6 in the Importer.
- After reviewing the Import Results report, click Close. This will close the report and the Importer.
Correct the Connections
Now, you will use the notes you took during the Resolve Network Connectivity step with the Importer. For each note:
- Open the relevant element editor and find the connection
- RE-SELECT the correct Model Variable or State Variable that is needed by the rule or element definition.
Note – when you first edit the element and its connection (e.g., rule or conditional expression), the editor may already show the correct variable. Don't assume that the link is OK. Re-link it anyway. But to do so, first select a different variable, then re-select the correct one. When done, click Apply before moving on to the next connection.
- When you have revised all the problem connections, save the network.
Update the Alternatives that use this Network.
Because you deleted one or more reservoirs from the network then recreated them, the alternatives based on this network will have lost the information you specified for those reservoirs and their elements, so you will need to re-enter that information. This can get pretty tedious, but here are some tips to make it easier.
You have a copy of the watershed that still has the alternatives in 'good shape'. We'll use them to help repair the alternatives in your watershed. But this will require having two instances of ResSim open at the same time. If you have two monitors it will be a little easier than with one monitor. In either case, try to keep the windows of each ResSim instance together. For example, keep the watershed you are editing (and its windows) to the left and the watershed you are copying from on the right.
- Move the main ResSim window to the left of your screen or to your left monitor.
- Launch a second instance of ResSim and move that main screen to the right of your screen or to your right monitor. In this second instance, open the copy of the watershed that you placed in your 'myCopies' directory.
- In each ResSim instance, go to the Reservoir Network module and open the Alternative Editor.
- Select the Alternative you want to work on and go to the Operations tab.
- If the reservoirs are in the same order in both instances, you can select the contents of the whole table on the right, copy it, and paste it into the table on the left. The steps for doing so are:
In the 'copy from' alternative at right…
- Click in the first cell of the table – literally the first cell, in the upper left corner of the table. This is NOT the first editable cell of the table (where you enter information or select something from a list).
- Press Ctrl-A on your keyboard to "Select All" (or right-click and choose Select All, if available, from the context menu). Note – not all cells in the table may highlight as you might expect, but they will still be properly selected.
- Press Ctrl-C to copy the selected information to the Windows Clipboard.
In the 'copy to' alternative at left…
- Click in the first cell of the table
- Press Ctrl-V on your keyboard to Paste the data from the clipboard into your table. NOTE – the right-click/context menu will NOT have Paste available because that first cell is not editable.
If the data in the table is not in the same order in the source alternative as it is in the target alternative, you can use the copy and paste technique on one or more rows at a time, but you need to be sure to make the selection from the first (left-most) cell(s) in the row for both the copy and the paste.
- Repeat step 5 for the information on the Lookback, Time Series, and Observed tabs, as needed. Between each tab, save the alternative.
- Repeat steps 4-6 for each alternative that is based on the network you have just revised.
- When done, close the Alternative Editor and Save the Watershed.
Verify your alternatives.
This really means, make sure your alternatives compute and get the right results. There are multiple ways to go about this, but I set you up in the easiest way I could think of when you followed the "Prepare the watershed" steps – which resulted in a Test my revised Alts simulation. So…
- Go to the simulation module
- Open the Test my revised Alts simulation.
- From the Simulation menu, select Replace from Base.
- In the Replace from Base dialog, click Select All, then OK. This will update the alternatives in the simulation to the revised versions that you just completed.
- Compute them all.
- Verify that the results look "right". One way to do this is to compare the current simulation.dss file to the one you created earlier – that I suggested you rename to Original_Results.dss. To perform the comparison, select HEC-DSSVue from the ResSim Tools menu. From the DSSVue Tools menu, select Compare, Files and then select the simulation.dss file and the Original_Results.dss file and click OK. Then review the comparison. If we're lucky, the compare will be clear and no differences will be found. If there are differences, then look at the datasets that were identified. See if you can figure out why there are differences. One possible reason is the naming of your elements. If you added or changed the name of any computation points, reservoirs, or reaches, then a simple file compare will not be able to perform a record by record comparison since the pathnames of some of the records won't match. You will need to make those comparisons yourself. If, however, all the element names are the same, then there's a good change the differences are caused lookback or time series mapping differences. You can correct things in your revised alternatives right there in the simulation module.
- When you are done and your comparison of the DSS files comes back with no differences, be sure to save the alternatives you changed "to base" so that your revisions are available for future simulations.
- Congratulations! You did it!