Graphical Parameter Calibration (Slider Bars) Setup
The soil moisture conditions of a watershed have the greatest impact on runoff, after precipitation. One of the most important steps in the process is calibrating the HEC-HMS model to current (soil moisture) conditions; miss-calibration can lead to large errors.
HEC-HMS has a calibration aid to help adjust the model to current conditions, called the "Graphical adjustment of forecast parameters", or "slider bars". Generally, this function is best used on "gaged headwater" subbasins, or a small group of subbasins, so that the user can compare computed verses observed runoff and make adjustments that are not obscured by routing or reservoir issues (e.g., wind changing reservoir elevation.) Flows from gages downstream of a reservoir or in an area that affects flows (e.g., wetlands) and not as helpful for calibrating soil moisture. Review the HEC-HMS model and select those subbasins to use as calibration points. Once the user has adjusted parameters, those adjustments can be made to other (non-calibration) subbasins.
In HEC-RTS, adjustments are made using "zones", a collection of similar subbasins that have similar parameters. Thus when making adjustments to parameters for a subbasin, the user can apply that adjustment to other subbasins in the same zone.
Because of the zone concept, setting up slider bars in HEC-HMS for HEC-RTS is different than setting them up for HEC-HMS in a study mode. After zones, and a forecast alternative have been created, the user can setup the slider bars using the following procedure.
- From the HEC-HMS main window (Figure 8.11), click the Compute tab, from the HEC- HMS study tree, expand Forecast Alternatives (Figure 8.11). Right- click on a forecast alternative, from the shortcut menu (Figure 8.11), click Forecast Slider Adjustment (Figure 8.11).
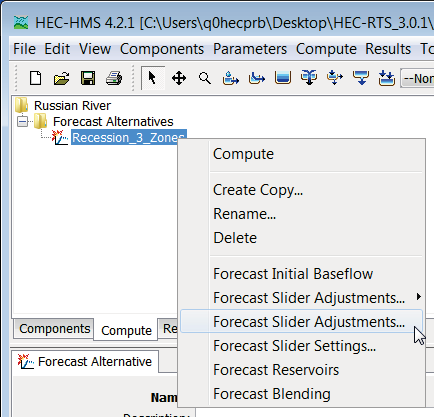
Figure 8.11 HEC-HMS – Compute Tab – Forecast Alternative Shortcut Menu
The Forecast Slider Adjustments [forecast alternative name] dialog box will open (Figure 8.12). From the box, select a zone, click Select, the Select Forecast Slider Adjustments [forecast alternative name] will open (Figure 8.13).
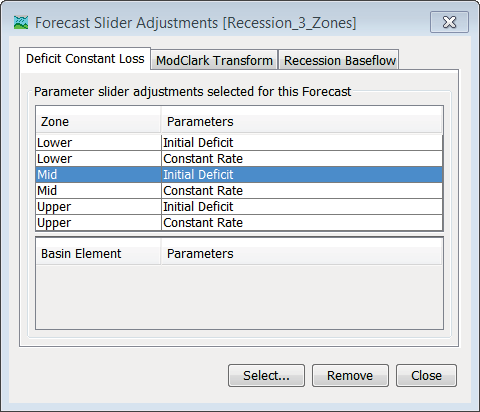
Figure 8.12 HEC-HMS – Forecast Slider Adjustments Dialog Box
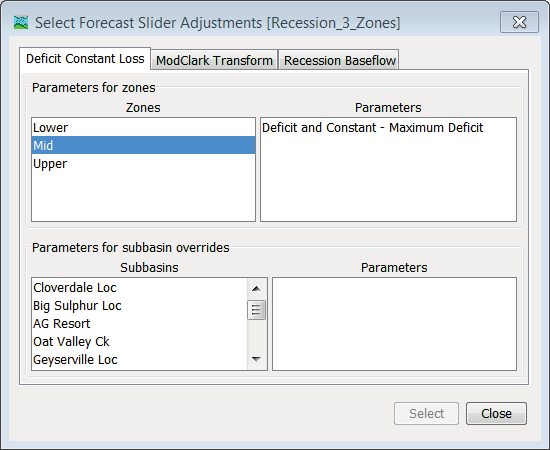
Figure 8.13 HEC-HMS – Select Forecast Slider Adjustments Dialog Box
For each of the zones, select the parameters that will be calibrated using slider bars (Figure 8.13). Close the Select Forecast Slide Adjustments [forecast alternative name] dialog box (Figure 8.13), and also close the Forecast Slider Adjustments [forecast alternative name] dialog box (Figure 8.12).
Right- click on a forecast alternative, from the shortcut menu (Figure 8.11), click Forecast Slider Settings (Figure 8.11). The Forecast Slider Adjustment Settings [forecast alternative name] dialog box will open (Figure 8.14).
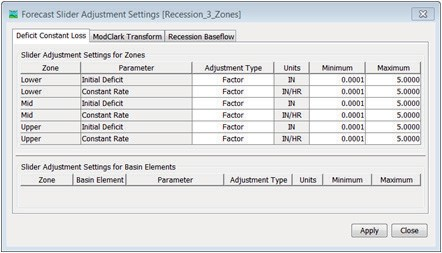
<ac:structured-macro ac:name="anchor" ac:schema-version="1" ac:macro-id="2df9e3fa-8d5a-466e-bbd5-879021ec77b0"><ac:parameter ac:name="">_bookmark132</ac:parameter></ac:structured-macro>Figure 8.14 HEC-HMS – Forecast Slider Adjustments Settings [forecast alternative name] Dialog Box
Adjust the maximum and minimum possible parameter values, as appropriate. When finished with adjustments click Apply, click Close, the Forecast Slider Adjustment Settings [forecast alternative name] dialog box will close (Figure 8.14).
Now the user has finished making all the necessary setup and adjustments needed to the HEC- HMS model.
From the HEC-RTS main window, from the Modeling module (Figure 8.15), open a forecast, from the Forecasts box, select the HMS model alternative. Click the Actions tab (Figure 8.15), click Combined Parameter Editor, a Forecast [forecast name] editor will open (Figure 8.16).
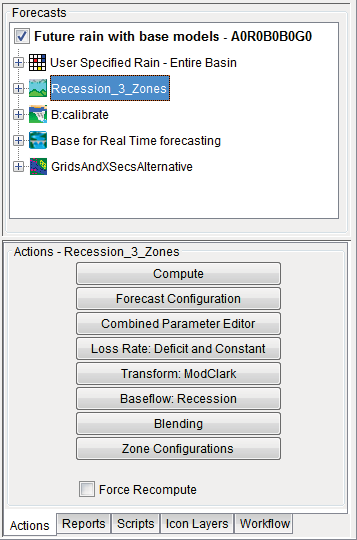
<ac:structured-macro ac:name="anchor" ac:schema-version="1" ac:macro-id="a2db7bc1-2934-4c42-b31c-e8e8b964b9a6"><ac:parameter ac:name="">_bookmark133</ac:parameter></ac:structured-macro>Figure 8.15 HEC-RTS – Modeling Module – Actions Tab
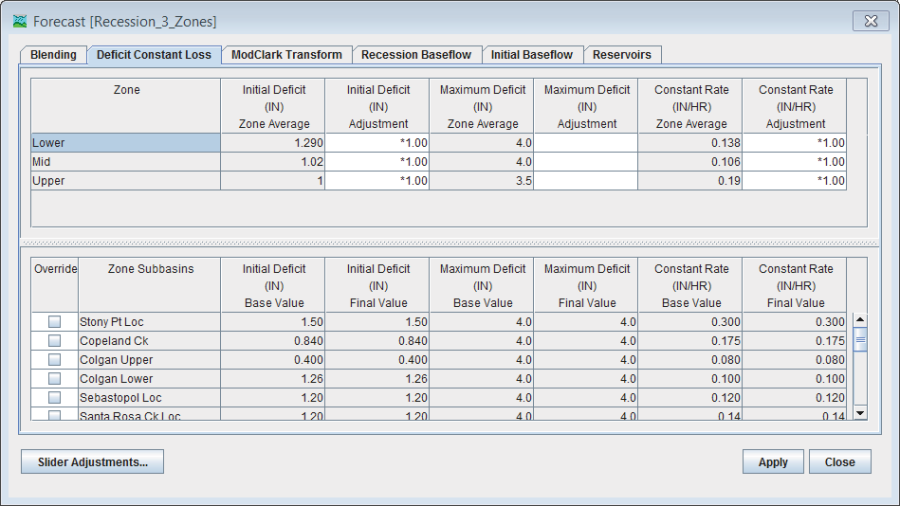
<ac:structured-macro ac:name="anchor" ac:schema-version="1" ac:macro-id="d2918aac-3378-4686-92ef-af9babb78a7d"><ac:parameter ac:name="">_bookmark134</ac:parameter></ac:structured-macro>Figure 8.16 HEC-RTS - Forecast [forecast name] Dialog Box
Click Slider Adjustments, the Forecast Parameters And Blending [forecast name] dialog box will open (Figure 8.17). Adjust parameters for each zone by moving the slider bar (Figure 8.17) once the user has the required adjustments click Apply. To return to the default setting click Reset.
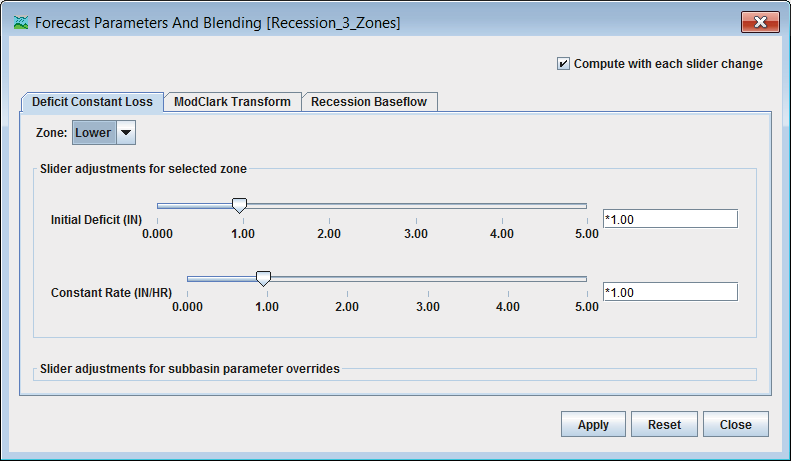
<ac:structured-macro ac:name="anchor" ac:schema-version="1" ac:macro-id="a51958f4-b765-474b-b99b-54e19380f114"><ac:parameter ac:name="">_bookmark135</ac:parameter></ac:structured-macro>Figure 8.17 HEC-RTS - Forecast Parameters And Blending [forecast name] Dialog Box
- To adjust parameters, move the slider or type a value in the input field. The user will need hydrograph plots with computed and observed flows, and after adjustments re- compute the HEC-HMS model. Selecting Compute with each slider change (Figure[ 8.17|#_bookmark135]), will make sure that the hydrograph plots are updated; however, this option is not ideal when simulation run times exceed a couple of seconds. Refer to the HEC-HMS User's Manual for more information.
When the user is finished with all adjustments click Close, the Forecast Parameters And Blending [forecast name] dialog box will close (Figure 8.17).
![]()