Creating a New Watershed
This guide walks you through the process of creating a new watershed in HEC-RTS.
Once a watershed is created, its name, units, coordinate system, and time zone cannot be changed. Please make your selections carefully.
Step 1: Open the Create New Watershed Dialog
To begin:
- With HEC-RTS open, go to the Setup tab.
- From the File menu, select New Watershed.
- The Create New Watershed dialog will appear.

Step 2: Enter a Name and Description
Provide a name and optional description for your watershed.
- Enter a name in the Watershed Name field.
- The watershed name must be less than thirty-two (32) characters.
- The name cannot contain any of the following special characters: , | / : * ? " < > - { }
- Use underscores and avoid using spaces.
- Optionally, enter a description in the Description field.

Step 3: Choose a Location
Next, you need to specify where your new watershed will be saved.
Watershed Location Recommendation
It is recommended to keep the model locally on your computer such as a CWMS folder directly on your C-drive.
It is discouraged to save the model you are using in a network location such as a network drive or OneDrive location as this can cause sluggish models and issues. Only save master team watershed models to network drives.
It is recommended to save backup models or master team watershed models to network drives, but this is not models you are running directly from the HEC-RTS application.
To define a new watershed location:
- Click the ellipses button next to the Watershed Location dropdown.
- The Create Watershed Locations dialog will open.

- Click Add Location to add a new entry in the table.
- In the Add Watershed Location dialog:
- Enter the name for the location in the Name field.

- Specify the folder where the watershed will be saved:
- Either browse to the folder, or
- Type the full path directly into the Location field.
- Enter the name for the location in the Name field.
- Click OK to close the Add Watershed Location dialog. The new location will appear in the table.
- Click OK again to close the Create Watershed Locations dialog.
To select an existing watershed location:
- Open the Watershed Location dropdown menu.
- Choose the desired location from the list.

Step 4: Set the Watershed Units
Select the unit system for your watershed from the Unit System dropdown:
- English (U.S. customary units)
- SI (System International)
Step 5: Add Map Layers (Optional)
You can optionally add map layers to your watershed during setup. This is especially useful if you'd like to use a shapefile to automatically define the watershed’s coordinate system.
To add map layers:
- Click the Add Map Layers button.
- In the Select Map to Add dialog:
- Browse to the folder containing your map files.
- Select one or more files to add.
- Check the box next to Create Copy (top right corner). This ensures the files are copied into the new watershed’s maps folder after setup.

- Click Open.
- The Set Watershed Coordinate System window will appear with two options:
- Click Yes. The windows will close, and the selected map's coordinate system will automatically populate in the Coordinate System field in the Create New Watershed dialog.
- Click No. The windows will close, and you will need to define the coordinate system manually in the next step.

Step 6: Define the Coordinate System
If you did not define the coordinate system using a map layer in Step 5, you must set it manually now.
To define the coordinate system:
- Click Edit next to the Coordinate System field.
- The Map Coordinate Information dialog will open.

- From the System dropdown, select the appropriate coordinate system.
- Enter any additional required information for the selected system.
- Click OK to close the dialog.
- The selected coordinate system will now appear in the Coordinate System field.
For more details about available coordinate systems, see Setting the Coordinate System.

Step 7: Select a Time Zone
Next, set the time zone for your new watershed.
To select a time zone:
- Choose a time zone group:
- U.S. Time Zones
- International Time Zones
- From the dropdown menu, select the appropriate time zone for your watershed.

Step 8: Create the Watershed
After reviewing all your settings, you're ready to create the watershed.
To finalize and create your watershed:
- Click OK in the Create New Watershed dialog.
- A Watershed Summary dialog will appear, displaying a summary of all the information you entered.

- Carefully review the information.
- If everything looks correct, click OK to proceed.
- If you need to make changes, click Cancel to return to the Create New Watershed dialog and adjust your settings.
Last Chance to Make Changes
This is your last opportunity to make changes. After clicking OK, the name, coordinate system, units, and time zone cannot be changed.
Congratulations! Your new watershed has been successfully created.
Next Steps
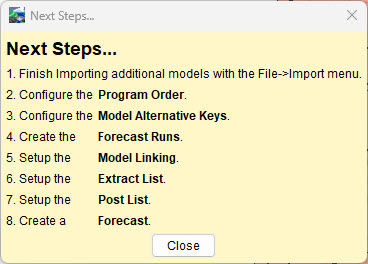
The Next Steps dialog will now appear with guidance on configuring and working with your new watershed. Once you've reviewed the information, click Close to begin using your watershed.

If you want to review the list of steps while building your watershed, you can find it under the Models menu in the Setup tab.