Using Sliders to Calibrate HEC-HMS Models
Sliders in HEC-HMS allow you to easily adjust loss rate, transform, baseflow, and routing parameters. Sliders depict a range of values, increments, or factors on a line and a selector that you can drag across the line to adjust the parameter. Sliders allow for quick, small adjustments of parameters and allow HEC-HMS to recompute runoff for a subset of basin elements instead of the entire watershed. This allows for faster computation of the HEC-HMS model when adjustments are made. You can use sliders to adjust parameters during calibration so that the simulated watershed response matches observed values more closely during the lookback period of the event.
This guide will teach you how to set up and use slider adjustments to calibrate an HEC-HMS model in your HEC-RTS watershed.
Using the slider adjustment tool is one way to calibrate an HEC-HMS model. This tool is particularly useful for understanding how individual parameters affect the results. After gaining familiarity with the parameters and their effects, it is recommended to use zonal editors for faster calibration of the model to the lookback period. This workshop will demonstrate how to effectively use zonal editors.
Step 1: Specify Parameters to Adjust
Before using sliders in HEC-HMS, you must first configure which model parameters to adjust.
To specify parameters:
- Launch HEC-RTS and open your watershed.
- Go to the Modeling tab and open a forecast that uses an HEC-HMS model alternative.
- In the Forecast Run Window, select the HEC-HMS model alternative and click Combined Parameter Editor from the Actions tab.
- In the Combined Parameter Editor, go to the Sliders menu and select Forecast Slider Adjustments.
The Forecast Slider Adjustments dialog will open.

Click the tab for the parameter type you want to configure and click Select.
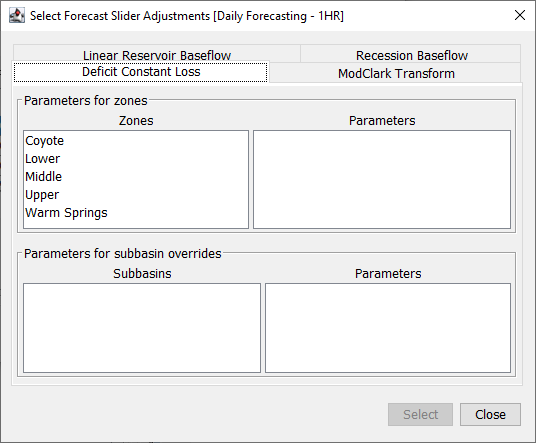
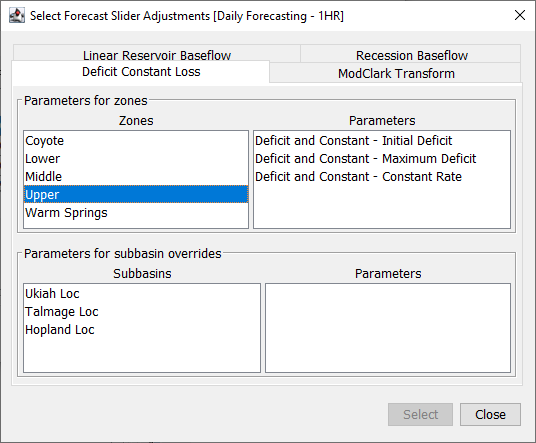
- The Select Forecast Slider Adjustments dialog will appear.

- Choose the zone from the list on the left and then select the desired parameter(s) from the list on the right.
- Click Select to add the parameter(s) to the list.

- Repeat steps 6-9 to select all desired parameters.
- Click Close to close the dialog.
- Review your selected parameters in the Forecast Slider Adjustments dialog.
- To remove a parameter, select it in the Parameters column and click Remove.
- Once satisfied, click Close.
Step 2: Configure Slider Settings
Now configure how the sliders will function, including the adjustment type and the minimum/maximum limits.
To configure settings:
- In the Combined Parameter Editor, go to the Sliders menu and select Forecast Slider Settings.
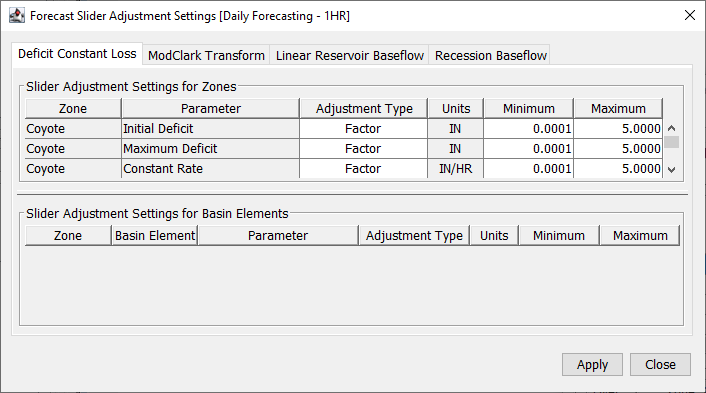
- The Forecast Slider Adjustment Settings dialog will appear.

- Each tab represents a different parameter group (loss, transform, etc.) and has two tables:
- The upper table shows settings for zones.
- The lower table shows settings for individual basin elements.
- Choose the adjustment type by using the dropdown in the Adjustment Type column. The options are:
- Factor - Multiplies the parameter value (e.g., *1.2).
- Increment - Adds or subtracts a value (e.g., +5, -3).
- Value - Replaces the parameter directly (e.g., 25).

- Specify Minimum and Maximum values for each parameter.
- Use realistic values tailored to your watershed (avoid defaults).
- Review your selections.
- Once satisfied, click Apply and then Close.
Step 3: Calibrate using Sliders
Once sliders are configured, use them to adjust parameters and calibrate the HEC-HMS model within your HEC-RTS forecast.
To access the sliders:
- With your forecast open in the Modeling tab, right-click the HEC-HMS forecast alternative in the Forecast Run Window and select Combined Parameter Editor.
- The Combined Parameter Editor will appear.
- Under the Sliders menu, choose Forecast Parameter Sliders.
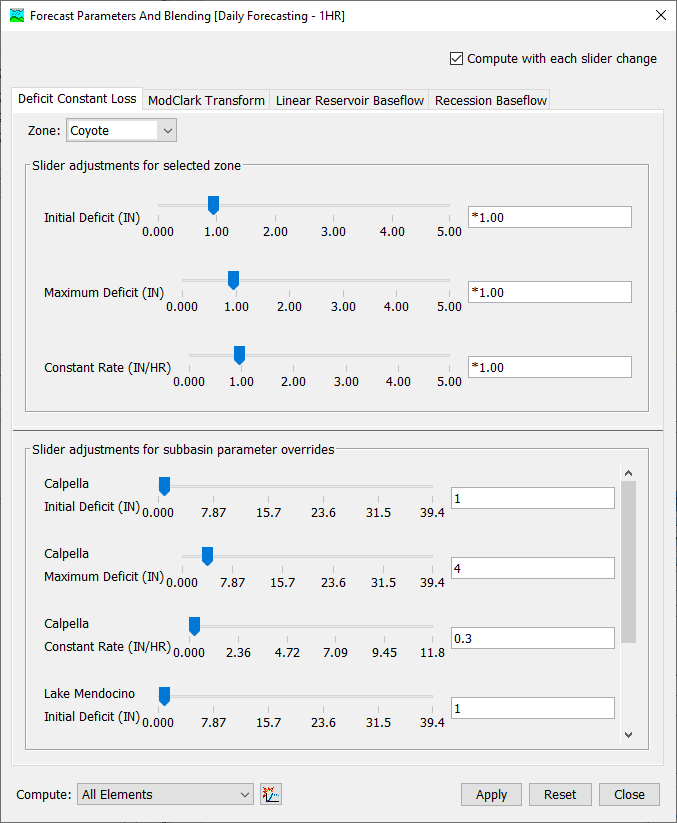
- The Forecast Parameters And Blending dialog will appear.

- Adjust the various parameters within your model.
- Adjust parameters by dragging sliders or entering values into the text box next to each slider.
- Input formatting:
- Factor: Must start with an asterisk (*).
- Increment: Must begin with a plus (+) or minus (-).
- Value: No symbol needed.
- Input formatting:
- If a value exceeds the slider range, the slider becomes disabled.
- Click Reset to revert parameters to their original values when the dialog opened.
- Adjust parameters by dragging sliders or entering values into the text box next to each slider.
- Close the dialog when calibration is complete.
Understanding the Dialog Interface
Tabs
The dialog consists of multiple tabs, named with the loss rate, transform, baseflow, and routing methods used in the model.
The zone is selected using the dropdown menu at the top of the window. The upper section of the dialog allows for parameter adjustments to the selected zone, while the lower section allows for parameter adjustments to individual elements within the zone (if configured).
Right-clicking a slider presents a menu with two options:
- Reset to Original Value will reset the parameter adjustment to the original value when the dialog was opened.
- Modify Slider Limits opens the Forecast Slider Adjustments Settings dialog to change the adjustment type or limits.
Compute Settings
In the top-right corner, the Compute with each slider change checkbox determines whether the model recalculates instantly after each adjustment.
- Checked: Recomputes immediately after each change.
- Unchecked: Changes are applied only after clicking Apply. No recompute occurs until you click on the compute button.
In the bottom-left corner, a Compute to Point dropdown lets you limit the compute to a selected location within the watershed. This enables partial computes, which are useful for reducing computation time in larger models.
For more information on using the Compute to Point settings, refer to the HEC-HMS documentation.