Editing HEC-MetVue Alternatives in HEC-RTS
This guide walks you through the steps to edit an HEC-MetVue alternative within your HEC-RTS watershed.
Step 1: Access the MetVue Alternative Editor Dialog
- Launch HEC-RTS and open your watershed.
- Navigate to the Setup module.
- In the Watershed Tree, expand the MetVue node.
- Right-click an existing HEC-MetVue alternative and select Edit MetVue Alternative.
- The MetVue Alternative Editor dialog will open.

Step 2: Configure Input Settings
- Click the Input Settings tab.
- Set the Lookback and Forecast checkboxes for each Map Panel:
- Check Lookback for observed data (e.g., QPE, Observed Temperature).
- Check Forecast for forecasted data (e.g., QPF, Forecast Temperature).

- Set Start of Simulation (SoS) Offsets and End of Forecast (EoF) Offsets:
- Choose the interval from the Interval column.
- Enter offset values in the corresponding columns.
If using the Gridded Hamon ET method in your HEC-HMS model, set the Observed Temperature SoS offset to -1 days and the Forecast Temperature EoF offset to 1 days. See the HEC-HMS Users Manual for more information.
- Ensure the Basin Average Maps shapefile is visible:
- Select a Map Panel from the top of the window.
- Click each panel individually to display/set the Basin Average Map.
- If no map displays, open the HEC-MetVue model and assign a Basin Average Map (see step 3 of Creating an HEC-Metvue Project).

- From the TIN/Grid Input dropdown, choose DSS.

- Confirm the correct pathname is set for the selected Map Panel:
- You can type the pathname in the individual part or click Browse to select from a HEC-DSS file.
- Using Browse will automatically set the correct duration.
- Click Apply to save your input settings.
Step 3: Configure Output Settings
- Go to the Output Settings tab.
- Click Add to create a new dataset.

- Configure the dataset:
- Dataset Name: use a descriptive name (e.g., QPF_Precipitation).

- Parameters and Units:
- Precipitation: Parameter = Precip, units = mm (unless using a non-standard project).
- Temperature: Parameter = AirTemp, units = deg C (unless using a non-standard project).
- Temperature datasets must use the parameter AirTemp for compatibility with HEC-HMS.
- Dataset Name: use a descriptive name (e.g., QPF_Precipitation).
- Select maps for the dataset:
- Lookback Map: Choose from a Lookback dataset (marked on the Input Settings tab).
- Forecast Map: Choose from a Forecast dataset (marked on the Input Settings tab).
- If maps are missing, return to the Input Settings tab and ensure the data is marked as Lookback or Forecast.
- Set the Time Zone:
- Click the ellipsis (...) in the Time Zone box to choose an option.
- Common options are UTC or GMT.

- Choose the Output Time Interval and Parameter Type:
- Precipitation: Time Interval = 1Hour, Parameter Type = PER-CUM.
- Temperature: Time Interval = 1Hour, Parameter Type = INST-VAL.

- Choose an Output Extents shapefile:
- Select from those listed in the From Map dropdown (linked previously in HEC-MetVue).
- If needed, load additional shapefiles (see step 3 in Creating an HEC-Metvue Project).

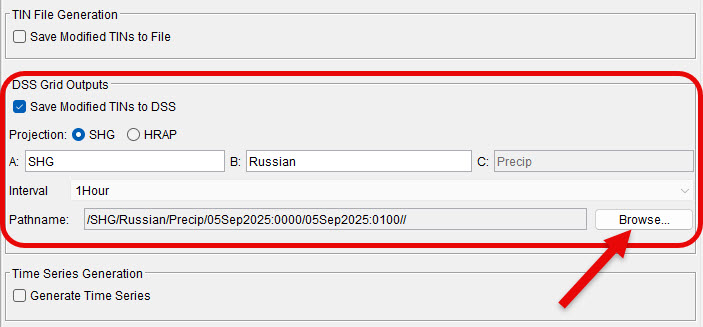
- Enable Save Modified TINs to DSS:
- The DSS pathname and parts auto-fill, except for the B Part.
- Enter a B Part that matches what HEC-HMS expects (or adjust it in model linking).
- Alternatively, use Browse to select an existing path from the forecast.dss file.

- Optionally, enable Time Series Generation:
- Check Generate Time Series.
- Select a sub-basin name from the dropdown.
- Using sub-basin names allows for closer inspection and calibration.
- Using sub-basin names allows for closer inspection and calibration.
- Click Apply to save your output settings.
Step 3: Final Review
- Review the Warnings box in both tabs:
- Ensure no errors or missing settings are listed.
- If needed, make edits until all errors disappear.
- Click Apply to save changes and OK to close the dialog.