Download PDF
Download page Developing a New Data Set.
Developing a New Data Set
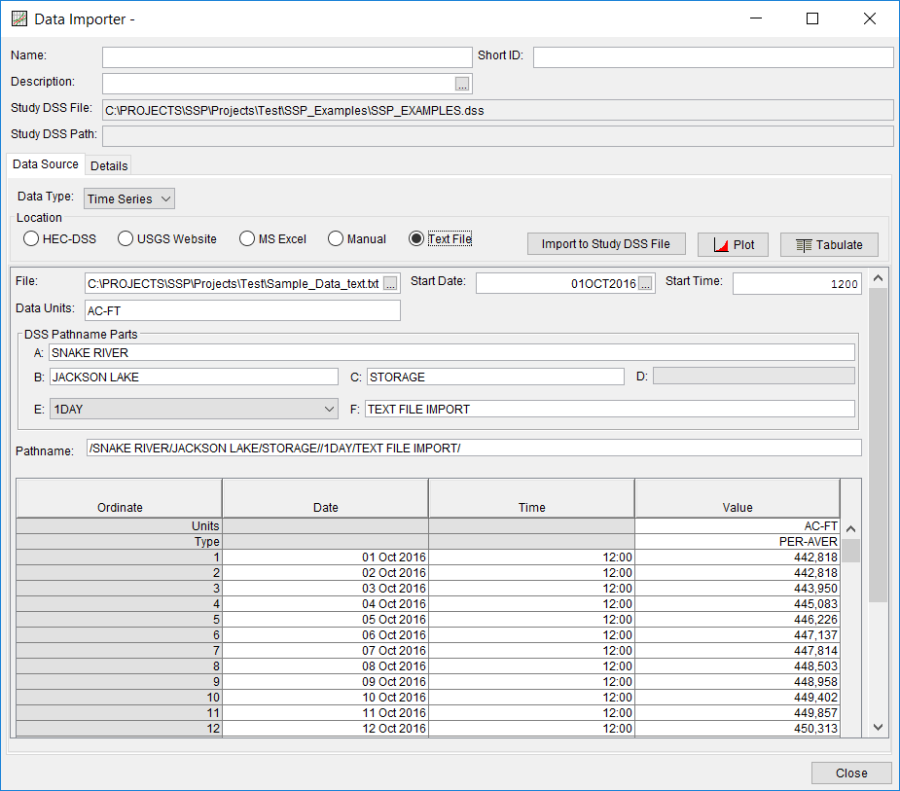
Before any analyses can be performed in HEC-SSP, the user must import or enter data into the study. Importing, entering, and viewing data is accomplished in the Data Importer. To open the data importer, go to the Data menu and select New from the list of options. Then choose the Traditional Import option to bring up a data importer as shown in Figure 1.
There are two options for importing data into an HEC-SSP project. The Data Import Wizard is new to HEC-SSP version 2.3 and provides step-by-step editors for choosing data to import. An example showing application of the Data Import Wizard is available from Data Import Wizard. The Traditional Import tool is described below.
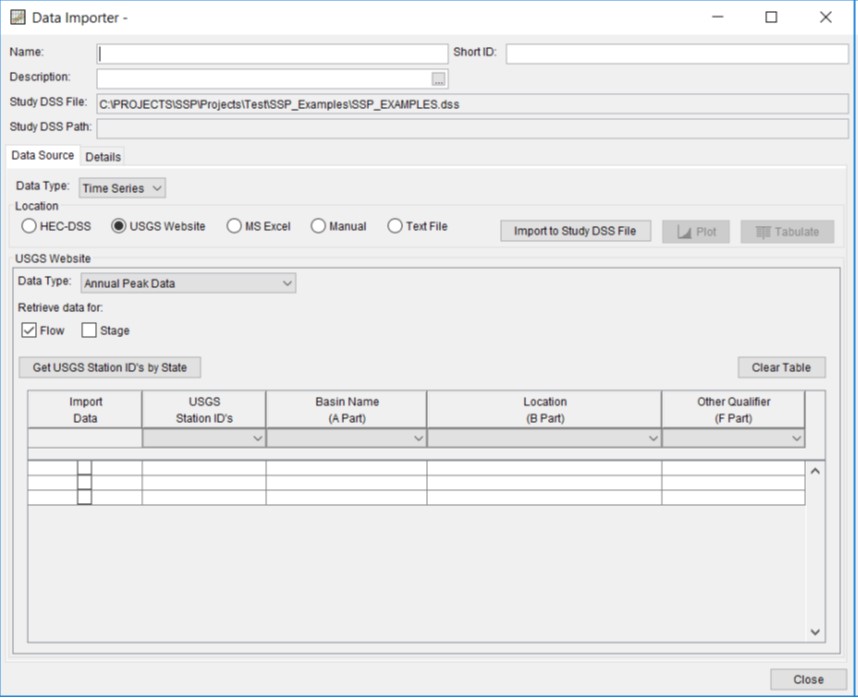
At the top of the Data Importer, the user can enter a Name for the new data set. Optionally, the user can enter a short identifier (limited to 16 characters) and a Description of the data set. The study DSS file name is provided. The DSS file is used for storing the data for the study. The user does not have to enter a name when importing or manually entering data. The program will automatically name the data using USGS names or HEC-DSS pathname parts. If a Name is entered then it will be combined with the USGS gage name or HEC-DSS pathname parts to create a unique name. The user can rename a data set by selecting the data set in the study explorer and clicking the right mouse button. A shortcut menu should open with a Rename menu option. The Data menu also contains a Rename menu option; however, the data set must be selected in the study explorer before this menu option is active.
The Data Importer contains two main tabs, Data Source and Details. The Data Source tab is used for importing or entering data manually while the Details tab is used to describe the data (i.e. metadata). The Data Source tab contains five options for getting data into the study DSS file: Importing from an existing HEC-DSS file, importing from the USGS Website, importing from an Excel spreadsheet, entering the data manually, and importing from a text file.
Importing Data from an HEC-DSS File
To import data from an HEC-DSS file into the HEC-SSP study DSS file, first select the HEC-DSS radio button on the data importer. Selecting HEC-DSS will change the view of the Data Importer to look like Figure 2.
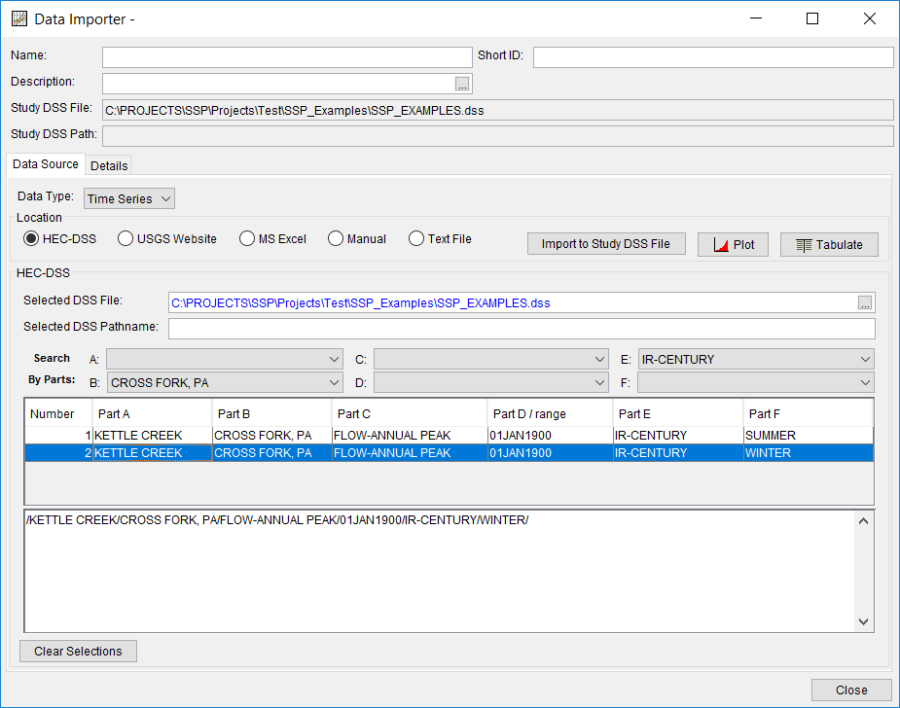
As shown in Figure 2, the user first selects a DSS file to import from by typing the path and name or by choosing the file browser at the end of the input field. Once a DSS file is selected, the table of pathnames will be filled with the records that are contained in that DSS file. The user can reduce the number of listed pathnames by selecting pathname parts to filter in the pathname part selection area just above the table. Any pathname part can be used to filter the list down to a more manageable number of pathnames to select from. The user can then select pathnames to import by double clicking on one or more of the listed pathnames in the table. Each selected pathname will show up in the list below the table. Once the user has selected all of the pathnames that they want to import, pressing the Import to Study DSS File button enacts the import process. An HEC-SSP data set will be developed for each pathname that was selected.
Importing Data from the USGS Website
The second way to import data into HEC-SSP is to use the USGS Website option. When this option is selected, the data importer will look like Figure 3.
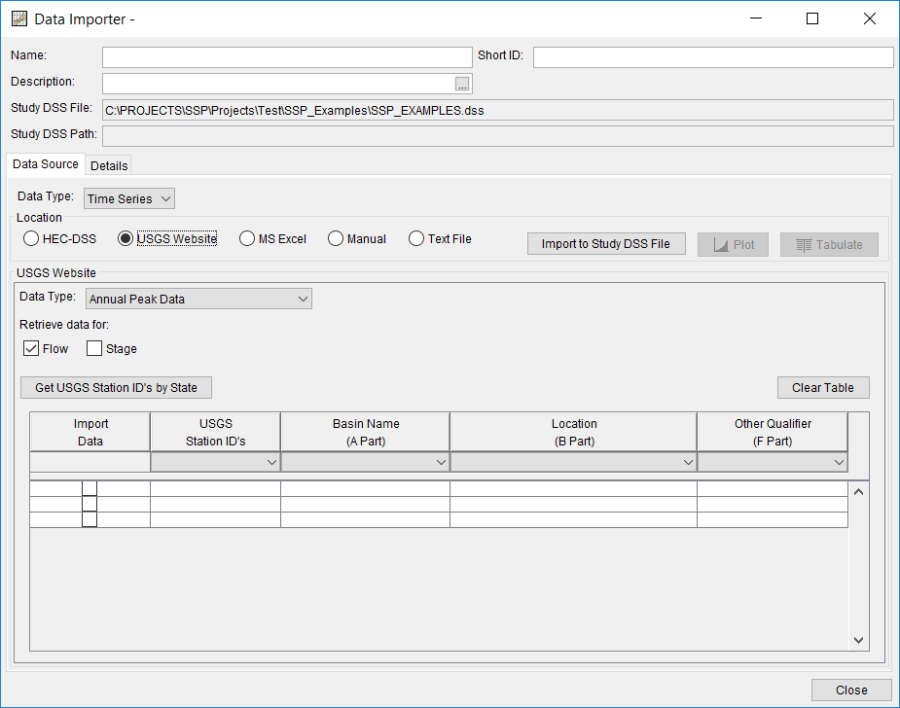
When using this data import method, multiple data type choices are provided including Daily, Instantaneous (i.e. 1 hour), Real Time (i.e. the previous 120 days from the current date), and Annual Peak Data. Both Flow and Stage data can be searched and/or imported. If the Daily or Instantaneous options are selected, a time zone for the data must also be specified. The data will not be converted from one time zone to another; this option merely designates the assumed time zone for the imported data.
When downloading Daily or Instantaneous data from the USGS website, a time window must be provided. As a convenience, a Retrieve Period of Record selection is available for use. When this option is selected, the Data Importer will attempt to download the entire period of record available from the USGS website. If the dataset of interest does not include data prior to 01Jan1900, this option will allow for the entire available period of record to be downloaded without entering a start/end date. If the dataset of interest includes data prior to 01Jan1900, a manual time window will need to be entered due to USGS website restrictions. When downloading Real Time data, the number of days prior to the current date must be specified (i.e. Days Back). A value between 1 and 120 days must be entered.
Users can also query the USGS website to find all available stations within one or more states by clicking the Get USGS Station ID's by State button. Multiple state searches can be accomplished by clicking this button, selecting a state, clicking OK, clicking this button again, searching for an additional state, clicking OK, and repeating as many times as necessary. Clicking this button will bring up a window that allows the user to select a state in which to acquire data, as shown in Figure 4.
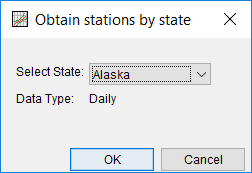
Once the user selects a state and presses the OK button, a process will begin in which all of the gage locations for that state will be downloaded from the USGS website. A listing of all the gages for that state will then be displayed in the table at the bottom of the data importer. The user can filter the resulting list of gages to a smaller number by using the filter drop down boxes at the top of the table.
An example of the data importer with a list of USGS gages is shown in Figure 5. Four state searches were performed for Colorado, Utah, Arizona, and California. The resulting gages were then filtered using a B-part of "Colorado River" to narrow down all of the available gages to only those along the Colorado River within the four previously mentioned states. Additionally, the asterisk (*) can be used as a wildcard to search for all strings that contain what has been typed. For instance, if the user typed "Colorado R*", a result similar to Figure 5 would be produced.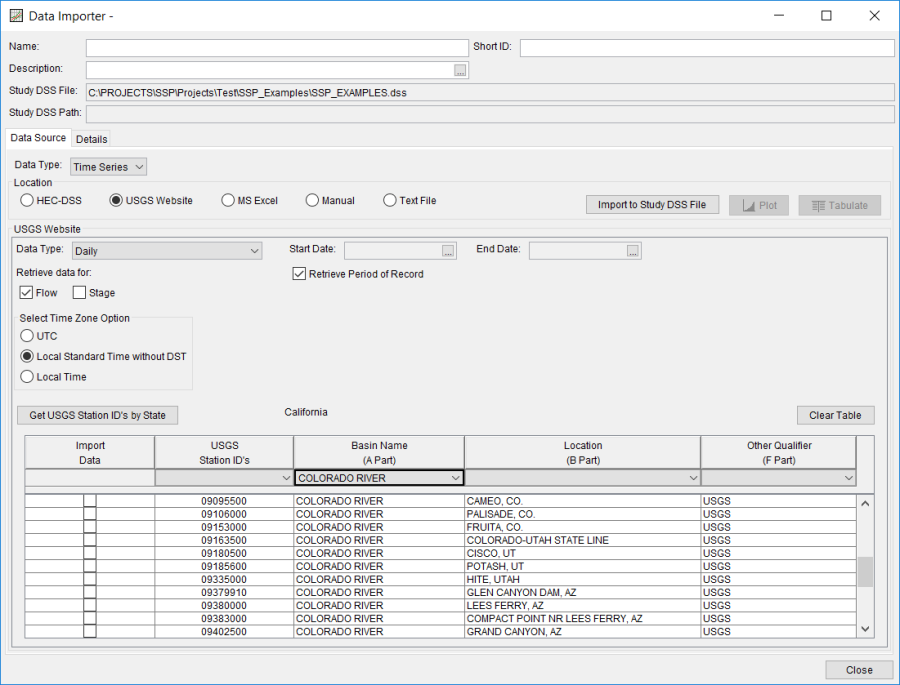
To select a gage for importing, check the box in the left hand column for each gage location that is to be imported. After all of the desired locations are selected, press the Import to DSS File button to import the data into the study DSS file. Pressing this button will start a process of downloading data from the USGS website. For each selected location, the software will download the Data Quality Codes if they are available and the Annual Peak Data type is selected. If/when available, the program will issue a message that data quality codes are available and adds the codes as an additional data set to the Data folder.
Warning: all data downloaded from the USGS website should be reviewed to ensure it is appropriate before any analyses are performed on the data. Some data stored on the USGS website are estimated, not measured. The user should check the data on the USGS website and be aware of the quality of all the data before using it. When the Annual Peak Data option is selected and quality codes are available, HEC-SSP will import the both the annual peak flow and stage quality codes (the program does not import quality codes for daily, instantaneous, or real time data). A description of the quality codes for annual peak flows is contained in Table 1 and a description of the quality codes for annual peak stages are contained in Table 2.
Table 1. Quality Codes for USGS Annual Peak Flow Data.
Code | Description |
|---|---|
1 | Discharge is a Maximum Daily Average |
2 | Discharge is an Estimate |
3 | Discharge affected by Dam Failure |
4 | Discharge less than indicated value which is Minimum Recordable Discharge at this site |
5 | Discharge affected to unknown degree by Regulation or Diversion |
6 | Discharge affected by Regulation or Diversion |
7 | Discharge is an Historic Peak |
8 | Discharge actually greater than indicated value |
9 | Discharge due to Snowmelt, Hurricane, Ice-Jam or Debris Dam breakup |
A | Year of occurrence is unknown or not exact |
B | Month or Day of occurrence is unknown or not exact |
C | All or part of the record affected by Urbanization, Mining, Agricultural changes, Channelization, or other |
D | Base Discharge changed during this year |
E | Only Annual Maximum Peak available for this year |
Table 2. Quality Codes for USGS Annual Peak Stage Data.
Code | Description |
|---|---|
1 | Gage height affected by backwater |
2 | Gage height not the maximum for the year |
3 | Gage height at different site and(or) datum |
4 | Gage height below minimum recordable elevation |
5 | Gage height is an estimate |
6 | Gage datum changed during this year |
Importing Data from an Excel Spreadsheet
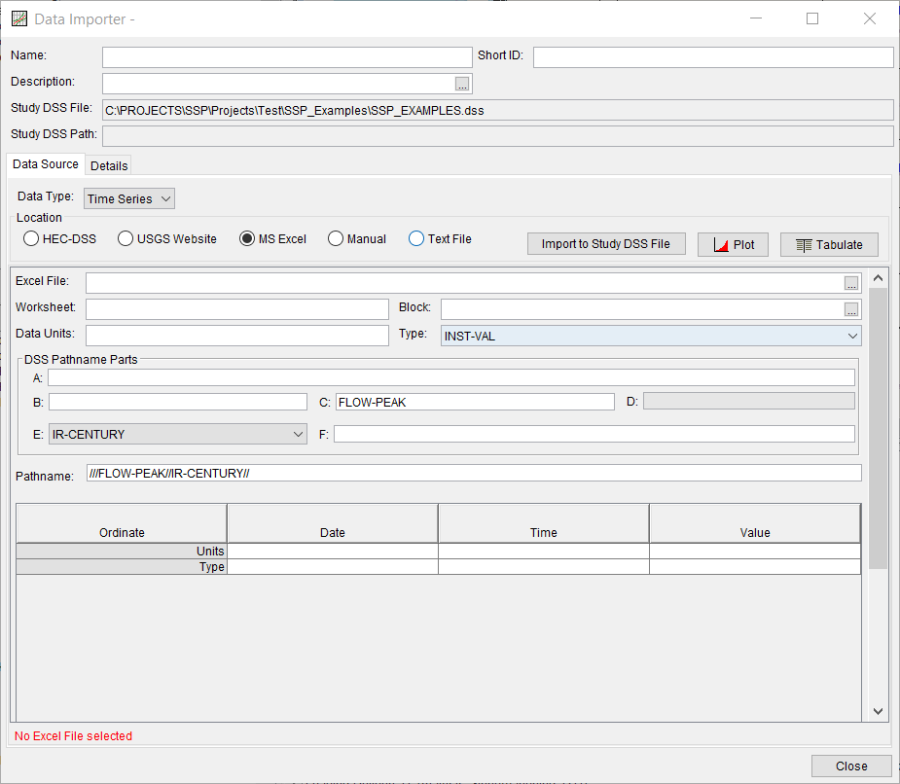
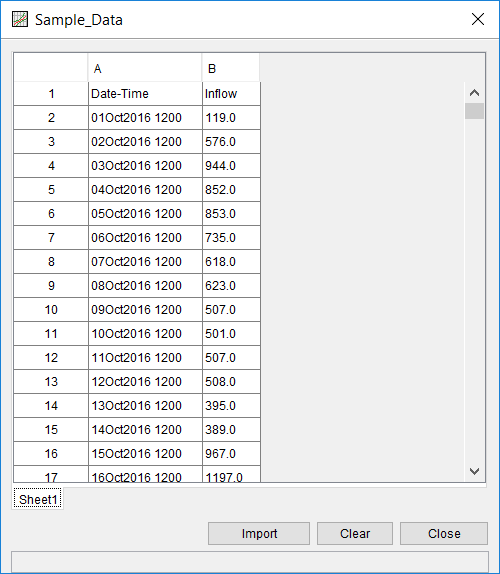
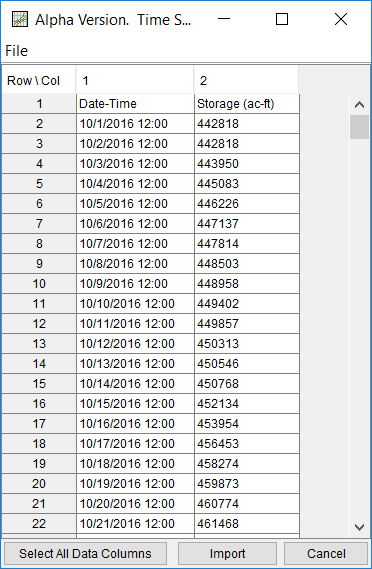
The third option for importing data into HEC-SSP is MS Excel (.xlsx and *.xls files). When this option is selected, the data importer will change as shown in Figure 6. To open an Excel spreadsheet, select the browse button, ![]() , at the end of the Excel File field. Once an Excel file is selected, a data view window will open showing the data contained in the selected spreadsheet. An example Excel® Data Viewer is shown in Figure 7.
, at the end of the Excel File field. Once an Excel file is selected, a data view window will open showing the data contained in the selected spreadsheet. An example Excel® Data Viewer is shown in Figure 7.
The date and data values to be imported into the study must be selected. This can be accomplished in one of the two following ways:
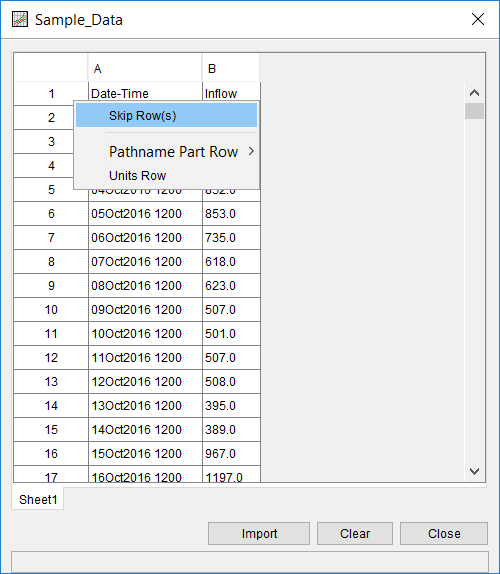
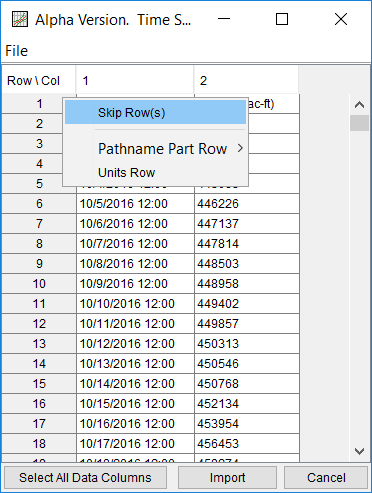
- Selecting the array of values by holding the shift key and left clicking. Only the dates, times, and data to be imported should be selected, not the column headings. If there are column headings, they must be identified and excluded from the import process. The Right Click | Skip Row(s) menu option can be used to identify and skip a row of column headings, as shown in Figure 8. To deselect an already selected cell, use the Right Click | Deselect option. Once the desired array of data has been selected, click Import. A window similar to Figure 12 will be presented. In this window, the DSS pathname parts, units, and data type must be defined. Once these parameters have been appropriately defined, click the Import to Study DSS File button to import the data.
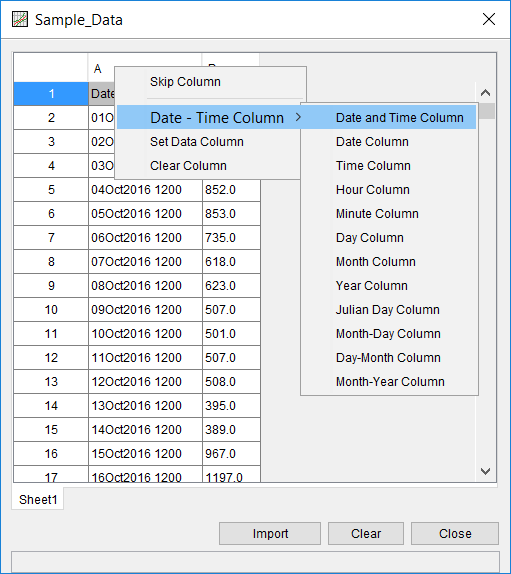
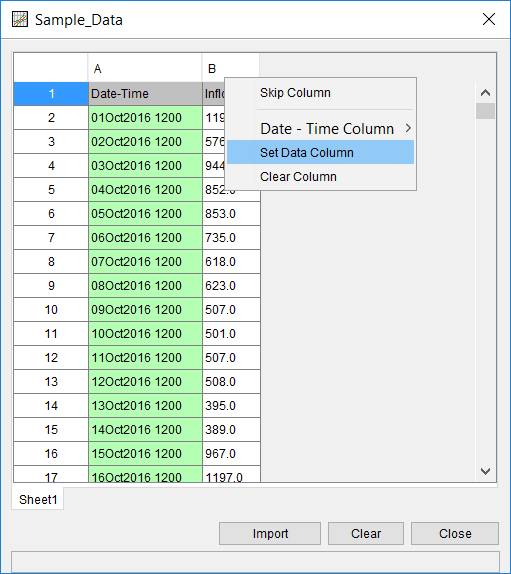
- Identify and set the date, time, and data columns. To identify the date and/or time column(s), place the mouse pointer on the column header, right click, and select a Date – Time Column option, as shown in Figure 9. Figure 9 shows that column 1 will be defined as the date and time column. The data viewer will highlight the date and time columns in green once they have been defined. To identify the data column, place the mouse pointer on the column header, right click, and select Set Data Column, as shown in Figure 10. Figure 10 shows that column 2 will be defined as the data column. After identifying and setting the data column, the data viewer will automatically close.
In the subsequent window, the DSS pathname parts, units, and data type must be defined, as shown in Figure 11. Once these parameters have been appropriately defined, click the Import Now button.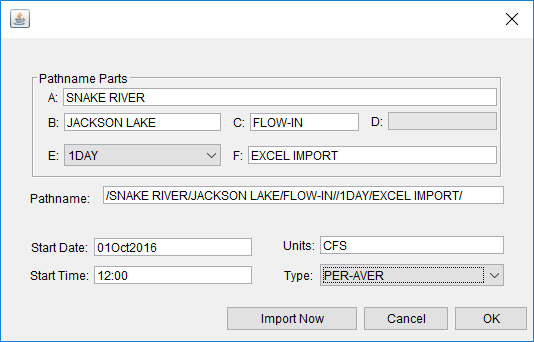
Note: Use care when entering the A-, B-, C-, E-, and F-parts. These fields are meant to provide the user with a means to differentiate individual data sets. If more than one data set is created with a non-unique combination of A-, B-, C-, E-, and F-parts (i.e. they are all left blank), data may be overwritten/lost. This is analogous to using the Save As command and specifying a file name that is equivalent to an already-existing file.
A window similar to Figure 12 will be shown. Ensure that the DSS pathname parts, units, and data type are set correctly. Click the Import to Study DSS File button to finalize the data import process.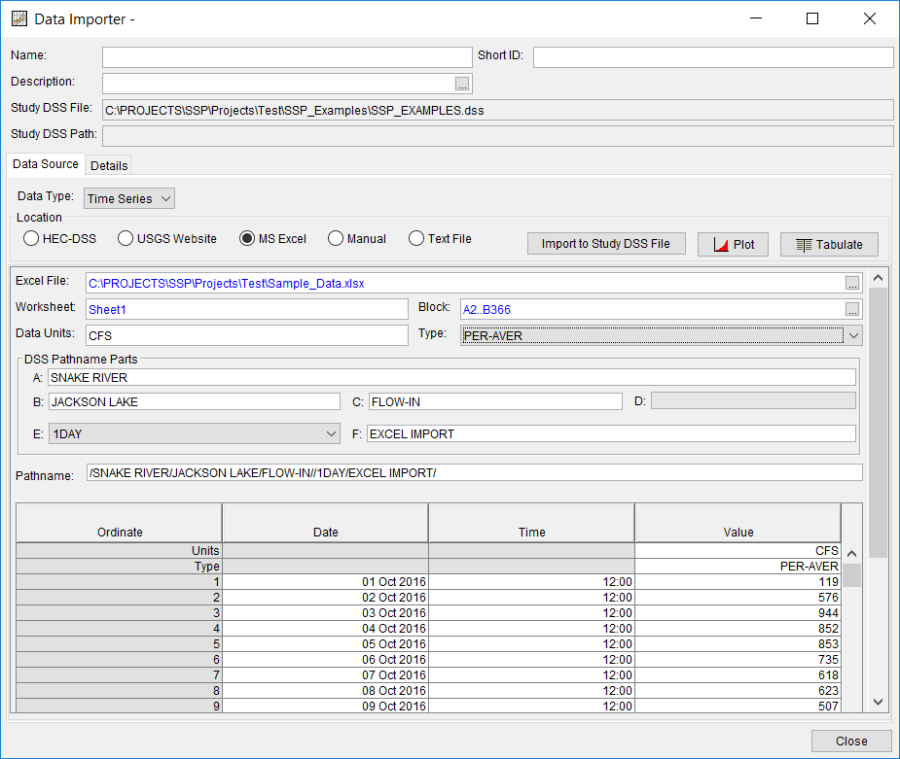
Entering Data Manually
Another option for getting data into the study is to enter the data manually. When the Manual option is selected, the window will change to what is shown in Figure 13. 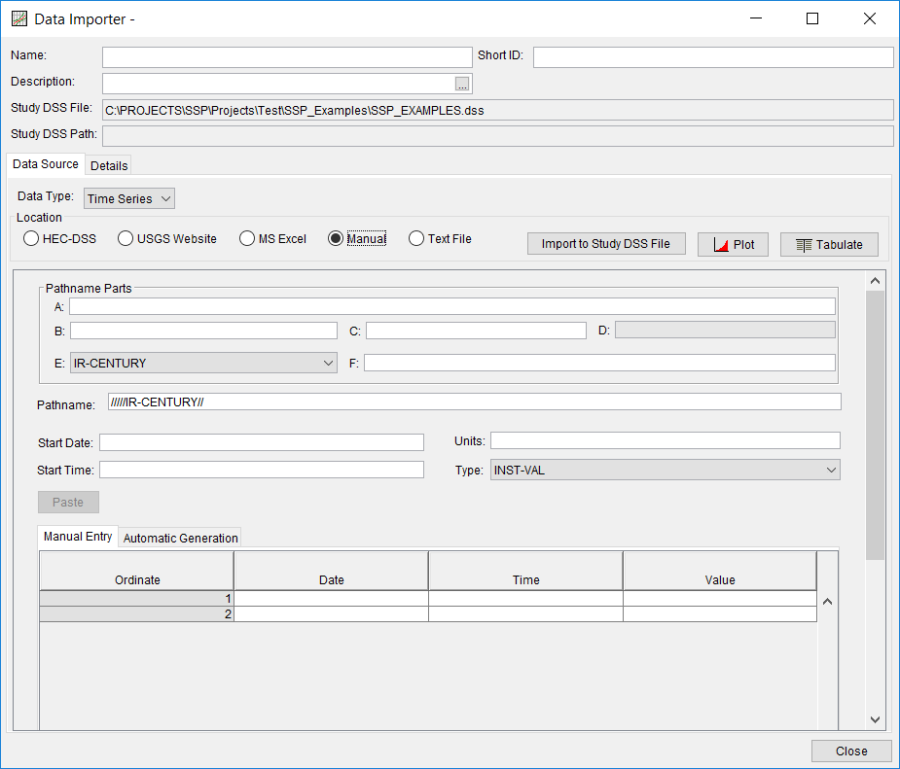
To enter data manually, the user may enter a name for the data set at the top, along with a short identifier and a description (optional). However, a starting date and time must be entered. The units of the data must also be defined as well as the data type. Finally, the DSS pathname parts must be specified.
Note: Use care when entering the A-, B-, C-, E-, and F-parts. These fields are meant to provide the user with a means to differentiate individual data sets. If more than one data set is created with a non-unique combination of A-, B-, C-, E-, and F-parts (i.e. they are all left blank), data may be overwritten/lost. This is analogous to using the Save As command and specifying a file name that is equivalent to an already-existing file.
Once all of the data labeling is completed, the data can be entered into the table at the bottom of the editor. The user must enter the Date, Time, and Value for each value to be entered. After a Date, Time, and Value are entered into a row, a new row will be generated in the table when the user leaves the Value field.
Note: The data must be in a format of Date in the first column and Data in the second column. The date should be in the Day, Month, Year, Hour, Minute format (ddmmyyyy hhmm)
Another option for getting data into the table is to copy it to the clipboard and then paste it into the table. The table supports pasting data one column at a time or you can paste the date, time, and value information all at once. When all of the data are entered into the table, the user can click the Import to Study DSS File button and the data will be stored in the study DSS file.
Importing Data from a Text File
The fifth option for importing data into HEC-SSP is a comma delimited Text File. When this option is selected, the data importer will change as shown in Figure 14.

To import data from a comma delimited Text File, click the Select File button at the end of the File field, ![]() . Once a comma delimited text file is selected, a data view window will open showing the data contained in the selected file. An example text file data viewer is shown in Figure 15.
. Once a comma delimited text file is selected, a data view window will open showing the data contained in the selected file. An example text file data viewer is shown in Figure 15.
Note: The data must be in a format of Date in the first column and Data in the second column. The date should be in the Day, Month, Year format (i.e. ddmmyyyy). Time should be in the Hour, Minute format (i.e. hhmm). Optionally, the date and time can be defined together in Day, Month, Year, Hour, Minute format (i.e. ddmmmyyyy hhmm).
The date and data values to be imported into the study must be selected. This can be accomplished in one of the two following ways:
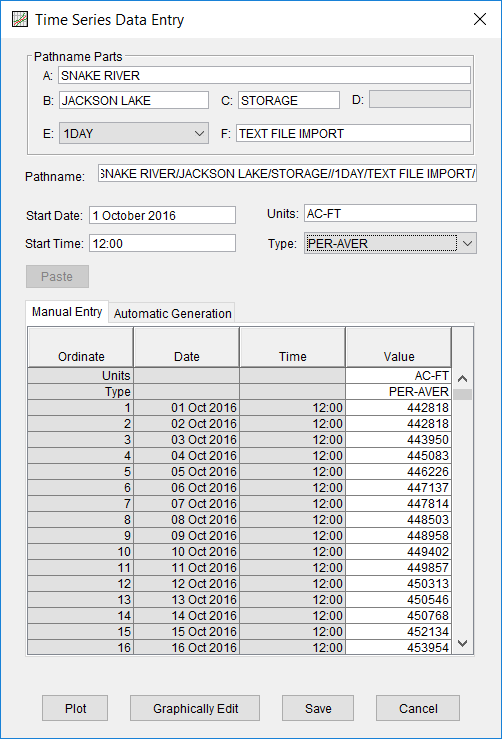
- Selecting the array of values by holding the shift key and left clicking. Only the dates, times, and data to be imported should be selected, not the column headings. If there are column headings, they must be identified and excluded from the import process. The Right Click | Skip Row(s) menu option can be used to identify and skip a row of column headings, as shown in Figure 16. To deselect an already selected cell, use the Right Click | Deselect option. Once the desired array of data has been selected, click Import. A window similar to Figure 17 will be presented. In this window, the DSS pathname parts, units, and data type must be defined. Once these parameters have been appropriately defined, click the Save button to import the data.
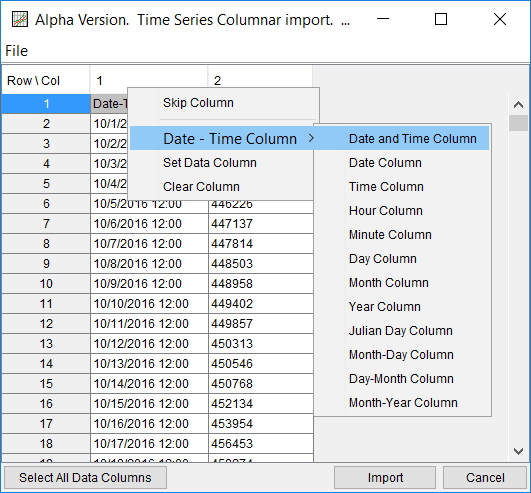
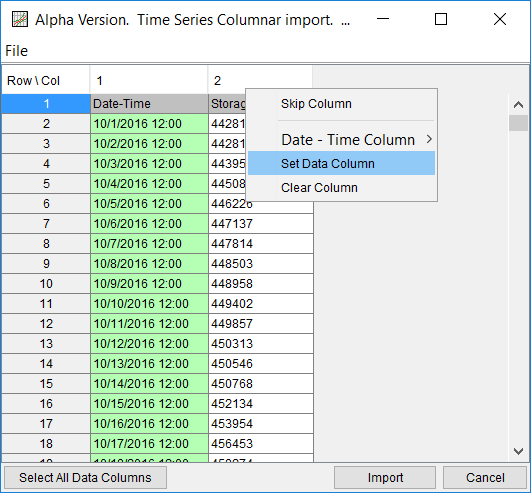
- Identify and set the date, time, and data columns. To identify the date and/or time column(s), place the mouse pointer on the column header, right click, and select a Date – Time Column option, as shown in Figure 18. Figure 18 shows that column 1 will be defined as the date and time column. The data viewer will highlight the date and time columns in green once they have been defined. To identify the data column, place the mouse pointer on the column header, right click, and select Set Data Column, as shown in Figure 19. Figure 19 shows that column 2 will be defined as the data column. After identifying and setting the data column, the data viewer will automatically close.
In the subsequent window, the DSS pathname parts, units, and data type must be defined, as shown in Figure 20. Once these parameters have been appropriately defined, click the Import Now button.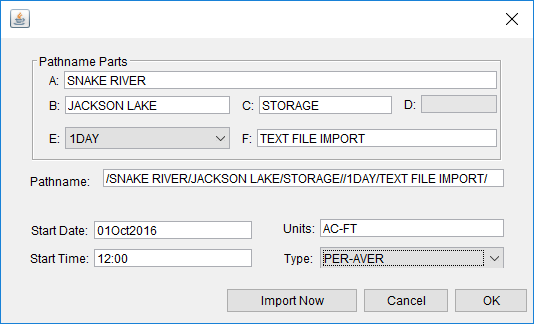
Note: Use care when entering the A-, B-, C-, E-, and F-parts. These fields are meant to provide the user with a means to differentiate individual data sets. If more than one data set is created with a non-unique combination of A-, B-, C-, E-, and F-parts (i.e. they are all left blank), data may be overwritten/lost. This is analogous to using the Save As command and specifying a file name that is equivalent to an already-existing file.
A window similar to Figure 21 will be shown. Ensure that the DSS pathname parts, units, and data type are set correctly. Click the Import to Study DSS File button to finalize the data import process.