Simple Computable Plugin
Simple Computable Plug-in
Objectives:
- Demonstrate how to add the methods for a plug-in to compute in a simulation.
For the simple computable plug-in, we are going to create a plug-in that is part of a WAT compute sequence (specifically the FRA compute sequence) that consumes event information. The plug-in will consume one DSS time series record as input and produce one time series record as output. For simplicity, the time series record will be multiplied by a uniform random number provided by the WAT representing the event random number. In the case of POR events, the time series will be multiplied by 2. The plug-in is going to be built in Java from scratch and can operate within the WAT JVM. These questions help to determine which interfaces must be implemented within the plug-in's main class.
This tutorial will use the NetBeans IDE although any Java IDE will work. To begin, create a new project. The main class name will ultimately be the name of the plug-in jar that is placed in WAT, so it is recommended that the project name be the same as the plug-in name you wish to use.
To create a new NetBeans project launch NetBeans, and select File > NewProject….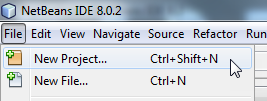
Figure 21 Creating a new NetBeans project
The new project wizard will appear. Define the project type, select the project type JavaApplication (within the Category Java) and press Next.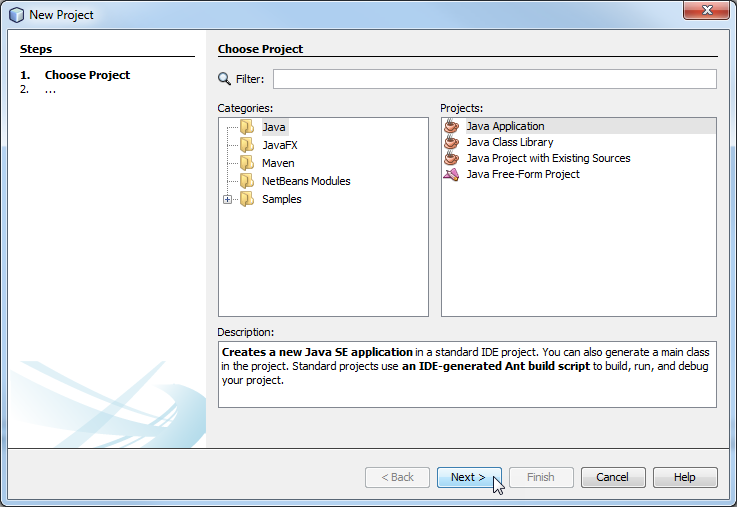
Figure 22 The NetBeans New Project Wizard
Name the project, define its location, and name the main class for the project. It is recommended that a dedicated folder for storing libraries is created and named lib. Once this step has been completed select Finish.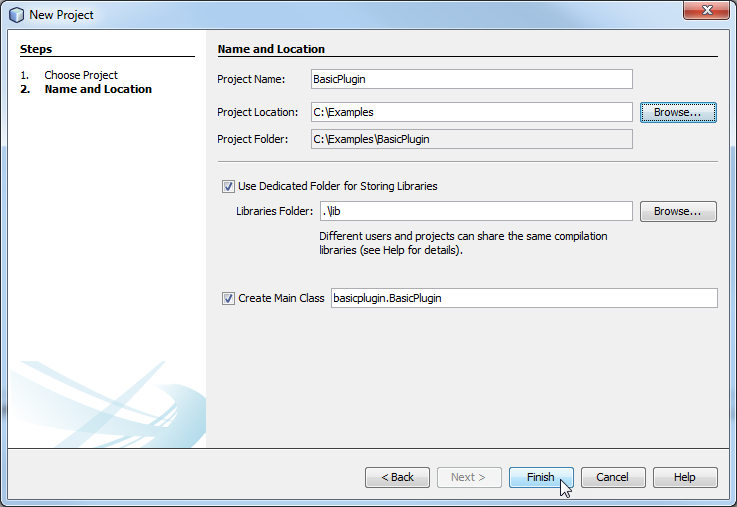
Figure 23 Creating a project
When you select Finish, NetBeans will create a new project, a new package based on your project name, and a new main class based on the name you defined. We will add all required referenced jars to the lib folder in the next few steps.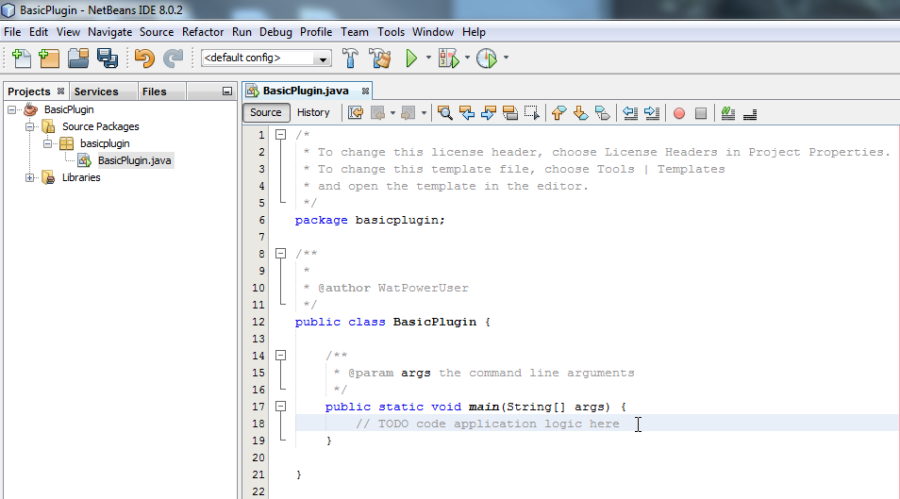
Figure 24 A New Project in NetBeans
Reference jars need to be added. The jars are within the HEC-WAT directory under the jars folder. To add the jars, right click on the Project node in the Project pane and select Properties.
Figure 25 Opening the Properties Editor
The properties editor will appear, in the left-hand pane. Select Libraries and click Add Jar/Folder. 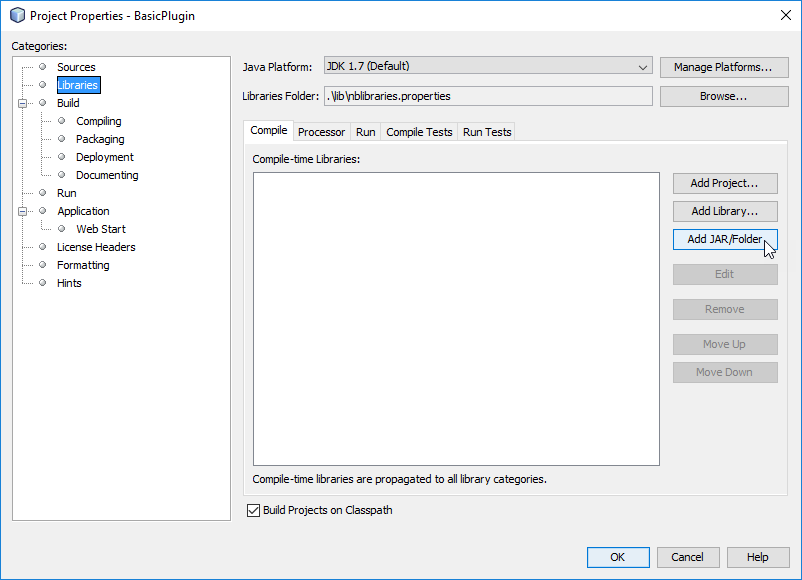
Figure 26 The Project Properties Editor
Browse to HEC-WAT/jar and select the following jars:
hec.jar, hecnf.jar, hecnfPlugin.jar, rma.jar, rmadev.jar, watModel.jar and wat.jar.
Figure 27 Adding jars
Click Add Jar/Folder, go into the sys folder and select jdom-1.0.jar.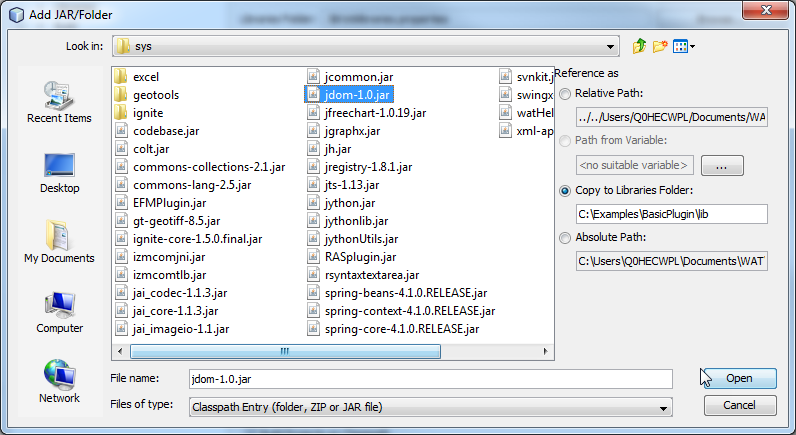
Figure 28 Adding jdom-1.0.jar
Your Project's properties should look like Figure 29: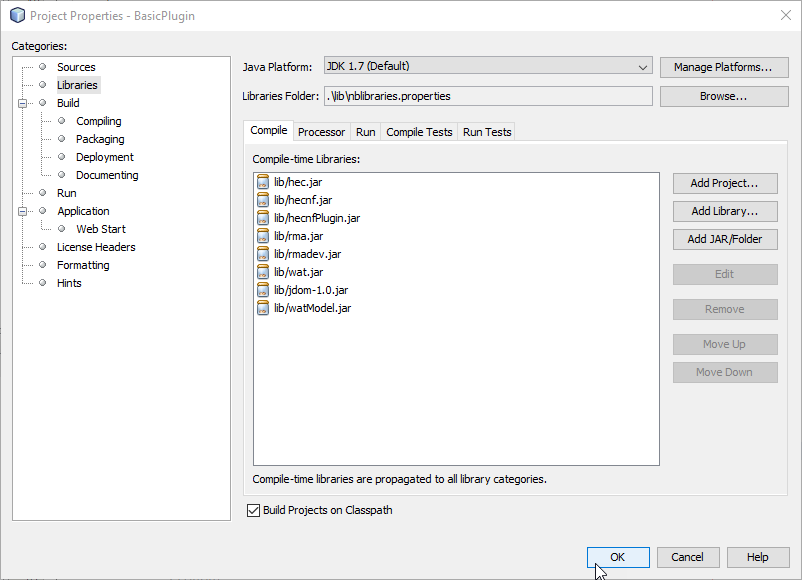
Figure 29 Project Properties example
Our next steps begin to create the first few classes for the plug-in.
Based on the workflow diagram, we will be extending the AbstractSelfContainedWATPlugin. The AbstractSelfContainedWatPlugin class is an abstract class that combines a great deal of the existing plug-in interfaces. As it is a generic (that is confined to be of type SelfContainedWATPluginAlt), we must create a plug-in alternative class that extends SelfContainedWatPluginAltbefore we can extend that class. To create a class, right click on the basicplugin package and select Create New.
Figure 30 Creating a Class
Name the alternative in a way that it is clear what the alternative is. You can create an abstract alternative and implement many different alternatives for the same plug-in but this project will only make one alternative. Its name will be BasicAlternative so that it is clear that this goes with the BasicPlugin.
Figure 31 The New Java Class Wizard
The first step after creating the class is to import the proper namespaces. Import hec2.plugin.selfContainedPluginAlt and use your class to extend the abstract class of the same name.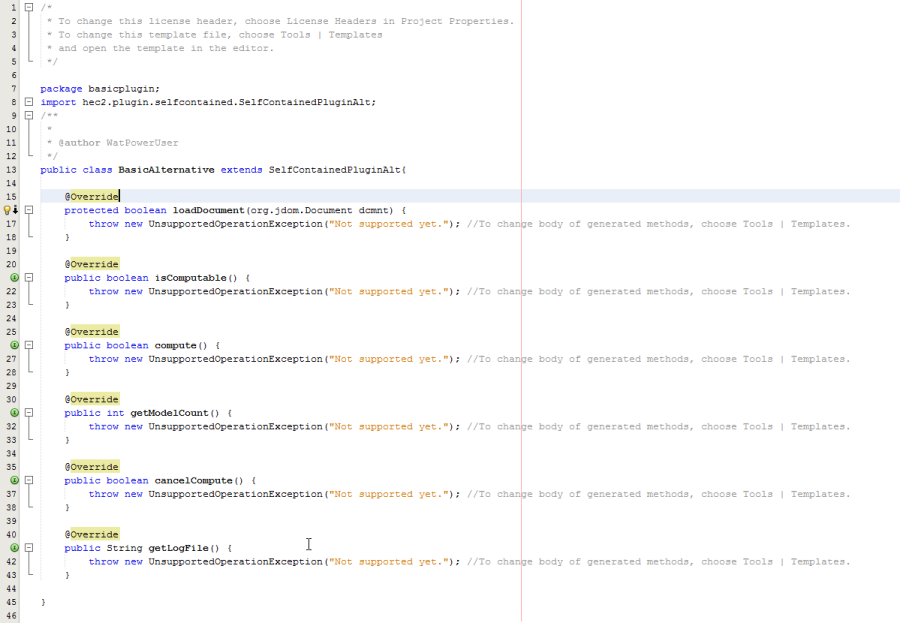
Code Example 18 Stubbing out Methods
Implementation of all methods marked @Override occur in later portions of this guide.
Now that we have an instance of the right type of alternative, we can create our basic plug-in. Go back to the BasicPlugin class and import hec2.wat.plugin.AbstractSelfContainedWatPlugin and then extend BasicPlugin using the BasicAlternative as your alternative type for the generic argument.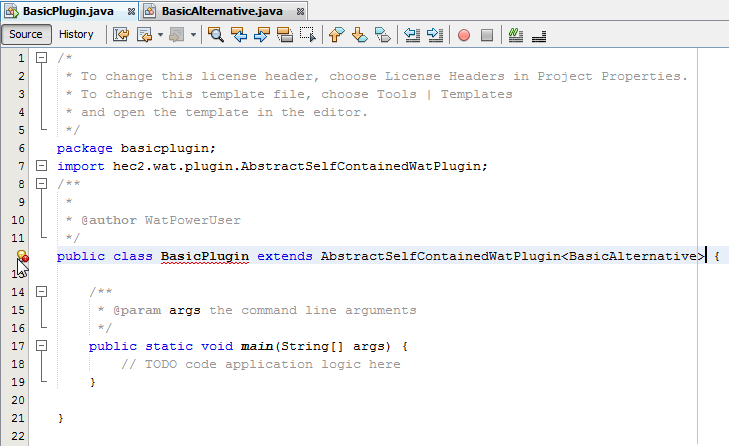
Code Example 19 BasicPlugin Class
By allowing the NetBeans IDE to implement all abstract methods with method stubs, we can see the scope of the methods that require implementation and all required imports are to the main class.
To provide WAT with the proper name of the plug-in to present to the user in the User Interface (UI) of the WAT, a default constructor must be created and initialization steps completed. It is conventional to use static variables for things like the name of the plug-in, the directory for results storage, the version number, and the extension of the files stored by this plug-in. Add four private static strings and create a constructor: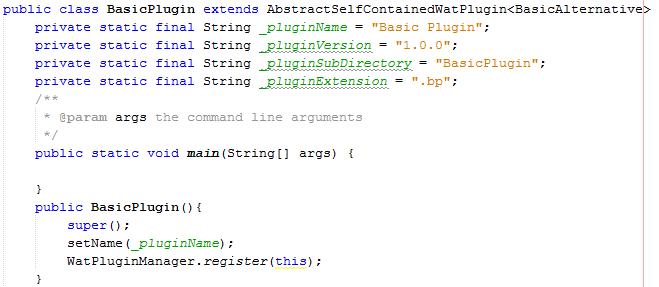
Code Example 20 Initializing the BasicPlugin
Three actions occur in the BasicPlugin constructor, calling the default constructor of the parent class, setting the name of the plug-in, and registering the plug-in. For non-server-based plug-ins it is acceptable to immediately register, for server-based plug-ins it is acceptable to register if the startup of the server was successful.
To ensure the plug-in appears in the program order list (enabling it to be a part of event compute sequence), we must register it as a program order item. The program order item constructor has five arguments: the name of the program order item, a description, if it should appear in the default program order list, the order it should appear in the default program order list, and a path to the image for the program order item.
For our case, we will set the program order up not appear in the default program list and have no default image. It is beneficial to set the program order item prior to registering with the WatPluginManager.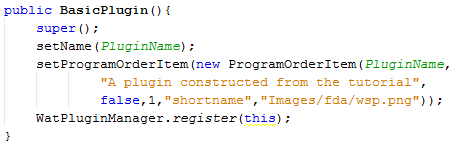
Code Example 21 The BasicPlugin constructor
To properly register with the WAT, all that is needed is to call the default constructor. The HEC-WAT program finds all plug-ins in the \ext directory and calls their main methods (defined in the manifest file at the end of this guide). Therefore, adding a line to construct the plug-in with the default constructor is required. This will be the only line necessary in the main method for the plug-in.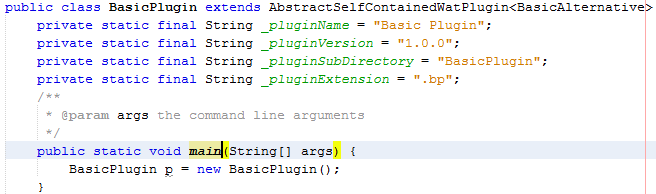
Code Example 22 BasicPlugin main()
The next steps are to begin filling out other methods necessary for file storage. Our first three methods are getAltFileExtension(), getPluginDirectory(), and getVersion(). These property setters will expose the private static strings created in an earlier step. The plug-in directory will be created in the root study directory if the plug-in is turned on in the instance of the WAT. Once an alternative is created by the user, the alternative file extension will be used to save the alternative's specifications in the plug-in directory within the root directory of the WAT. The getVersion method allows the plug-in to determine the correct approach for reading alternative files if subsequent versions of the plug-in are developed.
Code Example 23 Implementing getAltFileExtension(), getPluginDirectory(), getVersion()
DataLocations:
HEC-WAT facilitates linking plug-ins together using a DataLocation object. DataLocations have two components: the plug-in that creates the data location defines the data required for input and a linked model that provides a linked data location providing that input. The API requests data locations through one method at the plug-in level, but it provides an enumeration by injection declaring the request as input or output.
If a model is the first program in the program order, it will typically only produce output data locations for the models lower in the program order to receive as input data locations. Conceptually, each plug-in consumes input locations provided externally and produces output data locations for external things to consume. Depending upon the plug-in being created, this can be very complex and contain many locations or few locations. These locations could be editable by the user or fixed. One can also imagine that depending upon the specific project location there may be varying number of required inputs and outputs produced by any plug-in. Therefore, the input and output data locations are managed by the plug-in alternatives.
ModelAlternatives and ComputeOptions:
HEC-WAT requests plug-ins to compute by passing a ModelAlternative to the plug-in to compute (see the public boolean BasicPlugin.compute(ModelAlternative ma) method). The model alternative can be converted into a plug-in-specific alternative using the helper method provided by AbstractSelfContainedplugin called getAlt(ModelAlternative malt) this method produces the properly typed plug-in alternative (based on the generic argument provided in the class definition). The SelfContainedPluginAlt also requires a compute method: public boolean compute(). It is expected that the compute logic will also be controlled by the plug-in alternative. In the case of client server plug-ins, the compute is often delegated further to some compute engine for the model.
The model alternative injected via the plug-in compute method also carries a ComputeOptions argument. The ComputeOptions argument is important in determining certain runtime settings such as the time window for the event, which event is being computed, and where the output from the linked model's data locations is being placed
The next steps of this guide are to develop the BasicAlternative class, establish how it deals with input and output data locations, and determine how it saves and reads from disk so that user settings via the model linking editor are preserved from session to session.
The first step is to create some private memory for the BasicAlternative class to store the DataLocations. In our case we will only have one DataLocation, but because the API passes an array list of DataLocations we will store an array list. To initialize the list, we will create a default constructor. We will also create one overloaded constructor that takes a single argument of the name of the plug-in.
Code Example 24 Defining the DataLocations List
Now we need to be able to load a document of type org.jdom.Document based on the abstract loadDocument method provided by the SelfContainedPluginAlt or one of its interfaces or parents. With a little investigation of the source code, DataLocations serializes to xml and SelfContainedPluginAlt has built in functions to load and save Datalocation objects. The SelfContainedPlugin derives from AbstractManager which provides a method called saveData() and saveData(RmaFile file) which allows for simple management of the saving of the BasicAlternative. The AbsractManager derives from NamedType which stores a private variable of _name and _description exposed through getName() and getDescription() respectively. Before we load a document, we will define how our document will be saved. To do this we will override the AbstractManager.saveData(RmaFile file) method:
Code Example 25 Defining XML elements
To facilitate consistency and minimize typos in the reading and writing of the xml format, a few static strings were defined:
Code Example 26 Saving Alternative to XML
As you can see, we utilized the saveDataLocations method provided by SelfContainedPluginAlt and the writeXMLFile method provided by AbstractXMLManger class.
Now that we have our saving mechanism, we will write our reading process inside of the loadDocument method. In this method we verify many aspects about the file to ensure that it was generated by this BasicAlternative class. We utilize the loadDataLocations method provided by SelfContainedPluginAlt, as well as the setName and setDescription methods exposed by NamedType. Utilizing the setters rather than setting the private memory triggers the isModified property improperly on a load, so it is best practice to update that property after reading the file in by calling setModified(false). 
Code Example 27 Loading an Alternative from XML
The BasicPlugin class needs to be modified to save the alternative when the plug-in is asked to save the project. Since the plug-in may have many alternatives, we must save all alternatives when the saveProject method is invoked. The BasicPlugin has private memory allocated for an alternative list (_altList, or through the method getAlternativeList()) due to the AbstractSelfContained plug-in. In save project, we will loop through each BasicAlternative in _altList and call saveData(). saveData() in turn calls saveData(RmaFile file) using the getFile() method exposed in AbstractManager.
Code Example 28 Implementing saveProject()
In order to create an alternative, there are two minimum methods that need to be populated in the BasicPlugin class: newAlternative(String string) and getAltObjectFactory(). The WAT uses a marker interface to add a menu item to the plug-in in the study tree that allows the user to create a new alternative.
The first method is simple, we can just use the overloaded constructor on the BasicAlternative to create a new alternative with the string argument passed through.
Code Example 29 Creating a New Alternative
The second method returns a NewObjectFactory so it requires creating a class that extends NewObjectFactory specific to our BasicAlternative.
Create a new class called BasicAlternativeFactory, extend AbstractNewObjectFactory, and implement NewObjectFactory (both are in the com.rma.factories namespace). This will be the editor elicited by the WAT to allow the user to construct a new alternative.
The AbstractNewObjectFactory has a default constructor that receives a com.rma.util.I18n class. The I18n class facilitates loading resource strings from a resource bundle and creating common swing components. I18n refers to internationalization of the source code to allow creating of localized applications.
Create an additional class called BasicPluginI18n and have it extend I18n in the com.rma.util namespace.
Code Example 30 BasicPluginI18n class
A BasicPluginMessages class containing a static resource for the plug-in name needs to be created. Create a class called BasicPluginMessages and build it like the following image: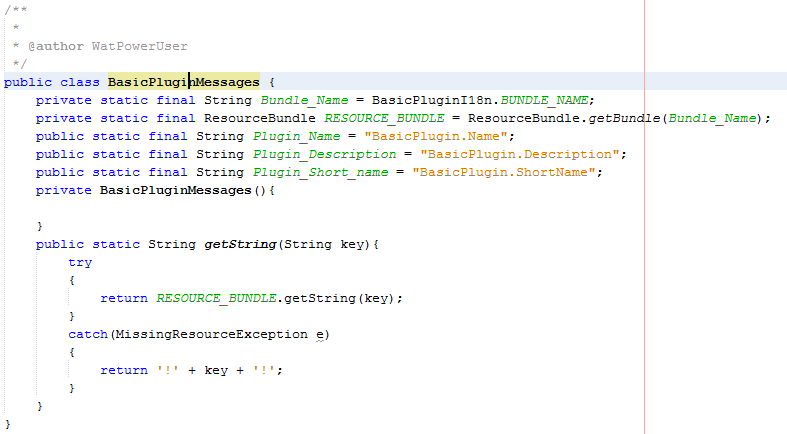
Code Example 31 The BasicPluginMessages class
Finally, we need to make a properties file which needs to be named consistently with our resource bundle name so that it will be in the basicplugin package with the name BasicPluginProperties.Properties. It will contain the following properties:
Code Example 32 Creating a Properties File
Using this class and the BasicPluginI18n class, we can implement the constructor on the BasicAlternativeFactory. The only constructor we want is one that passes in an instance of the plug-in to the alternative so that the plug-in can assist in creating the alternatives based on the user input from the generic editor the AlternativeFactory provides. We will create a space for a pointer to the plug-in in the class and instantiate the proper constructor on the parent class AbstractNewObjectFactory.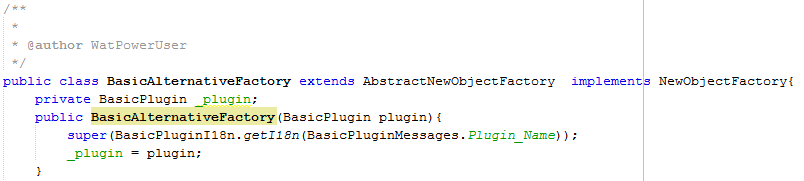
Code Example 33 BasicAlternativeFactory Contructor
There are four methods that need to be implemented in the BasicAlternativeFactory. createOpenObjectPanel and openObject(JComponent jc) can be coded easily by replacing the IDE generated exception with return null; in the first method and deleting the IDE-generated exception in the second. These will not be used by this plug-in.
The other two methods generate a user interface with a single panel with a name and description text box. Follow the code and your version will work:
Code Example 34 Methods to create new Alternatives
Now that we can create a new alternative and save the alternative in the project directory, our next step is to signify to WAT that the plug-in can create alternatives. To do this, implement the CreatableWatPlugin interface on the BasicPlugin class. As it is a marker interface, it does not require any methods to be implemented. 
Code Example 35 Implementing CreatableWatPlugin
Once the WAT recognizes this as a creatable plug-in, the Create New menu item will be added to a right click context menu. When clicked, the WAT will request the plug-in newobjectFactory, so we need to provide that through the proper method in the BasicPlugin. 
Code Example 36
Next, we will define data locations to provide to the Model Linking Editor for input and output, and support the calls that allow data locations to be set via the model linking editor.
The Model Linking editor will call getDataLocations and setDataLocations, so methods must be implemented to support the editing of linkages via the model linking editor.
Let's begin with the getDataLocations method. The argument is a ModelAlternative, and an int signifying whether the request is for input or output DataLocations. The first step is to convert the ModelAlternative object into an instance of the BasicAlternative we created before. To do this, we will use the method getAlternative(ModelAlternative malt). This ensures the correct model alternative is used when fulfilling the request for data locations. A user may have many alternatives for any given plug-in. The model linking editor is requesting data locations for a specific instance of an alternative.
We need to determine if the request is for input or output DataLocations by looking at the int provided. The code should look like this:
Code Example 37 Implementing getDataLocations()
Since each model alternative may have different storage based on user settings, it is best to delegate the request to the alternative. More advanced cases exist than the one provided in this example.
To support the delegation, add getInputDataLocations() and getOutputDataLocations() to the Basic Alternative class.
Add the following method stubs to the BasicAlternative class:
Code Example 38 Implementing getOutputDataLocations(), getInputDataLocations()
Now we can call these methods in the BasicPlugin implementation of getDataLocations.
The revised code in BasicPlguin should look like this:
Code Example 39 Filling out getDataLocations()
We can now focus our attention on providing the right input and output data locations from the BasicAlternative class. For our project, only one input will be required: a single DSS time series record of any parameter type. The output will be a converted DSS time series record based on the input time series. For our simple example, a single data location stored in a private variable of a list of DataLocations is sufficient. Typical programs will have a list of inputs and a different list of outputs (which is why the methods are separated in this example) but redirect back to the same method.
The input list will allow users to define what goes into the alternative. The output list allows other alternatives offered by other plug-ins lower in the program order to take the output from this plug-in as their inputs. In our case our input is redirected as an output, so they are the same as far as the model linking editor is concerned. Therefore, we simply redirect back to a single method to set the default list of DataLocations. It is important to note that the output list (and ideally the input list also) should have the DSS path parts defined so that any model alternative linked to our alternative can know what DSS record to look for during the simulation.
A method called defaultDataLocations is going to perform the majority of the work here. First, the method will check if the private list of DataLocations is empty or not. If it is empty, it has never been initialized, so we will initialize it. If it is not empty, it has either been previously set through the model linking editor within the same session, or it has been read from disk from a previous session of the WAT. If it exists, we do not want to create a new DataLocation because the data location is storing the linked data location information also.
If the list is not empty, we want to make sure the information is valid and update our data location to ensure that the DSS path parts are properly set. That way the model linking editor can operate more smoothly in matching inputs and outputs from other alternatives.
Since there are other places where we will check the validity of linked data locations and set the DSS paths, these methods were abstracted for consistency:
Code Example 40 Implementing defaultDataLocations()
The method for checking validity is fairly simple: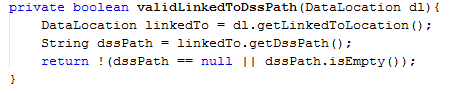
Code Example 41 Implementing validLinkedToDssPath()
The method for setting the DSS path parts for our single data location is a bit more complicated and outlines part of the peculiarities of WAT period of record and FRA computes. FRA stores collections in the lifecycle DSS files and the F-parts need to be manipulated to show that. However, it does not store collections (natively) in the POR computes. This method currently functions for the FRA compute, but it may not work properly with the POR compute. To properly meet WAT conventions, it is strongly recommended that the F-part for DSS output is defined using the PathnameUtilities class that sets the F-Part based on the ModelAlternative class. 
Code Example 42 Implementing setting of DSS path parts
The data location DSS parts are being defined based on the user's selected input and appending the word output to the b part. Remember this method is not being called unless the linkedTo location is checked for validity first.
Finally, the BasicAlternative, getInputDataLocations, and getOuputDataLocations methods need to be updated to point back at the getDefaultDataLocations method instead of returning null. 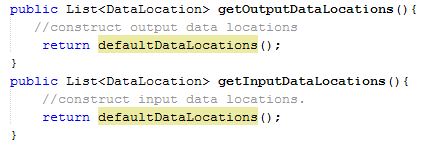
Code Example 43 Updating getInputDataLocations(), and getOutDataLocations() to return getDefaultDataLocations
Now when a user makes a linkage in the model linking editor, the model linking editor calls the setDataLocations method. Since the BasicAlternative needs to have the DataLocations properly set so the user preferences can be stored (and used in the compute), the plug-in will pass the information to the BasicAlternative. The boiler plate code is:
Code Example 44 Initial Code for setDataLocations()
Next the BasicAlternative needs a setter for the DataLocation exposed so that the plug-in can call the method. In this method, we will check the validity of the linkage. The validity test in our case will simply be to confirm the linked DataLocation has a valid DSS path. The DSS parts will also be updated in case the user has changed the linkedto model in the process. Notice that the location is only added if it is not already in the list, otherwise it is just modified and the DSS parts updated.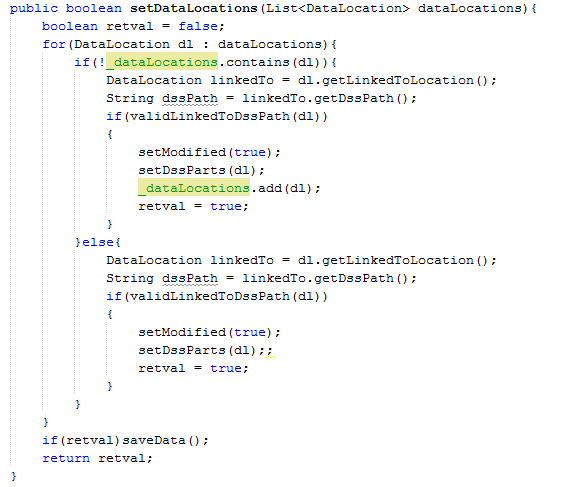
Code Example 45 Filling out setDataLocations()
One final step is to go back to the BasicPlugin class and modify the setDataLocations method to call the method we just wrote in the BasicAlternative class.
Code Example 46 Completing Plug-in's setDataLocations()
Now that alternative saving, reading, modifying, and linking are all in place, our final step is to define the compute sequence for modifying the DSS time series file we are consuming and writing out our modified DSS record.
The WAT initializes a compute by calling compute on the plug-in and passing in a ModelAlternative (which we will use that to call compute on the BasicAlternative) and defining our compute specific logic in that class.
An initial cut at the implementation would look like this in the BasicPlugin class:
Code Example 47 Implementing compute()
Since we want to change the compute if it is a deterministic vs WAT FRA compute, we need to pass the compute options into the BasicAlternative. Our first step is to create a private variable for the compute options, and then expose a setter. The isComputable method also needs to return true which we can do that at the same time.
Code Example 48 Implementing setComputeOptions(), isComputable()
Next, we need to set the compute options in the BasicPlugin compute method: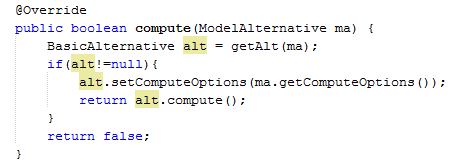
Code Example 49 Filling out compute()
We write the compute logic in the BasicAlternative compute method.
Since we need to differentiate between a deterministic and a stochastic compute within the WAT framework, the first line on the compute will be to cast the compute options over to an hec2.wat.model.ComputeOptions. To do this, we need to add an additional reference to the watModel.jar located in the HEC-WAT/jar folder.
If the compute is of type hec2.wat.model.compute, there will be a method exposed called isFRMCompute(). A return of true means it is stochastic, a return of false means it is deterministic. In deterministic cases, the input time series would be multiplied by 2, in stochastic cases, we will multiply by the event random number. In an FRA compute there are 3 random numbers passed by the WAT compute options: the realization random, lifecycle random, and the event random. Realization random numbers are used for variables that represent knowledge uncertainty, and event random numbers are intended to represent natural variability. Using the lifecycle random is not recommended.
Following the identification of the case, we will read the input from our linked to data location, update the values to represent the multiplied time series, and write the output out.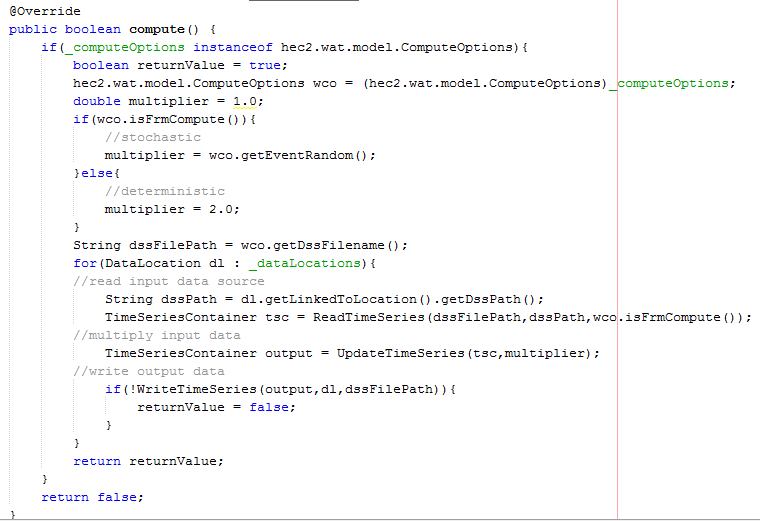
Code Example 50 Implementing Alternative's compute()
To find the proper information, it is best to ask the compute options for the proper F-part for the linked data location. This is reflected in the readTimeSeries method. Within the isFrm condition, the collection needs to be updated; if it is deterministic, the output is not stored in a collection and the twiddling of the colons is not necessary.
Code Example 51 Reading TimeSeriesContainer
Finally, in the writing, the F-part needs to be properly set to reflect the previously communicated pattern for the models linking to this alternatives output. Since we used the WAT convention to define the path, we need to ask the compute options for the F-part for this event.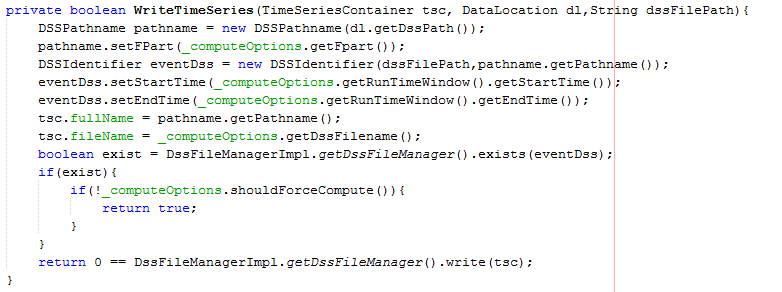
Code Example 52 Writing TimeSeriesContainer
The final step prior to building is to update the manifest file to contain a directive for HEC-WAT to know what main class to use for the plug-in file. You can accomplish this in many ways, the following is a simple way to update the file using a text editor.
Browse to the project directory with your file explorer. Open the manifest.mf file in any text editor, insert the following line WatPluginMainClass: basicplugin.BasicPlugin. Your main class will be dependent on the name of your project and main class.
After this step is completed, build your project. If you go to the dist directory of your project directory using a file explorer, you can copy your jar file and paste it into the HEC-WAT v1/jar/ext/ directory. If you do so, you should see your plug-in in the plug-in list next time you launch WAT. 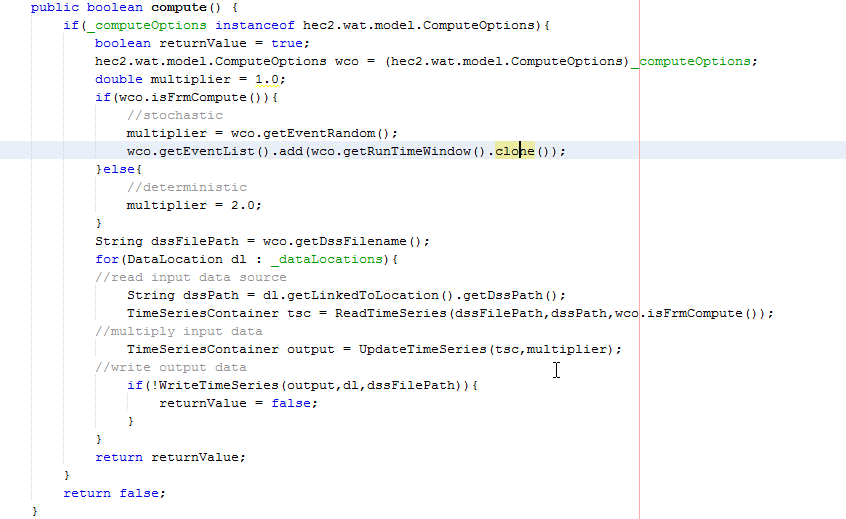
Code Example 53 Implementing Alternative's compute()