Simple Plugin Example
Simple Plug-in
For this simple plug-in, we are going to create a plug-in that displays a mapping and map editing application. The plug-in will launch from a button in the toolbar of the WAT and identify whether a valid project is open or not when the button is clicked. If a project is detected, it will search for the active map window and load all shapefiles into the mapping tool for display.
Objectives:
- Demonstrate how to build the simplest WAT plug-in type.
- Explain how to loosely connect the plug-in to a project.
- Show basic code to inspect the maps in the active map window.
This tutorial uses the NetBeans IDE although any Java IDE will work. To begin, create a new project. The main class name will ultimately be the name of the plug-in jar that is placed in WAT so it is recommended that the project name be the same as the plug-in name you wish to use.
To create a new NetBeans project launch NetBeans, and select File > NewProject…
Figure 12 Opening a New Project
The new project wizard will appear and prompt you to define the project type. Within the Java category, select the project type JavaApplication and press Next.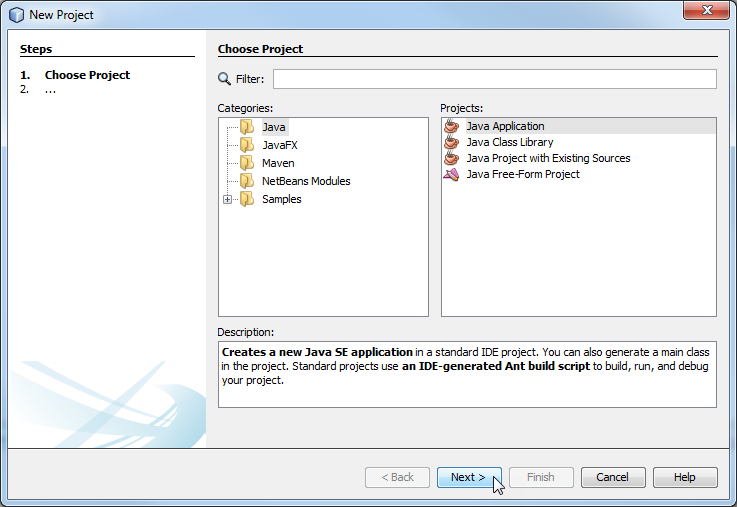
Figure 13 The New Project Wizard
Name the project, define its location, and name the main class for the project. It is recommended that a dedicated folder for storing libraries is created and named lib. Once this step has been completed select Finish.
Figure 14 Creating a New Project
NetBeans will create a new project, a new package based on your project name, and a new main class based on the name you defined. Next, we will add all required referenced jars to the lib folder.
You should see something in the NetBeans IDE similar to the code shown below: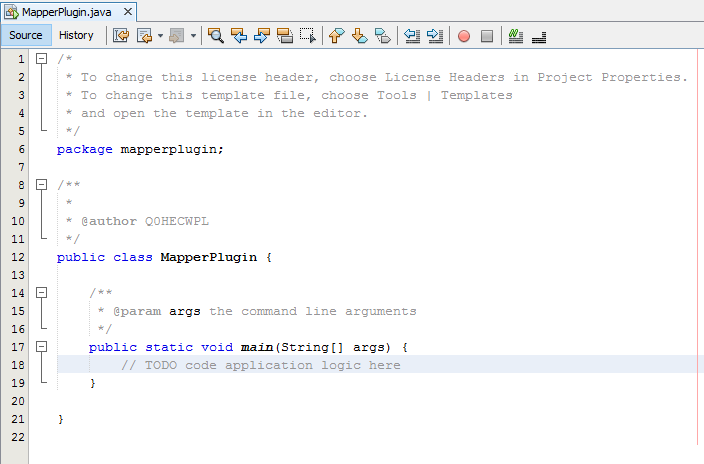
Code Example 3 MapperPlugin.java
We need to add some reference jars located within the HEC-WAT directory under the jars folder. To add the jars, right click on the Project node in the Project pane, and select Properties.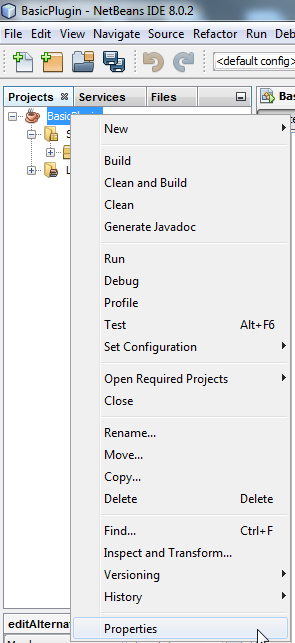
Figure 15 The Properties Node
The Properties Editor will appear. In the left-hand pane, select Libraries then click Add Jar/Folder. 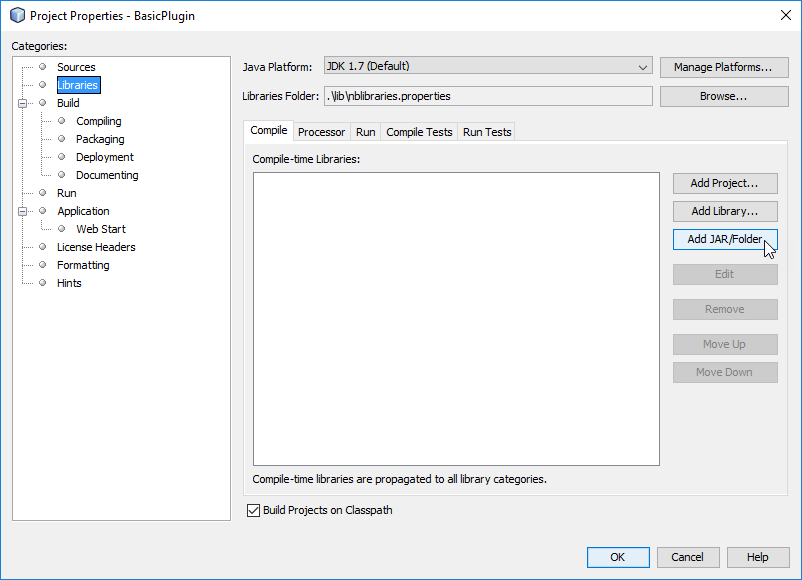
Figure 16 The Properties Editor
Browse to HEC-WAT/jar and select the following jars:
hec.jar, hecnf.jar, hecnfPlugin.jar, rma.jar, rmadev.jar, watModel.jar and wat.jar.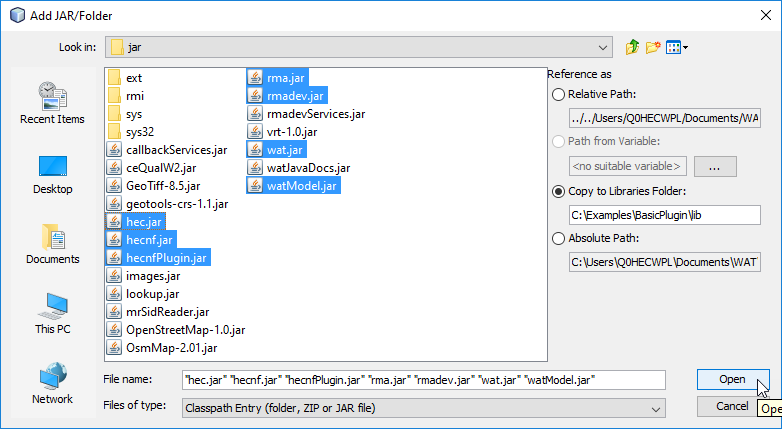
Figure 17 Adding jars
Click Add Jar/Folder, go into the sys folder and select jdom-1.0.jar.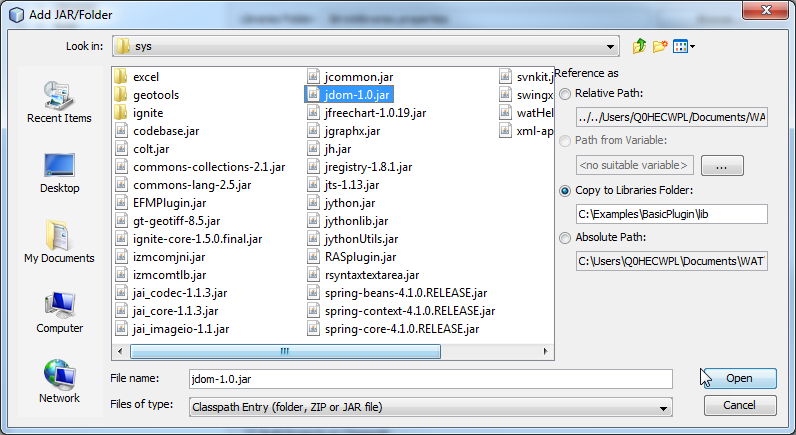
Figure 18 Selecting jdom-1.0.jar
Your Project's properties should look like Figure 19.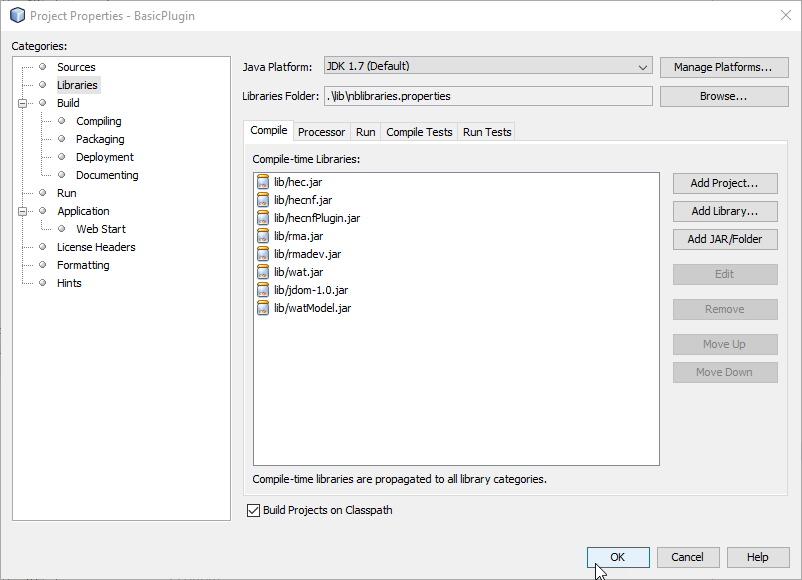
Figure 19 Project Properties with selected jars
This plug-in will extend AbstractPlugin from the hec2.plugin package and implement the hec2.wat.plugin.SimpleWatPlugin interface. After adding that to the class definition, the project should look like this: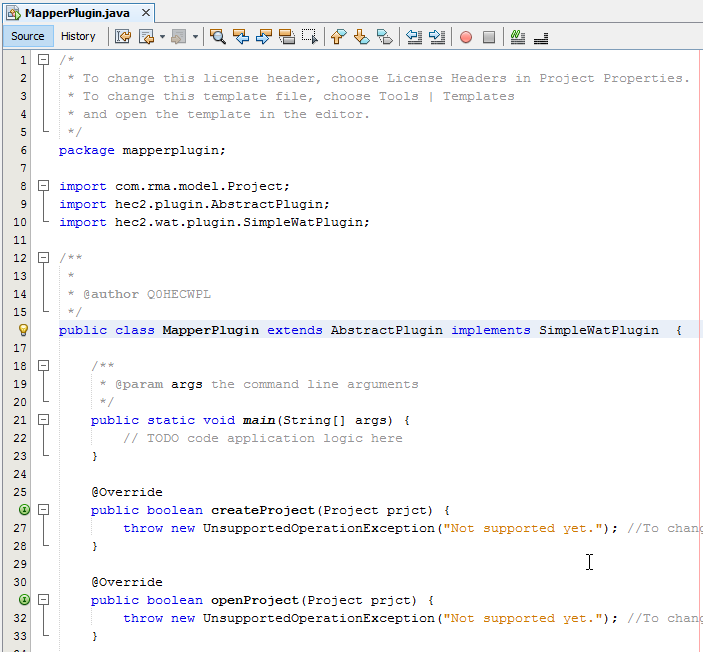
Code Example 4 Extending AbstractPlugin from the hec2.plugin Package
Our next task is to implement all required methods.
To begin, add some static final strings for the name of the plug-in, the short name for the plug-in, and the version of the plug-in.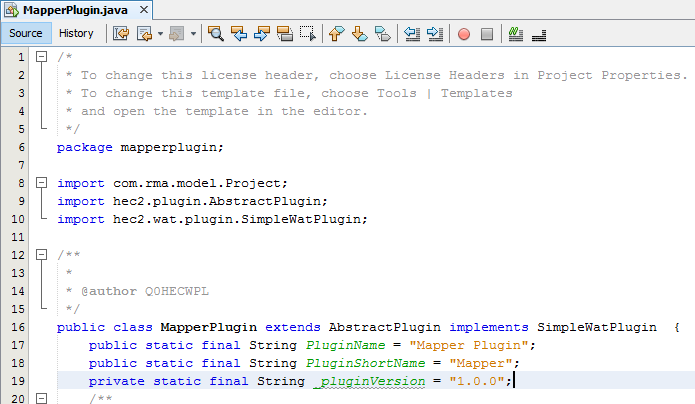
Code Example 5 Adding Static Variables
Next, initialize the Mapper Plug-in in the constructor and create an instance of the plug-in in the main sub. This step will require adding an import for the hec2.wat.plugin.WatPluginManager.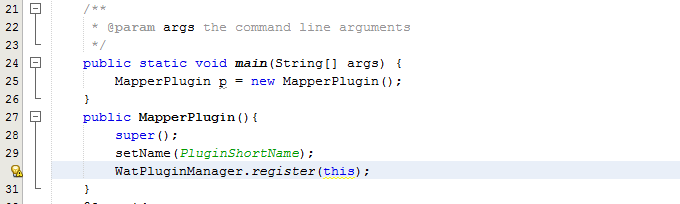
Code Example 6 MapperPlugin Constructor
We have set the name of the plug-in, initialized any abstract elements, and registered with the WatPluginManager. To give the user access to the plug-in from the WAT user interface, the plug-in needs to be added to some graphical element of the user interface. An easy place to store a utility tool like this is the tool bar. A simple method is added to the class to add the plug-in as a BrowserAction to the toolbar menu of the WAT user interface. The code being added requires added imports for com.rma.client.Browser, com.rma.client.BrowserAction, hec2.wat.client.WatFrame, javax.swing.Action, javax.swing.Icon, and rma.swing.RmaImage.
Code Example 7 Additional MapperPlugin Initialization
There are a few items worth noting here:
- The isAppInstalled() method has not been defined (we will define it next).
- An icon is set using the path Images/ this is in the images jar stored within the jar folder of the WAT. If you wish to add your own icon, open images.jar, insert the image, and re-compress the file. In this case an image called "Globe_20.png" was added to the images.jar root directory. Images in the toolbar are 20 x 20. If you provide a larger image, the toolbar will grow to fit the image which may impact the look and feel of the toolbar in a negative way.
- In the creation of the BrowserAction, the action is identified by the fourth argument on the constructor. Each plug-in needs a unique name for the BrowserAction. A good practice is to include the plug-in name in the name of the action. The method backing the string needs to be included in the class with the same spelling and capitalization. We will make this method in one of the following steps.
To determine if the application is installed, we will need to define the path to the application. Within HEC-WAT there are two main locations where applications live: the apps directory at the same level as the HEC-WAT directory and the ext directory where all plug-in jars are stored. We are going to store the application in the ext folder in a sub directory called Mapper and the executable will be called MapperView.exe.
In official installations, it is possible that the user will not have admin rights to modify the directories in the HEC-WAT folders — the plug-in developers should consider this as they are developing their applications.
We need to add the appropriate file path to the application as a private variable to the plug-in. 
Code Example 8 Defining Executable path
Right-click isAppInstalled() and let the IDE add the method at the bottom of the class and implement it.
Code Example 9 Implementing isAppIppInstalled()
This method will add an import for com.rma.io.FileManagerImpl. getApplicationPath() is a method we need to add. This is written so that we can get the application path in two different locations within the plug-in, determine if the application exists, and launch it later.
Code Example 10 Implementing getApplicationPath()
This method will add an import for hec.appInterface.AppDaddy. From the AppDaddy class we are able to get the current application (HEC-WAT) and the working directory where the HEC-WAT.exe is stored. From there, we add jar/ext/Mapper/MapperView.exe to fully qualify the path to the mapper executable. This step of identifying the working directory ensures that the directory is the WAT directory instead of using other methods supplied in java.IO because some other developers in other applications may modify the current working directory.
Our next task is to implement the displayApplication() and displayApplicationUnique() methods. This will launch the application when the button in the toolbar is pressed.
There is no information directly provided via injection in the displayApplication() method required by the SimpleWatPlugin interface. However, through the use of some of the RMA libraries, one can determine pertinent information about the current state of the WAT.
The simplest thing to do in this case is launch the mapping application via command line with no variation based on the status of the current WAT instance. The code to do that will look something like this:
Code Example 11 Implementing displayApplication()
This requires an import for java.lang.IOException. A private variable of type Process was added to keep a pointer to the process that was initialized to shut down the process if WAT requests the application to shut down.
Code Example 12 Adding Process member
This can be accomplished through the Close() method.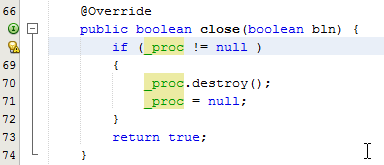
Code Example 13 Implementing close( )
It is possible to connect this plug-in closer with the WAT instance in a few different ways. For instance, determining whether an existing project is opened and whether the existing project has a map window. If there is a map window, we can use that map window to define a list of shapefiles to add to the mapper program through the mapper plug-in. For all of this to work, the mapper program needs to be able to accept command line arguments of the shapefile paths to be able to display the shapefiles in the mapper's map window.
The following code determines the list of shapefiles in the map window, if there is a current project with a map window open, and constructs a string that will provide the shapefiles as a command line argument:
Code Example 14 Determining the shapefile list in the map window
This mapper produces the following result: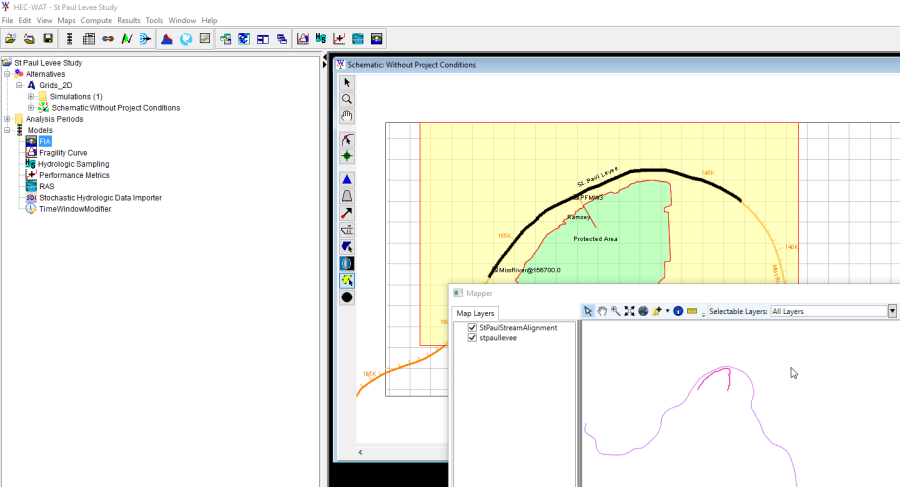
Figure 20 Mapper Result
There are a few additional details that need to be finalized. There are a handful of methods that have not been implemented:
- boolean createProject(Project prjct)
- boolean openProject(Project prjct)
- String getProjectName()
- boolean saveProject()
- String getLogfile()
- String getVersion()
- String getDirectory()
None of these are absolutely necessary to create a utility program, but each can provide a variety of useful features. For this tutorial they are implemented as seen below: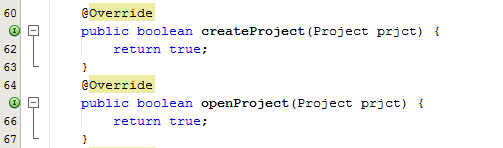
Code Example 15 Implementing openProject() and createProject()
Code Example 16 Implementing getProjectName(), saveProject(), getLogFile()
Code Example 17 Implementing getVersion(), getDirectory()
Please conduct the following steps (based on section 1.5.3 and 1.5.4) to ensure the correct main class can be found by the WAT in the manifest file.
Update the manifest file to contain a directive for HEC-WAT to know what main class to use for the plug-in file. You can accomplish this in many ways, but the simplest is to update the file using a text editor.
Browse to the project directory with your file explorer. Open the manifest.mf file in any text editor and insert the following line WatPluginMainClass: basicplugin.MapperPlugin. Your main class will be dependent on the name of your project and main class.
After this step is completed, build your project. If you go to the dist directory of your project directory using a file explorer, you can copy your jar file and paste it into the HEC-WAT v1/jar/ext/ directory. You should see your plug-in in the plug-in list next time you launch WAT.