In ResSim, reservoirs are complex elements that are made up of a variety of other elements (or components). The elements that make up a reservoir fall into two categories — release elements and property elements. A Release Element is a physical feature of a dam or reservoir that can take water away from the reservoir pool and put it somewhere else in the network, usually into the downstream river system. The release elements include the reservoir itself, the dam, all the outlet types, outlet groups, and diverted outlets. A property element describes some physical aspect of the reservoir, such as the size and shape of the reservoir pool. The property components include the pool, evaporation, seepage, leakage, tailwater elevation, and forebay head loss.
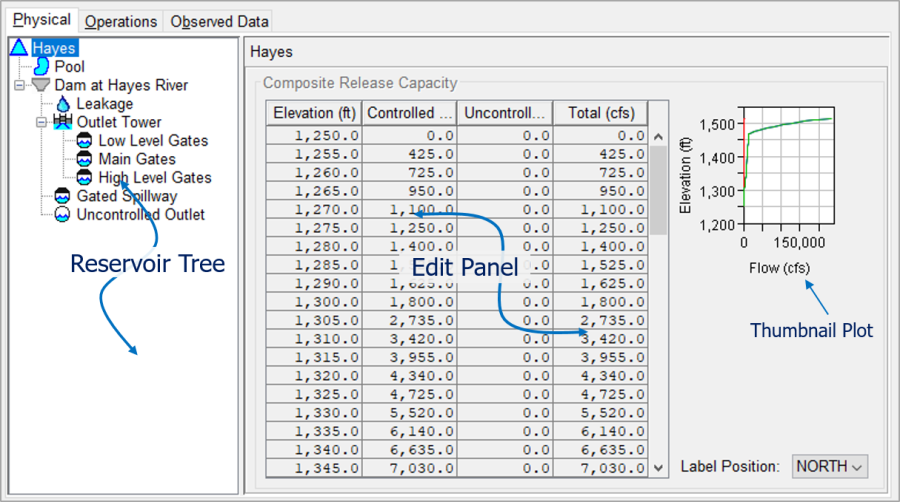
The Physical tab of the ReservoirEditor uses a "tree structure" to represent the hierarchical relationship between the reservoir and its elements. This tree structure is called the Reservoir Tree and is shown at the left side of the Physical Tab of the Reservoir Editor.
The Reservoir Editor
Figure: Reservoir Editor—Physical Tab
The Reservoir node is the root of the Reservoir Tree. By default, each reservoir has two elements:
the Pool and
the Dam
which appear as nodes immediately below the Reservoir in the Reservoir Tree.
Other Elements that can be added to the Reservoir Tree include:
Controlled Outlets,
Uncontrolled Outlets,
Power Plants,
Pumps,
Outlet Groups,
Diverted Outlets,
Water Quality Control Device
Evaporation, Seepage, and Leakage losses, and
Tailwater Elevation and Forebay Head Loss specifications.
When an element is added to a node in the Reservoir Tree, the receiving node spawns a branch in the tree (if it doesn't already have one) and the new element becomes a node on the branch. Almost all components of a reservoir are added to the Pool, the Dam, an Outlet Group, or a Diverted Outlet branch of the Reservoir Tree. Element nodes cannot be added to the reservoir node itself — with one exception — a diverted outlet. See Section 9.5.1for details on adding a diverted outlet to the reservoir.
But the Reservoir Tree is more than just an illustration of the reservoir hierarchy; it is the user interface mechanism you will use to access the data for the various components of a reservoir.
When you select an element (node) in the Reservoir Tree…
The Edit Panel to the right of the Reservoir Tree will display the edit pane for the selected component. At the top of each edit pane is the fully-qualified name of the selected element. The rest of the edit pane will contain the data entry fields for specifying the data needed to define the selected element.
An elementmenu will appear in the Menu Bar of the Reservoir Editor. For example, when you select the Dam in the reservoir tree, a Dam menu appears in the menu bar. Each element menu contains options pertinent to the selected element in the Reservoir Tree.
And, when you right-click on any element in the Reservoir Tree, a context menu will appear, giving you access to the same options that are available from the element menu that will appear in the Menu Bar.
The order in which you add elements to the reservoir (tree) and edit their properties is flexible. You can add all the physical elements to the reservoir then go back and define each element's properties, or you can define the properties of each element as you add it, before going on to add and edit the next element. Choose the style that works best for you. Just be sure to finish defining the physical representation of your reservoir before going on to define its operational data (Chapter 10), as the definition of the operational zones depends on the physical definition of the pool and the rules depend on the description of the outlets.