Download PDF
Download page Defining the Stream Alignment.
Defining the Stream Alignment
You have two options for defining the stream alignment. You can:
- Digitize (draw) each stream by hand
- Import your stream alignment from a GIS shapefile.
Although it is not necessary, you may find it useful to display a background map of the river system as a guideline for drawing the streams for your stream alignment. If your stream alignment is going to be imported from a shapefile, that shapefile should already have been added as a map layer in the watershed. See "2024-06-23_11-53-56_.Adding Background Maps v3.5" or "Working with Map Display Layers" to learn how to add map layers to your watershed.
To be useful as a guide for drawing the stream alignment, the map layers should contain water features, such as stream channels and reservoirs or lakes. Also, by adding at least one background map layer to the watershed, you have implicitly established the coordinate system and units of the watershed; the stream stationing of your stream alignment will be determined by the watershed coordinate system and units. See "2024-06-23_11-52-56_.Watershed Setup and Configurations v3.5" for more information about specifying the watershed coordinate system and units.
Drawing the Stream Alignment
The following are the steps for digitizing a stream alignment. (See "Importing a Stream Alignment" for details on importing the stream alignment.)
To create a stream in the stream alignment:
- Select the Stream Alignment Tool
 from the Toolbar.
 - Determine an upstream location where you want to start a stream element.
- Hold down the Ctrl key. Starting at the upstream end, draw the first vertex of the stream element by clicking the left mouse button.
While continuing to hold down the Ctrl key continue moving the cursor downstream and clicking the mouse button to place more vertices and thus draw more of the stream element "Figure: Drawing a Stream Alignment".

Figure: Drawing a Stream Alignment
To place the last point of the stream, release the Ctrl key, then click at the last downstream location. An ending stream node will be created at the last point of the stream element.
The Create New Stream dialog ("Figure: Create New Stream") will open after you place the last point of your stream. Enter a name (and an optional description) for the stream element, then click OK to close the Create New Stream dialog.
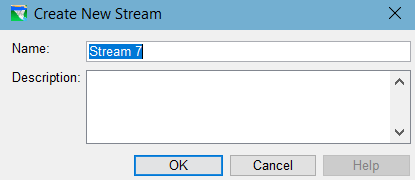
Figure: Create New Stream
Repeat these steps to add more stream elements to your stream alignment.

When drawing the stream of your stream alignment…
- Draw the mainstem (primary river) of your watershed) first.
- Draw the major tributaries (of the mainstem) next.
- Then draw the minor tributaries (of the major tributaries), etc.
To create a Stream Junction at a confluence (or bifurcation):
Place the last (or first) point of the stream you are drawing directly on an existing stream.
After naming the new stream, the Connect Stream Reaches dialog ("Figure: Connect Stream Reaches") will appear. You must determine whether you want to connect the new stream to the existing stream. Click Yes if you want the two stream elements connected. If you selected No, and if there are other existing streams that are possible candidates for connecting your new stream element to, then a subsequent Connect Stream Reaches dialog will appear to give you the opportunity to connect to the next existing stream.

Figure: Connect Stream Reaches
When multiple stream elements are connected (e.g., at a confluence), a stream junction is automatically created. A stream junction looks like a stream node highlighted with a bright green circle (a "bright green halo") as shown in "Figure: Stream Junction".

Figure: Stream Junction
- Once you have completed the creation of your stream alignment, save your work. From the File menu, select Save Watershed and the stream alignment for your watershed will be saved.
Importing a Stream Alignment
Since creating and editing the stream alignment is a Watershed Setup activity, the stream alignment Import feature is only available in the Watershed Setup Module. It can be found in the Watershed menu in a submenu under the Import option.
The Importer can only import streams from a GIS shapefile containing polylines that represent the stream system of your watershed. The polylines in the shapefile must have an attribute that is the name of each stream, and each stream must form a single contiguous line. In addition, the Importer has been designed to look for appropriate shapefiles from the active map layers of your watershed. Although not required, before importing, you should first add the shapefiles that represent the centerlines of the rivers and creeks of your watershed as map layers and make them active. Refer to "2024-06-23_11-53-56_.Adding Background Maps v3.5" for instructions on "Adding a New Map Layer" to your watershed.
To import a stream alignment:
- You must be in the Watershed Setup module.
- If you haven't already, use the Layer Selector (View menu) to add the relevant shapefile as a map layer and make it active (check it on).
- From the Watershed menu, select Import, and then select Stream Alignment from the Import submenu.
The Import Stream Alignment dialog ("Figure: Stream Alignment Importer") will open.

Figure: Stream Alignment Importer
- The Shapefile Name selector (drop-down list) should show the name of one of the active line shapefile map layers that have been added to your watershed. If the first entry is not the desired shapefile, select the correct one from the drop-down list.
Note: if the desired shapefile is not in the Shapefile Name selection list, then it is not an active map layer in the watershed. However, you can still import from a shapefile that is not a map layer in the watershed:From the File menu of the Importer, select Choose Shapefile. The Choose Shapefile dialog ("Figure: Choose Shapefile for Importing Stream Alignment") will open. Browse to the folder containing the shapefile you want to add, select it, and click OK.

Figure: Choose Shapefile for Importing Stream Alignment
- Once the correct shapefile has been chosen, select the appropriate attribute that identifies the individual streams from the Database Field Name selector. This is typically a "name" attribute or field.
- The Importer automatically searches for an attribute of Stream_ID; if it doesn't find one, it will select the first attribute in the selection list by default. You should review the available attributes in the selection list to find the one that contains the names of each stream.
- The table below the Database Field Name selector will fill with the values of the selected Database Field Name (attribute). Hopefully, these values will reflect the names of the streams in your watershed.
If the polyline(s) identified by each displayed attribute value forms a single contiguous line, then the checkbox in the Import column of the table will be set (checked). If there is something wrong with the line that represents a stream, the checkbox will not be set, and ResSim will not import that stream element.
You can view the streams before Importing!!!
- Move the Import Stream Alignment dialog (the Importer) so that it doesn't overlap the main ResSim window. You need to be able to see the Map Display Area.
- Click (select) a row in the table of attribute values.
- The polyline(s) identified by the attribute value in the selected row will highlight in red in the Map Display. Even polylines that the Importer has identified as "non-contiguous" and won't import can be highlighted in this manner—making them easy to identify and review.
Note: Only active map layers are visible in the Map Display so you cannot view streams from a shapefile you have selected with the Choose Shapefile browser opened from the Importer's File menu.
- The Gap Tolerance ("Figure: Stream Alignment Importer") value is used to enable the Importer to create stream junctions (connections) between connect stream elements that have a gap between the end point of one stream and the nearest line segment or endpoint of another stream. By default, the Gap Tolerance is set to zero (0.0), so ResSim can only connect streams where the endpoint of one stream is exactly coincident with a stream segment or vertex of another stream. If you click Gap Tolerance, then you need to enter a value larger than zero in the Gap Tolerance box, which will allow ResSim to connect streams that might have a larger gap between them.
- The Replace Existing Stream Alignment box, allows you to replace the existing stream alignment with the one being imported from the selected ArcView® shapefile.
- Once everything is set, click Import. The stream alignment will be automatically drawn in the display area. From the File menu, choose Close and the Import Stream Alignment dialog ("Figure: Stream Alignment Importer") will close.