Download PDF
Download page Creating and Managing Reservoir Networks.
Creating and Managing Reservoir Networks
ResSim provides three ways to create a reservoir network:
- create a new network,
- make a copy of an existing network, and
- import a network from another watershed.
But, before you start creating reservoir networks, it is important to understand how they relate to watershed configurations and the watershed schematic(s) you created in the Watershed Setup module.
ResSim was designed to fully implement the shared schematic concepts that are the basis of the Watershed Setup module and watershed configurations. To that end, ResSim's reservoir networks were designed to be created using a watershed configuration as a template. Using a configuration as a template means that ResSim will create model elements in the reservoir network for each watershed schematic element it recognizes in the selected configuration. Thus…
- For each reservoir in the configuration, ResSim will create a reservoir with the same name and position on the stream alignment in the new network.
- For each diversion from a stream in the configuration, ResSim will create a diversion with the same name, shape, location, and connectivity in the new network.
- For each diversion from a reservoir in the configuration, ResSim will create a diverted outlet the associated reservoir in the new network. The diverted outlet will have the same name, shape, location, and connectivity as the diversion in the selected configuration.
In addition, for each computation point defined in the watershed schematic, ResSim will create junctions in the reservoir network when a reservoir network is created based on a configuration.
Each of the network elements that were created based on a watershed schematic or configuration element stores a reference or link to the element it was based on. By maintaining this information, a network can be updated to reflect any changes that have been made to the watershed schematic or configuration since the network was first created.
Once the preliminary model schematic for a new network appears in the Map Display, you will need to add routing reaches (and possibly other network elements) to complete the connectivity of your reservoir network schematic.
Creating a New Network
When you create a new reservoir network, you can (and should) identify which projects will be included in your network by selecting an appropriate watershed configuration. After creating the network (based on a configuration), you will need to add additional elements to complete the connectivity and to represent any additional features that were not identified by the configuration.
To create a new reservoir network:
From the Network menu, select New.
The Create New Reservoir Network dialog will appear ("Figure: Create New Reservoir Network").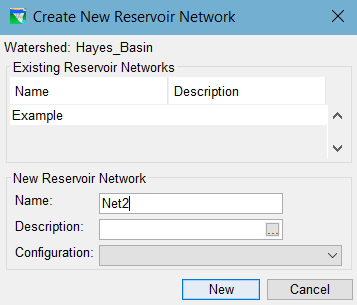
Figure: Create New Reservoir Network
Enter a Name and a Description for the network.
- From the Configuration list, select the configuration on which this network will be based.
Click New.
If no configuration was selected, a warning dialog will ask you to confirm that the network will not be based on a configuration ("Figure: Creating a New Network with no Configuration Selected").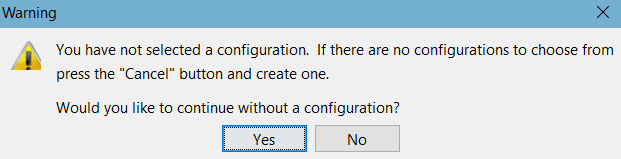
Figure: Creating a New Network with no Configuration Selected
- Click Yes to proceed without a configuration. If you do not use a configuration when creating your network, you will have to create all the model schematic elements for your network.
- Click No to return to the Create New Reservoir Network dialog so that you can select a configuration.
After you (and ResSim) complete the process of creating a new network, you will see the name of your new network and the configuration it was based on displayed below the Module Toolbar. Also, the reservoirs, junctions, and diversions that ResSim created in your network based on the configuration will appear in the Map Display area.
Note: A reservoir network can be created without specifying or selecting a configuration. If you do so, you will have to add each model schematic element into your network by drawing them, one by one, in the Map Display area. And, networks created without a configuration cannot be updated based on changes in made to a configuration nor can a configuration be applied to or imposed on them.
Importing a Reservoir Network
The Import Network Wizard guides you through the process of importing a reservoir network from another watershed. For each step of the process, the Import Network Wizard displays a different dialog panel. Each panel identifies the current Step in the title bar and tells you what the objective of the step is with a label in the upper left corner of the panel (below the title bar). The process involves six steps:
- Select the Watershed—select the source watershed that contains the network you want to import into your current watershed.
- Select the Network to Import Elements from—select the source network.
- Set New Network Name—the process of importing a network creates a new network in your current watershed, so you are given the option to give the new network a new name and description.
- Assign Stream Names—associate streams in your current watershed's stream alignment to the schematic elements in the network you are importing.
- Resolve Network Computation Points—associate computation points in your current watershed schematic to the junctions in the source network.
- Review the Import Summary and Finish—this step shows you a listing of the current stream or computation point associations you made for the various elements of the network you are importing. It also shows what elements, if any, have not been associated to elements in your current watershed. Be sure to review the summary carefully.
To import a network:
- Select Import Network… from the Network menu.
The Import Network Wizard will open and display the Step 1 of 6 panel ("Figure: Import Network Wizard - Step 1 - Select the Watershed"). This panel shows two tables.
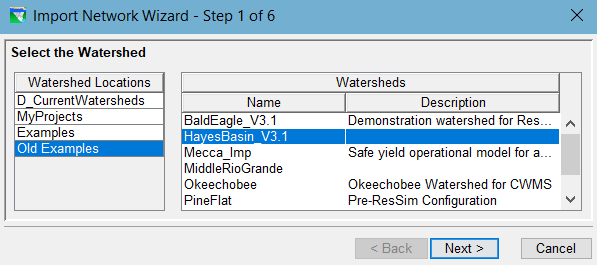
Figure: Import Network Wizard - Step 1 - Select the Watershed
- The first table lists the Watershed Locations (shortcuts) you currently have defined in ResSim. Select the appropriate watershed location.
The second table lists the Watersheds that ResSim found at the selected watershed location. Select the watershed that contains the network you want to import.

Note: The Import Network Wizard is only capable of identifying watersheds in known watershed locations. If you do not have a watershed location (or shortcut) already defined in ResSim for the location where your source watershed resides, you must create one before you can proceed with the network import process. Instructions for creating a shortcut/watershed location are provided in Defining a Watershed Location and in ResSim Application Settings.
- Click Next> to proceed to the next step (or Cancel to abort the import process and exit the Import Wizard).
The Import Network Wizard will display the Step 2 of 6 panel ("Figure: Import Network Wizard - Step 2 - Select the Network to Import Elements from"). The Select the Network to Import Elements from panel shows the name of the source Watershed you selected and a list of the Available Networks it contains.
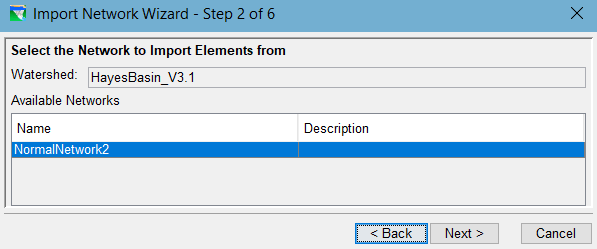
Figure: Import Network Wizard - Step 2 - Select the Network to Import Elements from
- Select the source network (from which you would like to import all its elements).
- Click Next> to proceed to the next step or <Back to return to the previous step.
The Import Network Wizard will display the Step 3 of 6 panel ("Figure: Import Network Wizard - Step 3 - Set New Network Name and Description"). The top half of the Set New Network Name and Description panel shows the name of the current watershed and a list of the networks that exist in it. The bottom half has two textboxes which contain the name and description of the source network.
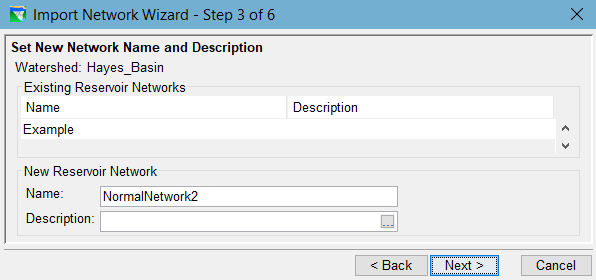
Figure: Import Network Wizard - Step 3 - Set New Network Name and Description
- You can let the New (imported) Reservoir Network have the same name and description as its source or you can enter a new Name and Description.
- Click Next> to proceed to the next step (or <Back to return to the previous step.)
The Import Network Wizard will display the Step 4 of 6 panel ("Figure: Import Network Wizard—Step 4—Assign Stream Names"). The Assign Stream Name panel shows the name of the current Watershed as well as the name you specified for the New Network and the name of the Import From (source) Network. This panel also contains a table showing a list of the network Elements to be Imported, their Element Type, and the (From) Stream they are associated with in the source watershed.
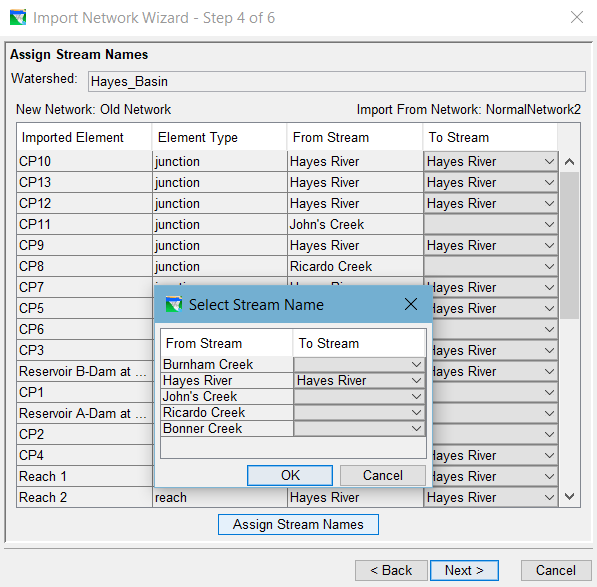
Figure: Import Network Wizard—Step 4—Assign Stream Names
- In the last column of the table, you will associate a stream in the current watershed to each element in the list. If any of the streams in the current watershed have the same name as a stream in the source watershed, ResSim will assume they are the same stream and will fill in those cells of the table for you. You have two options for assigning streams to each element:
- Assign the streams, one at a time, to each element in the list by selecting an appropriate steam from the drop-down list in each cell. Or…
- Assign the streams all at once by clicking the Assign Stream Names button, then, for each stream listed in the From Stream column in the Select Stream Name dialog, select a stream from your current watershed from the selection list in each cell in the To Stream column. When done, click OK. The importer will use the associations you made to complete the To Stream column of the Assign Stream Names table.
- Click Next> to proceed to the next step (or <Back to return to the previous step).
The Import Network Wizard will display the Step 5 of 6 panel ("Figure: Import Network Wizard—Step 5—Resolve Network Computation Points"). The Resolve Network Computation Points panel starts by identifying the current watershed which is followed by a selection list of the available configurations. Select the configuration that you want the new (imported) network to be associated with.
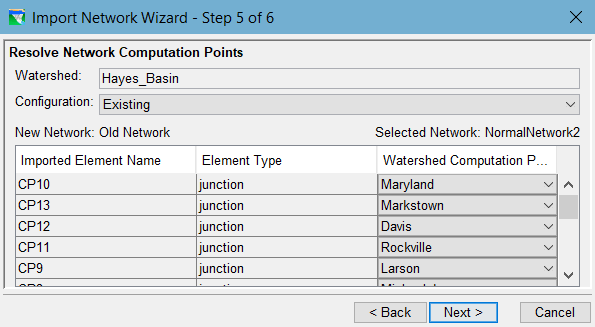
Figure: Import Network Wizard—Step 5—Resolve Network Computation Points
- The Resolve Network Computation Points panel also includes a table containing a list of the model schematic elements to be imported from the source network. Your objective is to associate each element with a watershed schematic element from the selected configuration in the current watershed. Use the drop-down list in each cell to make your selections. This can be a tedious process so take your time.
- Click Next> to proceed to the next step (or <Back to return to the previous step).
The Import Network Wizard will display the Step 6 of 6 panel ("Figure: Import Network Wizard—Step 6—Import Summary").
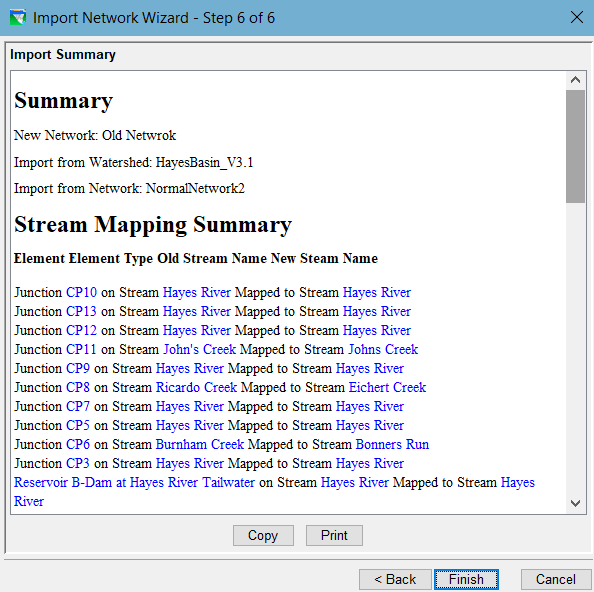
Figure: Import Network Wizard—Step 6—Import Summary
Review the Import Summary carefully. This is your last chance to double-check all the work you put in mapping (associating) the imported elements to streams and configurations.
Select Finish to carry out the Network import, or select Back to make changes in previous steps. A confirmation dialog will open…
Select Yes in the Continue with Import dialog ("Figure: Continue with Import") to perform the import. Or…
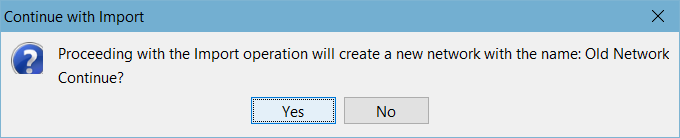
Figure: Continue with Import
Select No to return to Step 6 of 6 of the Import Network Wizard. From there, you can go <Back to a previous step to revise one or more entries or Cancel the process and exit the Wizard.
- Review the imported network carefully. The Importer is good but not perfect. Areas for careful review include:
- Any rule, constraint, or condition that is a function of a time series (model, state, or external variable)—the links may look okay, but it wouldn't hurt to reset them.
- Downstream connectivity—any rule or feature that identifies another element in its setup should be reviewed. These features include downstream control rules, tandem rules, pump rules, and tailwater definitions.
- Any state variable or scripted rule—scripts often reference other model elements, but the importer does not have the ability to revise the names of those elements in the scripts during the import process.