Part 2 - Setup HEC-WAT for a Deterministic Compute
Part 2.1 - Create an Analysis Period
Now that we have run all the models in the base directory and made decisions about computational timestep, we need to set up HEC-WAT to run a deterministic compute with all the models running in sequence.
An HEC-WAT compute requires an HEC-WAT alternative, an analysis period, a program order, and model alternatives.
To create an analysis period:
1. From the HEC-WAT main window, click on the Study tab, from the Study Pane, right-click on the Analysis Period folder. From the shortcut menu, click New.

2. The Create New Analysis Periods dialog box will open. In the Name box, enter a name (RR_Jan1997). In the Time Window box, enter the information required for the time window.

3. For the Start Date (25Dec1996) and End Date (09Jan1997), enter in the format ddmmmyyyy. The Start Time (2400) and End Time (2400) should be entered as military time - e.g., 0000, 0600, 1300 (1 p.m.), 2400 (midnight).
4. Click OK to create the new analysis period.

Part 2.2 – Setup Lookback Window – HEC-ResSim
The time window for an HEC-ResSim run has two parts, a "lookback period" and a "simulation or forecast period". The lookback period is used by HEC-ResSim to "warm up" a ResSim model alternative. During this period, routing of flows through the river and reservoir network are performed but no release decisions are made nor are any mass balance computations evaluated. The user should think of the lookback period as the time to establish the state of the river network and the starting conditions of the reservoirs. The simulation period is the portion of the time window during which HEC-ResSim simulates reservoir operations and makes release decisions based on the operation scheme defined by the user. Releases are then routed through the river network, combining with local inflows along the way.
Since HEC-WAT and most of the models treat the analysis period as a single, continuous time window. For this reason, a setup step is required for each HEC-ResSim alternative in an HEC-WAT study. The setup step lets each HEC-ResSim alternative know how much of the analysis period to use for the lookback period.
To setup the lookback period:
1. From the HEC-WAT main window, click Edit | ResSim | Lookback Window.

2. The Lookback Window dialog box will open.

3. The table displays the HEC-ResSim model alternatives that are available in the HEC-WAT study. Each model alternative that is being used in an HEC-WAT simulation will need to have a lookback window set. For this workshop, select the HEC-ResSim model alternative RT-Normal2, and define a TimeStep of 1 Hour and Lookback Steps of 6.
Note: The time step can be selected from the TimeStep column, in each cell there is a list of available time steps for the user to select. The selected time step has to match the time step that was specified for the HEC-ResSim model alternative as part of the alternative's original run control data (which is located in the HEC-ResSim Alternative Editor). The number of lookback steps must be entered in a cell in the Lookback Steps column. At least one lookback time step is required for an HEC-ResSim model alternative to compute, however more lookback steps may be needed, depending on a variety of factors in the ResSim model alternative's operating scheme. The HEC-ResSim modeler should be consulted to determine the minimum lookback window needed by each alternative.
4. Click OK, a Missing Lookback Info window will open. This message window is letting the user know that lookback information for the other ResSim model alternatives have not been set. For this example, the user is only using the RT-Normal2 model alternative, click OK to close both dialogs.

Part 2.3 – Program Order
HEC-WAT allows for a flexible set of programs, computation order, and data flow through the establishment of a program order. Once a program order has been chosen for an HEC-WAT study, changes should not be made to the program order as this could cause a disruption in the flow of data and invalidate any existing work.
Currently in HEC-WAT Version 1.1 the default program order is - HMS, ResSim, RAS, FIA. We will need to change the Program Order to remove FIA. For further details on Program Order, review Chapter 11 (Section 11.1) of the HEC-WAT User's Manual.
- Select the Program Order Icon in the menu. The Program Order window will open.

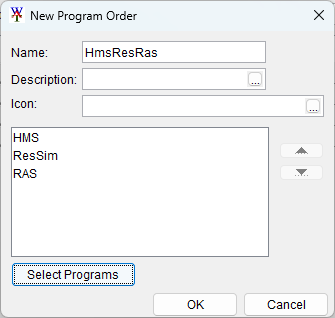
- Select Program | New. The New Program Order window will open.
- Name the program order HmsResRas. Choose Select Program to select the Plugins.
- Add HMS, ResSim, and RAS to the Selected column. Select OK to close the window.

- The Program Order should look like the following image. Select OK to close the New Program Order window.
Part 2.4 – Create an HEC-WAT Simulation
Now that all the building blocks have been configured (alternative, analysis period, program order, models), the user can now create an HEC-WAT simulation. To create an HEC-WAT simulation:
1. From the HEC-WAT main window, from the Study Tree, expand Alternatives and WO, right-click on Simulations and click New from the shortcut menu. The Create New Simulation dialog box will open.
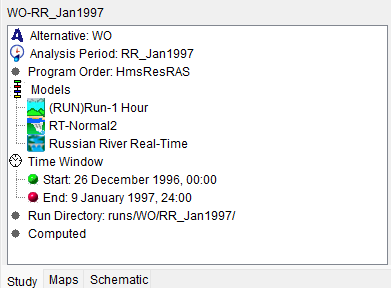
2. Enter a name for the simulation (WO-Jan1997) in the Name From the Analysis Period list, select RR_Jan1997.
3. A program order needs to be selected. From the Program Order list, make sure HmsResRas is selected as the program order.
4. In the Models table, the software applications that were defined in the program order appear in the order the software applications were selected. Now the user must select the appropriate alternative (plan, run) for each software application. From the Alternative column, from the list for HMS, select the appropriate HMS run ((RUN)Run-1 Hour). Repeat the process for the other software applications.
Below is the list of the appropriate alternatives for the RussianRiver study:
- HMS – (RUN)Run-1 Hour
- ResSim – RT-Normal2
- RAS – Russian River Real-Time
5. Now that all the model alternatives have been selected, click OK. The Create New Simulation dialog box will close.

6. From the HEC-WAT main window, the created simulation appears on the Study Tree, under the Simulations folder, click on the simulation.

The Content Pane displays information about the selected simulation.
7. Double click on the simulation name (WO-Jan1997), a Select Map dialog box will open. Click New Map Window, click OK. The Select Map dialog box will close. The new map window will contain the schematic elements that represent the simulation.
'
Part 2.5 – Linking 
The next step is to have the models of a simulation communicate with each other. This is accomplished by linking (DSS mapping) the models thru DSS and using a simulation name. From HEC-WAT, the Model Linking Editor provides a way to link models including observed data and provides a mechanism where the linking will have to be done once per alternative.
For this workshop, the Model Linking is already set up for you.
Review Linking the HEC-HMS Model Alternative
1. To save time in this workshop, the HEC-HMS model linkages have been defined in a reference file for you.
2. From the HEC-WAT taskbar click ![]() to open the Model Linking Editor. From the Model to Link list select HMS-(RUN)Run-1 Hour. The Model Linking Editor table will now display all but one of the locations for the HEC-HMS model alternative. This is because the .dsv file has been manually added for you. Typically linking an HEC-HMS model about this size will take around twenty to thirty minutes.
to open the Model Linking Editor. From the Model to Link list select HMS-(RUN)Run-1 Hour. The Model Linking Editor table will now display all but one of the locations for the HEC-HMS model alternative. This is because the .dsv file has been manually added for you. Typically linking an HEC-HMS model about this size will take around twenty to thirty minutes.

3. From the File menu, click Save; alternatively click ![]() from the toolbar.
from the toolbar.
Review Linking the HEC-ResSim Model Alternative
1. From the Model Linking Editor, from the Model to Link list select ResSim-RT-Normal2. The Model Linking Editor table will display the linking for the HEC-ResSim model alternative. This is the linking for the standalone HEC-ResSim model alternative; you will be linking the HEC-ResSim model alternative to results from the HEC-HMS model alternative.

2. In the table, highlight all the rows, click Default Model To Link. The Select Default Model To Link dialog box will open. From the Default Model To Link list, select HMS-(RUN)Run-1 Hour, click OK. The Select Default Model To Link dialog box will close.

3. A Confirm Input From Model changing to window will appear.

The window is asking the user to be sure before proceeding, click Yes. The Confirm Input From Model changing to window will close, and on the table, in the Input From Model column, HMS-(RUN)Run-1 Hour will display for the all the rows.

4. You need to verify that the linking is correct. HEC-WAT tries to match locations with the correct pathnames. When looking at the Coyote-Pool location in the table, the selected pathname is not correct. Click on Coyote-Pool, click Select Source Data, the Select Source Data Location dialog box will open. Browse the table for a location of Coyote and a parameter of Pool Elevation, select that row, click Set Location. Click Close to close the Select Source Data Location dialog.

5. When finished checking the linking, click ![]() from the toolbar. The Model Linking Editor should look like the following figure.
from the toolbar. The Model Linking Editor should look like the following figure.

Review Linking the HEC-RAS Model Alternative
1. From the Model Linking Editor, from the Model to Link list select RAS-Russian River Real-Time. The Model Linking Editor table will now contain all the locations for the HEC-RAS model alternative. The current linking that is displayed for the HEC-RAS model alternative is the linking for the standalone model. For this simulation the HEC-RAS locations will need to be linked to the HEC-HMS and HEC-ResSim model alternatives.

2. In the table, highlight all the rows. Click Default Model To Link, the Select Default Model To Link dialog box will open. From the Default Model To Link list, select HMS-(RUN)Run-1 Hour, click OK to close the Select Default Model To Link dialog.
3. A Confirm Input From Model changing to window will appear. The window is asking the user to be sure before proceeding, click Yes. The Confirm Input From Model changing to window will close, and on the table, in the Input From Model column, HMS-(RUN)Run-1 Hour will display for the all the rows.
4. There are two locations in the HEC-RAS linking that need to be linked to the HEC-ResSim model alternative. From the Model Linking Editor table click on DryCreek DryCreek RS 14.28 (Warm Springs Out) row and from the Input Model column, select ResSim-RT-Normal2. HEC-WAT finds the correct match, WarmSprings Outflow - Flow.
5. Repeat the input model ResSim-RT-Normal2 selection for the Russian CoyoteToDC RS 99.93 (Coyote Out); HEC-WAT finds the correct match, Coyote Outflow - Flow.
6. Once the linking is finished for the HEC-RAS model alternative, from the Model Linking Editor click ![]() , this will save the linking. That completes the linking for the HEC-RAS model alternative.
, this will save the linking. That completes the linking for the HEC-RAS model alternative.
