Download PDF
Download page Viewing of CWMS Data and Results.
Viewing of CWMS Data and Results
You can view data from the Acquisition Module and Visualization Module using plots or tables. You can view model results from the Modeling module through plots and reports (CWMS Results).
Plots
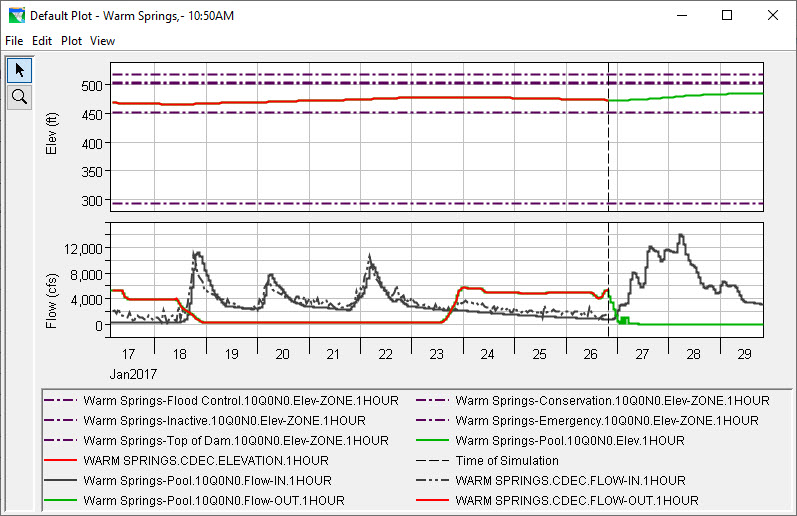
CWMS plots offer data and results specific to the active module. Data available to view is defined in the Setup module at time series icon locations (Time Series Icons). Modeling results can also be viewed at time series icons or at individual modeling elements (e.g., reservoirs). For example, in the Acquisition module, the plot for one time series icon might open a graph of incoming data at a specific location. In the Modeling module, the same time series icon might display reservoir modeling results at that location.

The plot displays the location name in the title bar, has axis labels, and a color-coded legend for the data contained in the plot. When a plot depicts results of a model alternative, a dashed vertical line represents the time of forecast. The Zoom Tool from the plot window operates the same as described in CWMS CAVI Main Window.
You can customize the appearance of plots through the use of several editors. To access these editors, use the Select Tool and right-click on different elements of the plot (e.g., lines, axis). You can also access these editors through the Edit and View menus in the Plot dialog. Plots provides further details on customizing plots.
- Curve Properties - right-clicking on a plot curve or point will open an editor where you can change curve colors, styles, and weights as well as labels and quality symbols.
- Viewport Properties - right-clicking on the viewport of a plot will open an editor where you can customize the border, background, and gridlines of the plot.
- Title Properties - right-clicking on a plot axis will open a title properties editor where you can customize the title of a plot.
- Axis Properties - right-clicking on a plot axis will open an axis properties editor where you can customize the axis scale and tic marks.
- Legend Properties - right-clicking on the legend of a plot will open an editor where you can add a title, icons, and text to the plot.
- Label Properties - right-clicking on an axis label or plot legend will open a label properties editor where you can add or change the background color of labels or add a border to the labels.
- Spacer Properties - right-clicking on the space between the plots will open an editor that allows you to adjust the space between plots (if you have multiple plots in your plot window).
- Polygon Properties - right-clicking on a polygon will open a polygon properties editor where you can customize borders and backgrounds.
Tables
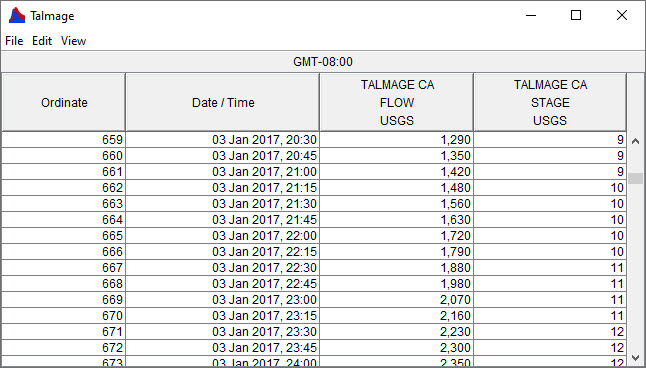
The same data and information viewed from a plot can also be viewed in tabular form. As with plots, the type of data and results displayed within a table depends on the properties you have defined for each time series icon. You can customize the appearance of tables through the use of commands available from the menu bar of the table dialog.

Photos and Webcam Images
Photos, webcam images, web pages, or documents can be assigned to time series icons. By adding them to an icon in the Setup module, you can access them in the Visualization, Acquisition, and Modeling modules through the icon shortcut menu. Images and webcams can be viewed in their own separate dialog or as icons on the map window. The example below displays an image that can be viewed from a time series icon. If a time series icon represents a dam, you could link to a webcam displaying a real-time video of an outlet on that dam. The time series icon could also have access to pictures of the dam and reports providing details about the dam. For more information on how to set up these features, see Time Series Icons.
![]()
Scripts
Scripts can be assigned to individual time series icons. The scripts can be used to update data at given intervals, compute other information from the data, or complete other tasks. Scripts are assigned to the icons in the Setup module, through the Time Series Icon Editor. Scripts may also be created in the Script Editor frame. For more detailed information on assigning and using scripts, see Scripting.