Creating Simulations
There are now two options for creating simulations. The first option is the original option to create a simulation for one or more alternative, event, and time window. The second option, first added to HEC-FIA Version 3.1, is the reconstruction simulation. The reconstruction simulation can only be used for alternatives that have the reconstruction compute option turned on (review Compute Options for an Alternative). Instructions for creating simulations from these two options are described below.
Create a Simulation
To create a standard simulation:
- From the Study Tree, which is in the Study Pane, right-click on Simulation, from the shortcut menu, click New Simulation. The Simulation Manager dialog box opens.
- Enter a name in the Name box for the simulation. A description for the simulation group can be added in the Description box.
Next the user must add an alternative (or multiple alternatives) to the simulation group. Click Add, a row is added to the table. The user can add the same alternative for multiple events, allowing them to be run in the same simulation group. Alternatively, multiple alternatives can be matched to the same event, allowing the evaluation of damages to be based on changes in the floodplain (such as structural and nonstructural measures) identified in the alternative, through the watershed configuration or other changes in the alternative. To do this, from the Alternative column the user selects the defined alternative from a list; from the Event column, selects events that have been defined for the selected alternative; and, from the Time Window column select defined time windows.
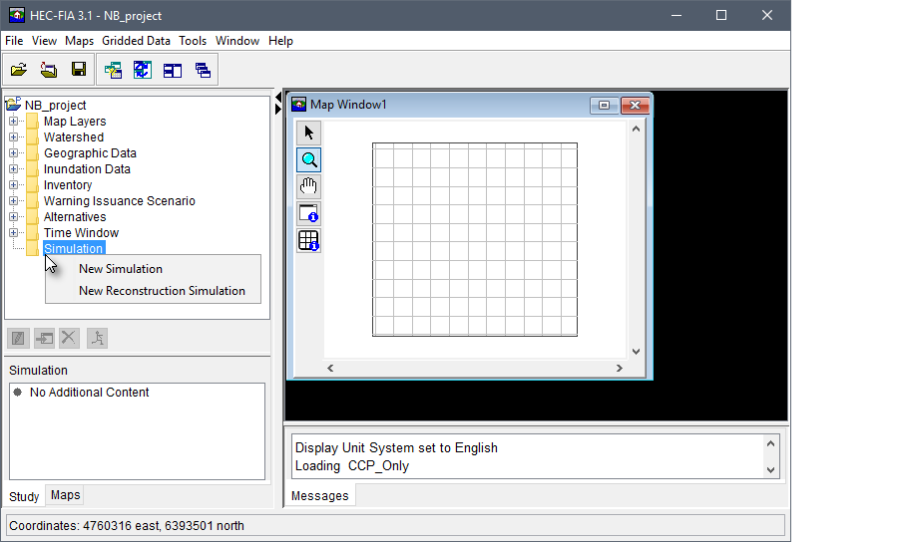
Figure: Simulation Study Tree - Shortcut Menu Commands
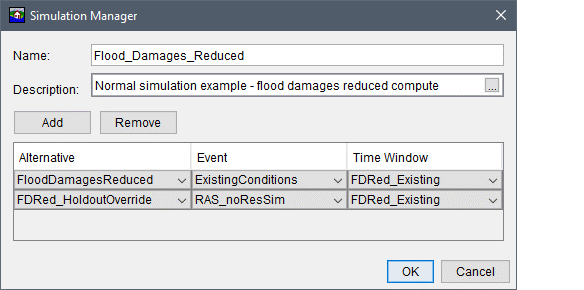
Figure: Simulation Manager Dialog Box - Example Simulation
- Once the simulation is defined, click OK. The Simulation Manager dialog box closes. The name of the simulation (i.e., Flood_Damages_Reduced) appears in the Study Tree below the Simulation folder.
Create a Reconstruction Simulation
To create a reconstruction simulation:
From the Study Tree, which is in the Study Pane, right-click on Simulation, from the shortcut menu, click New Reconstruction Simulation (figure below). The Simulation Manager dialog box opens. Note, an alternative must exist with the reconstruction option turned on in order for this shortcut menu option to be enabled (review Create an Alternative).
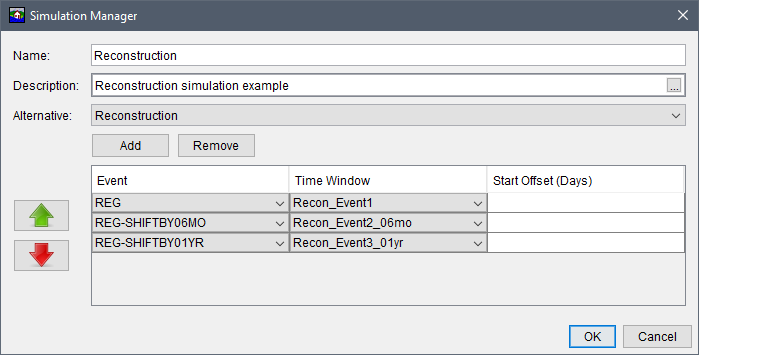
Figure: Simulation Manager Dialog Box - Example Reconstruction Simulation
- Enter a name in the Name box for the simulation. A description for the simulation group can be added in the Description box.
- Next the user must select an alternative from the Alternative list. The selected alternative enables the Event column to list all events contained in the inundation configuration selected for the alternative.
- To select any event from the inundation configuration (for the selected alternative) click the Add button, and a row is added to the table. Next, from the Event column, select the first event in the series of events for the first row. Add additional events by clicking the Add button as required. Important: The events are computed by HEC-FIA in order from the top of the table to the bottom. To reorder events in the Simulation Editor click
 , to move the selected event up one row; or click
  , to move the selected event down one row.
 - Next, for each event select the appropriate time window for the event from the Time Window column. Note, for hydraulic data from HEC-DSS time series records, the time window must match the data in the HEC-DSS file (time window start and end date and time cannot extend beyond the data in the HEC-DSS file).
The Start Offset (Days) column allows the user to move the start of the selected Event (the arrival time of the flood) by a set number of days. Entering a negative number of days will push the entire flood backward in time, and entering a positive number will push the flood forward in time, from the start of the selected Time Window. For example, if all events in the inundation configuration use the same time window, then the events can be staggered by simply putting increasing numbers into the Start Offset (Days) column. As displayed in the figure. another use of the start offset is the ability to move an event around in time to put one event in front of another.
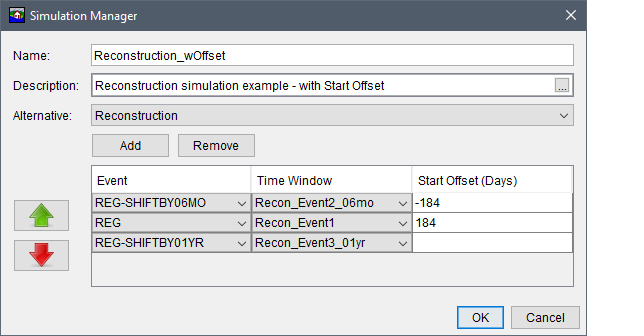
Figure: Simulation Manager Dialog Box - Reconstruction Simulation - Start Offset Example
- Once the reconstruction simulation is defined, click OK. The Simulation Manager dialog box closes. The name of the simulation (i.e., Reconstruction) appears in the Study Tree below the Simulation folder.