Import Common Computation Points
Common computation points (CCPs) are locations along the stream alignment where mapped HEC-DSS time series information is exchanged between models by linking HEC-DSS pathnames (e.g., between HEC-ResSim and HEC-FIA). Linking of HEC-DSS time series information is done during the CCP import process (as described in the following steps) and when defining events for created inundation configurations (refer to Inundation Data). There are two import options for importing CCPs: Standard CCPs (original import option), or CCPs with Holdout Distribution Areas, an import option for use in the Flood Damages Reduced computes.
Standard CCPs
Standard CCPs are not typically used when evaluating consequences. However, standard CCPs can be helpful if a quick real-time analysis needs to be completed and HEC-RAS is not part of the CWMS model sequence. If very few damages are expected to occur in an area of the watershed, sometimes hydrologic routing used with a stage-flow rating curve is adequate (a HEC-RAS model can still be used to generate the stage-flow relationship). Since HEC-FIA can only have one provider of hydraulic data per alternative, separate alternatives (or HEC-FIA projects) have to be created for these areas.
Important: Make certain that the attributes in the shapefile's database which contain information pertaining to the HEC-DSS pathname parts matches the linked HEC-DSS record for each CCP exactly, so that HEC-FIA can find the correct inundation data during a compute. Watershed components are linked to HEC-DSS files from created inundation configurations; for more information regarding inundation configurations review Inundation Data.
To import standard common computation points (CCPs):
From the Study Tree, from the Watershed folder, right-click on the Computation Points folder. From the shortcut menu, point to Import and click Standard CCPs; the Import Computation Points dialog box opens.
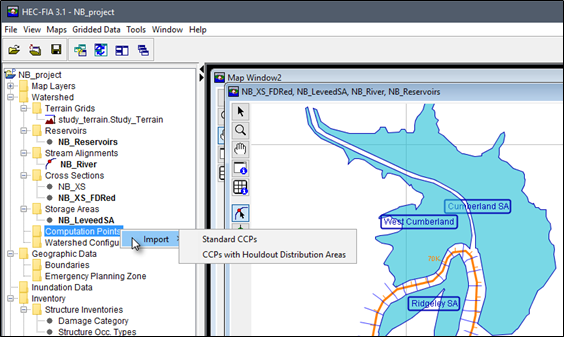
Figure: Computation Points - Shortcut Import Submenu Options
- Provide a name for the standard CCP layer in the Name box on the Import Computation Points dialog box.
Select the appropriate stream alignment from the Stream Alignment list (e.g., NB_River).
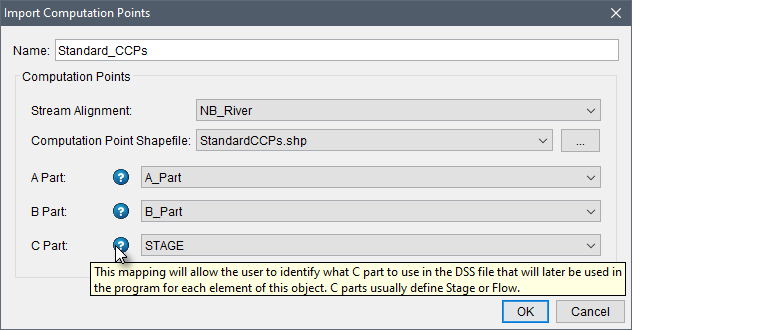
Figure: Import Computation Points Dialog Box - Standard CCPs
- The Computation Point Shapefile lists the available point shapefiles that have been added as map layers to the project. If a map layer that represents the standard CCPs has not been added to the HEC-FIA project, click the
 button. The Open browser window opens. Browse to the location of the standard CCPs shapefile, select the shapefile, click Open. The browser window closes and the name of the selected shapefile appears in the Computation Point Shapefile list (e.g., StandardCCPs.shp).
 - Next, the user needs to define information about the CCP shapefile using the dropdown lists provided. Standard CCPs only need the A Part, B Part and C Part lists defined. When importing CCPs from HEC-HMS or HEC-ResSim the A Part is not selected (blank). Note the Help
 icon; hover over the Help icon to view tooltips for each standard CCP component.
 - Now that everything is defined, click OK. The Import Computation Points dialog box closes. The imported standard CCPs will display in the active map window. Under the Computation Points folder in the Study Tree, the name of the standard CCP set with the selected stream alignment name (Standard_CCPs.NB_River) appears.
Once imported, the standard CCPs can be edited:
- From the Study Tree, from the Watershed folder, from the Computation Points folder, right-click on the standard CCPs name (e.g., Standard_CCPs.NB_River). From the shortcut menu click Edit and the Edit Computation Points dialog box opens.
The user can view and edit the standard CCPs information from the Edit Computation Points dialog box. Either click the cell once to replace the text or double-click to edit part of the text. HEC-FIA completes the STREAM_NM and STREAM_ST values based on the location of the standard CCP along the selected Stream Alignment; therefore, the user should not modify these columns.
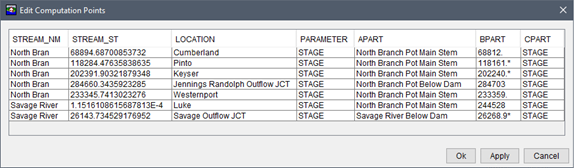
Figure: Edit Computation Points - Standard CCPs - Example
- Once edits are complete, click Ok to close the dialog and save the edited file. Alternatively, click Cancel to close the dialog without saving changes.
CCPs with Holdout Distribution Areas
The option to import CCPs with Holdout Distribution Areas was created to be used with an imported reservoir set (refer to Import Reservoirs) when including reservoirs in a Flood Damages Reduced compute. In the Flood Damages Reduced compute, the CCPs with holdout areas represent locations within the HEC-ResSim watershed where hydrograph time series information is written for holdout computes. In HEC-ResSim, holdouts indicate the effects of reservoir regulation (by calculating the amount of water stored by the reservoir) as described in the HEC-ResSim User's Manual. In HEC-FIA, holdout distribution areas define the geographic extent of the influence of the reservoirs for the associated CCP location, and HEC-FIA uses the reservoirs' influence to apportion a calculated damage estimate in the holdout distribution areas. Review Alternatives and Simulation and Results of this manual for more information regarding Flood Damages Reduced.
Important: The user-defined holdout CCP names must match the CCP names in the linked HEC-DSS file containing the HEC-ResSim exported holdouts time series. Watershed components are linked to HEC-DSS files from created inundation configurations; for more information regarding inundation configurations review Inundation Data.
To import common computation points (CCPs) with holdouts:
- From the Study Tree, from the Watershed folder, right-click on the Computation Points folder. From the shortcut menu, point to Import and click CCPs with Houldout Distribution Areas; the Import Computation Points dialog box opens.
- Provide a name (e.g., HoldoutCCPs) for the CCP with holdouts layer in the Common Computation Point Set box on the Import Computation Points dialog box.
The CCP Shapefile lists the available point shapefiles that have been added as map layers to the project. If a map layer that represents the CCPs has not been added to the HEC-FIA project, click the
button. The Open browser window opens. Navigate to the CCPs shapefile (for the Flood Damages Reduced compute), select the shapefile, and click Open. The browser window closes and the name of the selected shapefile appears in the CCP Shapefile list (e.g., ResSim_CCPs.shp).For the selected CCP shapefile, from the CCP Name list, select the attribute which contains the CCP names (e.g., ID_NAME). Important: The user-defined holdout CCP names must match the CCP names in the linked HEC-DSS file containing the holdouts time series exported from HEC-ResSim. Watershed components are linked to HEC-DSS files from created inundation configurations (review Inundation Data).
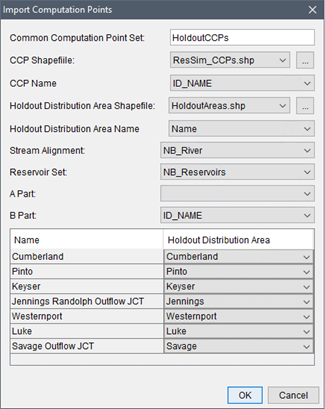
Figure: Import Computation Points Dialog Box - CCPs with Holdout Distribution Areas
- The Holdout Distribution Area Shapefile lists the available polygon shapefiles that have been added as map layers to the project. If a map layer that represents the holdout areas has not been added to the HEC-FIA project, click the button. The Open browser window opens. Browse to the location of the holdout areas shapefile, select the shapefile, and click Open. The browser window closes and the name of the selected shapefile appears in the list (e.g., HoldoutAreas.shp).
- For the selected holdout distirbution areas shapefile, from the Holdout Distribution Area Name list select the attribute which contains the names of the holdout areas (e.g., Name).
- The CCPs Name and Holdout Distribution Area table, located at the bottom of the dialog, automatically populates with the names of the CCPs and holdout areas. Each CCP must correspond to a specific holdout area. Note: The Holdout Distribution Area column allows the user to manually change automatically selected holdout distribution area name(s) by using the list(s) to select a different holdout name for the corresponding CCP.
- Select the appropriate imported stream alignment (review Stream Alignment) from the Stream Alignment list (e.g., NB_River).
- Select the appropriate imported reservoir set (review Import Reservoirs) from the Reservoir Set list (e.g., NB{}Reservoirs{_}). Important: The reservoir names must match the C Part must match the CCP names in the linked HEC-DSS file containing the holdouts time series exported from HEC-ResSim.
- Next, the user needs to define HEC-DSS mapping information for the CCP shapefile using the A Part and B Part dropdown lists provided. In general, when importing CCPs from HEC-ResSim the A Part is not selected (blank). Important: The B Part must match the CCP names in the linked HEC-DSS file containing the holdouts time series exported from HEC-ResSim.
- Now that everything is defined, click OK. The Import Computation Points dialog box closes. The imported CCPs will display in the active map window. Under the Computation Points folder in the Study Tree, the name of the CCP set with the selected stream alignment name (HoldoutCCPs.NB_River) appears. Note, the holdouts polygon shapefile will not display in the map window with the CCPs; however, the user can import the holdout distribution areas shapefile as a boundary layer (review Chapter 6 of this manual regarding geographic data).
Once imported, the CCPs (with holdout distribution areas) can be edited:
From the Study Tree, from the Watershed folder, from the Computation Points folder, right-click on the holdout CCPs name (e.g., HoldoutCCPs). From the shortcut menu click Edit and the Edit Computation Points dialog box opens.
Figure: Edit Computation Points - CCPs with Holdout Distribution Areas - Example
- The user can view and edit the CCPs information from the Edit Computation Points dialog box. Either click the cell once to replace the text or double-click to edit part of the text. HEC-FIA completes the STREAM_NM and STREAM_ST values based on the location of the CCP along the selected stream alignment; therefore, the user should not modify these columns.
- Once edits are complete, click Ok to close the dialog and save the edited file. Alternatively, click Cancel to close the dialog without saving changes.