Import Reservoirs
Reservoirs are new watershed elements that were first added to HEC-FIA in Version 3.1. They can be used to represent HEC-ResSim reservoirs in the study for the Flood Damages Reduced compute option. Reservoirs are one-dimensional areas which represent HEC-ResSim reservoirs in the study area. For projects which include reservoirs in the Flood Damages Reduced compute, HEC-FIA requires reservoirs in the watershed configuration (refer to Create a Watershed Configuration), as well as common computation points (CCPs) with holdout distribution areas (as described in Import Common Computation Points).
NOTE: The reservoir set must be imported prior to importing the CCPs with holdout distribution areas.
Important: The user-defined reservoir names must match the reservoir names in the linked HEC-DSS (HEC's Data Storage System) file containing the holdouts time series exported from HEC-ResSim. Watershed components are linked to HEC-DSS files from created inundation configurations; for more information regarding inundation configurations review Inundation Data.
To import a reservoir set:
From the Study Tree, from the Watershed folder, right-click on the Reservoirs folder. From the shortcut menu, click Import; the Import Reservoirs dialog box opens.

Figure: Reservoirs - Shortcut Menu Command
Enter a name for the reservoir set in the Reservoir Name text box. Important: The user-defined reservoir names must match the reservoir names (listed at the end of the C Part) in the linked HEC-DSS file containing the holdouts time series exported from HEC-ResSim.
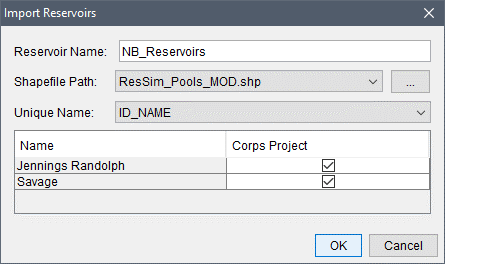
Figure: Import Reservoirs Dialog Box - Example
The Shapefile Path lists the available polygon shapefiles that have been added as map layers to the project. If a map layer that represents the reservoirs has not been added to the HEC-FIA project, click the
 button. The Open browser window opens.
Browse to the location of the shapefile that represents the reservoirs, select the shapefile (.shp) filename (i.e., ResSim_Pools_MOD.shp), and click Open. The Open browser window closes, and the Import Reservoirs dialog box is populated with information from the selected shapefile.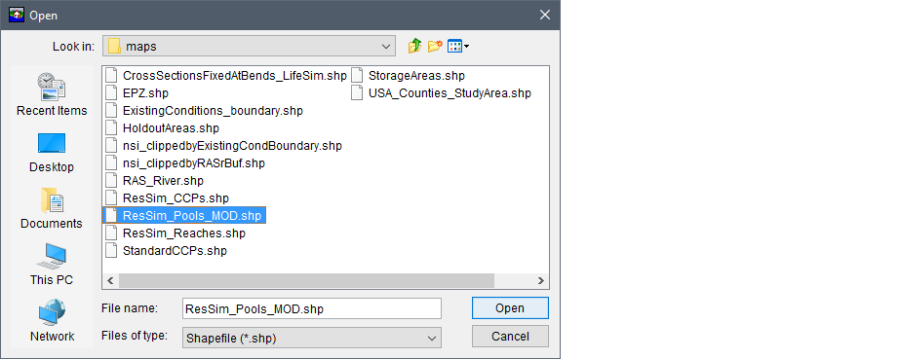
Figure: Open Browser Window
- From the Unique Name list, select the appropriate field name that contains the reservoir names. For the example provided in the figure above, ID_NAME is the correct unique name for the reservoir names in the selected shapefile.
- When the correct unique name has been selected, a table populates with the unique reservoir names and provides a checkbox which allows the user to identify if the reservoir is a USACE project (false, or unchecked, by default). If the reservoir is a USACE project, then check the
 checkbox in the Corps Project column of the table.
 - Click OK, the Import Reservoirs dialog box closes. The name of the reservoir set appears in the Study Tree under the Reservoirs folder.
To display the imported reservoirs in an active map window, from the Study Tree, from the Watershed folder, from the Reservoirs folder, right-click on the filename of the reservoir set (e.g., NB_Reservoirs) and click Display in Map Window from the shortcut menu. The reservoirs will display in the active map window.
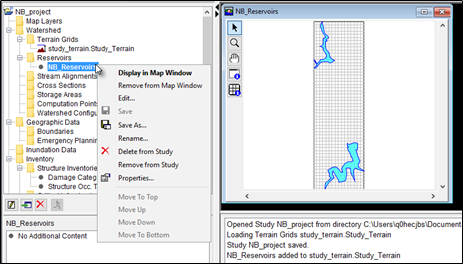
Figure: Reservoirs Data - Shortcut Menu Commands
Once imported, the reservoir set can be edited:
- From the Study Tree, under the Watershed folder, under the Reservoirs folder, right-click on the reservoir set (e.g., NB_Reservoirs). From the shortcut menu click Edit and the Edit Reservoirs dialog box opens.
The user can edit the reservoir name(s) from the ResName column. Either click the cell once to replace the name or double-click to edit part of the reservoir name. From the CorpsPrj column the user can check or uncheck the checkbox that categorizes the reservoir as either a USACE project (checked) or not (unchecked). Once edits are complete, click Ok to close the dialog and save the edited file. Alternatively, click Cancel to close the dialog without saving changes.
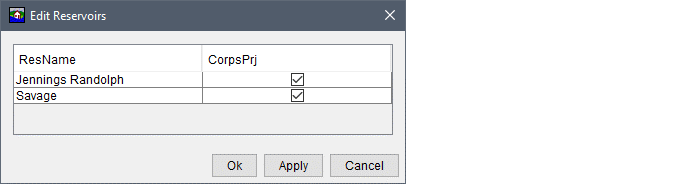
Figure: Edit Reservoirs Dialog Box - Example