Import Storage Areas
A storage area typically represents where water goes if a lateral structure like a levee is overtopped. Storage areas are usually given a unique name and are not necessarily tied to a river or river station. If the project requires storage areas then cross sections must be imported as well (refer to Import a Cross Section Set) as both datasets are intended to be used together. The exception to this is when storage areas are only used to define leveed areas, such as within a gridded Flood Damages Reduced compute. For Flood Damages Reduced computes, the storage areas represent the leveed areas in the watershed, not necessarily RAS storage areas.
To import storage areas:
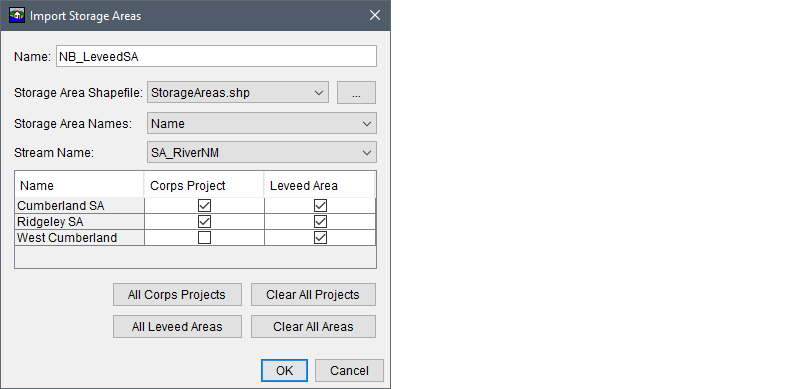
From the Study Tree, from the Watershed folder, right-click on the Storage Areas folder. From the shortcut menu, click Import; the Import Storage Areas dialog box opens.

Figure: Import Storage Areas Dialog Box
- In the Name text box, enter a name for the storage areas set.
- The Storage Area Shapefile lists the available polygon shapefiles that have been added as map layers to the project. If a map layer that represents the storage areas has not been added to the HEC-FIA project, click the
 button. The Open browser window opens. Browse to the location of the storage area shapefile, select the shapefile, click Open. The browser window closes and the name of the selected shapefile appears in the Storage Area Shapefile list (e.g., StorageAreas.shp).
 - From the Storage Area Names list, select the appropriate field name that contains the storage area attribute names (e.g., Name).
- Next, from the Stream Name list, select the field that contains the stream name associated with the storage areas (e.g., SA_RiverNM). Note, all watershed elements included in a watershed configuration (refer to Create a Watershed Configuration) should contain matching names across the elements. For example, the stream names selected for imported storage areas should match the names in the imported stream alignment.
- When the unique Storage Area Names field has been selected, a table populates with the storage area names contained in the selected field. The table also provides the Corps Project and Levee Area columns which contain checkboxes that allow the user to identify the storage area as a USACE project and/or leveed (by default both columns are false with checkboxes unchecked). If a storage area is a USACE project, then check the checkbox
 in the Corps Project column of the table. Also, if the storage area is leveed, then check the checkbox
  in the Leveed Area column of the table.
 - Click OK, the Import Storage Areas dialog box closes. The name of the storage area set appears in the Study Tree under the Storage Areas folder.
To display the imported storage areas in an active map window, from the Study Tree, from the Watershed folder, from the Storage Areas folder, right-click on the filename of the storage areas (e.g., NB_LeveedSA) and click Display in Map Window from the shortcut menu. The storage areas will display in the active map window.
Once imported, the storage areas can be edited:
From the Study Tree, from the Watershed folder, from the Storage Areas folder, right-click on the storage areas name (e.g., NB_LeveedSA). From the shortcut menu click Edit and the Storage Areas dialog box opens.

Figure: Edit - Storage Areas Dialog Box
- The user can view and edit the storage area information from the Storage Areas dialog box. Either click the cell once to replace the text or double-click to edit part of the text. From the CorpsPrj column the user can check or uncheck the checkboxes that categorizes the storage area as either a USACE project (checked) or not (unchecked). Likewise, from the LeveedArea column the user can check or uncheck the checkboxes that indicates the storage area as either leveed (checked) or not leveed (unchecked).
- Further, as illustrated in the figure above, the Storage Areas dialog box, the import completes the APart, BPart, and CPart for the storage areas automatically. The A Part and C Part information is set by HEC-FIA to Storage Area and Stage, respectively. The B Part is set based on the unique Storage Area Names field provided by the user during import (from the Import Storage Areas dialog box).
- Once edits are complete, click Ok to close the dialog and save the edited file. Alternatively, click Cancel to close the dialog without saving changes.