Download PDF
Download page Input Variables.
Input Variables
To identify a Monte Carlo Input Variable that you want to have randomly sampled:
- Open the Alternative Editor, select your Monte Carlo Alternative, and select the Monte Carlo tab.
- Select the Input Variables sub-tab ("Figure: ResSim Alternative Editor - Monte Carlo Tab - Input Variable Sub-Tab").
Click the Add button at the top right corner of the tab. The Random Variable Wizard will open ("Figure: Random Variable Wizard - Step 1 - Select Variable Type") to step you through the process of defining an input variable.

Figure: Random Variable Wizard - Step 1 - Select Variable Type
Step 1 of 4: Select the Random Variable Type
The randomly sampled input variable can be a standard ResSim input variable needed by your model or a script variable computed by a Jython script you write yourself.
- Click the radio button next to the Random Variable Type of your choice.
- The ResSim input variable types that are available to be randomly sampled during a Monte Carlo iteration include:
- Time Series Multiplier—by varying the inflow multiplier (a scalar value) on one or more inflows to your model, you can investigate the impact of the uncertainty of the inflow magnitude on your system. For example, you can determine whether a 10% variance in reservoir inflow have any impact on downstream flooding.
- Input Time Series—by providing a variety of inflow shapes for a given probability event, you can investigate the impact of the uncertainty on the inflow duration. For example, if you provide a collection of inflow hydrographs that represent the same event volume but with different durations and peaks, you can determine if the hydrograph shape has an impact on downstream flooding.
- Reservoir Rule Parameter—by varying the magnitude of a rule limit, you can determine if the uncertainty in that operating constraint has a significant impact on the system. For example, if you vary the maximum channel capacity, you can determine if the maximum pool elevation is significantly affected.
- Lookback Value—you can vary the starting condition(s) of your reservoir, diversion, or state variable to determine if the uncertainty in starting condition has a significant impact on the operation of your system. For example, you can determine if there is a significant relationship between starting pool elevation and downstream flooding or peak pool elevation
- Rating Curve—since stream morphology is ever changing, you can investigate the impact that the uncertainty of the relationship between flow and stage has on your system by varying the stage value returned by the rating curve lookup.
- Or, for additional flexibility beyond the currently available options, you can define your own Script Variable by selecting:
- Script—you can develop your own sampling method if standard options are not sufficient. By utilizing script variables and dependencies, you can also incorporate two-stage sampling. Although defined as an input variable, these sampling scripts are really only intermediate variables that another random input variable depends on; dependency is defined by clicking on the ellipsis (…) button next to the distribution parameter field—see Step 4 of 4 below.
If you are setting up your Monte Carlo alternative for use in an HEC-WAT Flood Risk Analysis (FRA) run, variables can be sampled at different levels of a nested compute loop, so you must select the Uncertainty Type for your input variable.
Click the radio button next to the Uncertainty Type of your choice. Your options include:
- Natural Variability variables are sampled in the inner WAT loop with each event. The are variables that change with each discrete event simulated by HEC-ResSim.
- Knowledge Uncertainty variables are sampled in the outer WAT loop with each realization. These are typically variables that remain constant but are difficult to measure or have significant uncertainty in their true value. HEC-ResSim will only resample a value for this parameter at the start of each realization and use that value throughout the whole realization.
See the HEC-WAT User's Manual for more information on the Flood Risk Analysis simulation type.
Once you have chosen your input variable's type,
- Click Next. This will take you to Step 2 of 4, the Select Location and Parameter step. The list of locations and variables will vary depending on the variable type you selected.
Step 2 of 4: Select a specific Location and Parameter
Based on the Input Variable Type selected in the previous step, the Random Variable Wizard will provide you with a list of locations and parameters of that type to choose from. Examples of these lists are shown in below Figures. The initial value of each scalar variable is shown in the applicable list.
Except for Input Time Series and Script, each input variable type will let you select more than one variable of that type. For example, the Reservoir Rule Parameter variable type lets you select more than one rule, from one or more reservoirs. If you select multiple variables in this step, they will form a single input variable group, and the same random number and relative probability distribution will be applied to each variable in the group.
- Select the input variable from the list of variables of the type you selected in the previous step.
- Click Next. This will take you to Step 3 of 4 to select the Reference- and Time- Dependency types for your input variable's distribution parameters.

Figure: Random Variable Wizard—Step 2—Select Location and Parameter for Inflow Multiplier Variable Type
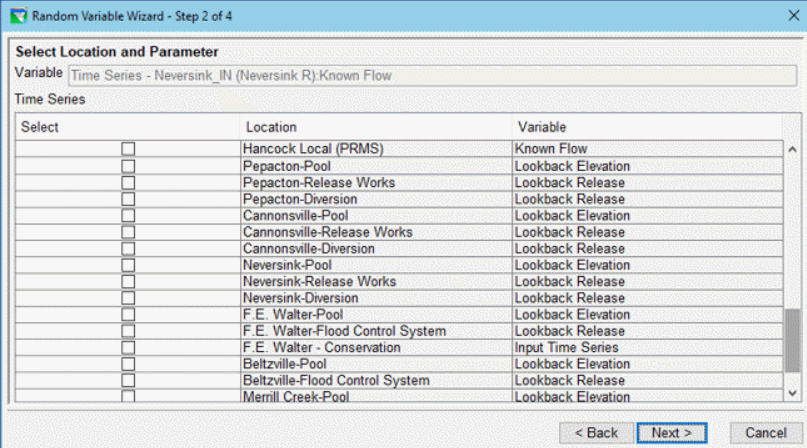
Figure: Random Variable Wizard—Step 2—Select Location and Parameter for Time Series Variable Type

Figure: Random Variable Wizard—Step 2—Select Location and Parameter for Reservoir Rule parameters Variable Type

Figure: Random Variable Wizard—Step 2—Select Location and Parameter for Lookback Values Variable Type

Figure: Random Variable Wizard—Step 2—Select Location and Parameter for Rating Curves Variable Type

Figure: Random Variable Wizard—Step 2—Select Location and Parameter for Scripts Variable Type
Step 3 of 4: Select Variable Parameters
In step 3, you will select how the probability distribution parameters (defined in step 4) will be specified for your input variable or variable group ("Figure: Random Variable Wizard—Step 3—Reference- and Time-Dependency").
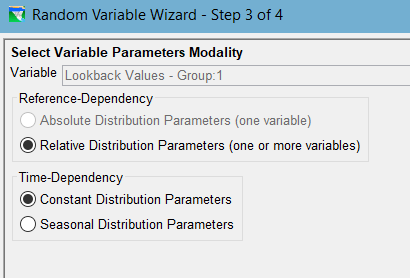
Figure: Random Variable Wizard—Step 3—Reference- and Time-Dependency
- Reference-Dependency—If you selected only one variable (rather than a group of variables) to be associated with your input variable, then you will have the option to specify whether that input variable will use an absolute probability distribution or a relative probability distribution. Otherwise the Relative Distribution option will be selected for you.
- Absolute Distribution Parameters—the parameters of the input variable's probability distribution are explicitly defined and have no relationship to the original value of the variable. You will specify the distribution using the units of the input variable.
- Relative Distribution Parameters—the parameters of the input variable probability distribution are relative to the original value of the variable. If different variables of a given type have been defined as an input variable group, it is unlikely that they would each share an identical absolute distribution, so the shared probability distribution must be defined with relative parameters that are based on the initial values of each. You will specify the parameters of your probability distribution as percentages of the initial value of the variable.
- Time-Dependency—While only one probability distribution type can be selected for each variable or group, you can specify whether the parameters of that distribution will be held constant throughout year or vary seasonally. As such, you must choose between:
- Constant—this option will allow you to define only one set of distribution parameters in the next step of the wizard.
- Seasonal—this option will allow you to vary your distribution parameters seasonally. With this option, in the next step of the wizard, you will need to define the seasons and then the distribution parameters that will apply for each season
- Once you have selected the modality for your input variable, click Next.
Step 3 of 3: Script Variable
For a Script input variable, Step 2 of 3 required you to specify a unique name for your script variable and to associate the script with a model location (element) and parameter. Step 3 of 3 of the Random Variable Wizard is the script editor, much like ResSim's state variable editor, which will allow you enter the script that defines your sampling scheme ("Figure: Random Variable Wizard—Step 3—Script Variable Editor with Script Variable Template"). This script will receive the random value generated for it in the current Monte Carlo iteration and can use that value any way you wish to compute the script variable's value. A stochastic script may use this number to generate randomness, or it may be ignored in the case of a deterministic script. Similarly, the Monte Carlo alternative data is passed as a parameter (mcData). Using the Monte Carlo Variables section of the tree on the left side on the Script Editor panel allows the user to quickly add code to retrieve information about other Monte Carlo input variables. If you retrieve data from another Monte Carlo variable, ResSim assumes that the script is dependent on that variable. A return value must be specified in each sampling script; this value may be passed to other variables or sampling scripts dependencies.
Note: When using a script for the random variable, Step 3 is the last step since no distribution is needed. The other types of random variables require a fourth step to set up the distribution.

Figure: Random Variable Wizard—Step 3—Script Variable Editor with Script Variable Template
Step 4 of 4: Select and Configure a Distribution Type
For each input variable, the value randomly sampled will be from the probability distribution type and parameters you specify.
- Select a Distribution Type. Your distribution type options are:
- Uniform
- Triangular
- Normal
- LogNormal
- Log10Normal
- Gamma
- Empirical
- Discrete
These distribution types and their required parameters are described in the next section, "Random Variable Distribution Types".
Next, enter values for the distribution parameter values needed for the Distribution Type you selected. How you specify these parameters will depend on what modality selections you made in Step 3 of 4:
If you selected Absolute for the Reference-Dependency, then you will define the parameters in the units of the input variable (except for dimensionless parameters).
If you selected Relative for the Reference-Dependency, then you will instead define the parameters as a percentage of the initial values of the variable.
If you selected Constant for the Time-Dependency, then a single field for entering each distribution parameter value will be displayed.
If you wish to make the distribution parameter dependent on another variable, click the ellipsis button that follows the parameter field (as annotated in "Figure: Random Variable Wizard - Step 4 - Select Distribution Type".
Figure: Random Variable Wizard - Step 4 - Select Distribution Type
The Variable Dependency dialog ("Figure: Variable Dependency Dialog") will open showing a list of the input variables you have already defined. Select a variable whose value will be used as the parameter value then click OK to accept the selected variable and close the dialog; or click Cancel to return without defining a dependency.
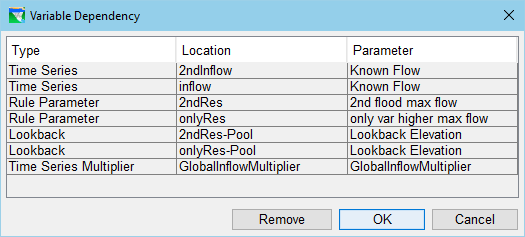
Figure: Variable Dependency Dialog
If you created a variable dependency, the parameter field and ellipsis button in the Select Distribution Parameters panel of the Random Variable Wizard will be replaced with a button identifying the selected dependent variable. If you wish to change or delete the dependency, click the dependency button to reopen the Variable Dependency dialog. Use the Remove button to delete the dependency or select a different variable to change the dependency.
If you selected Seasonal for the Time-Dependency, then an Edit Seasons button will appear above a table for entry of the seasonally varying distribution parameters. Click the Edit Seasons button to open the Seasonal Variation dialog ("Figure: Seasonal Variation Dialog"), then enter the start date of each season in the table.

Figure: Seasonal Variation Dialog
When done, click OK. A column for each season will appear in the Distribution Parameters table ("Figure: Random Variable Wizard—Step 4—Select Distribution Parameters—Seasonal Variation"). Enter values for each parameter for each season in the table.

Figure: Random Variable Wizard—Step 4—Select Distribution Parameters—Seasonal Variation
Next, select the Distribution Clipping options you want to apply to your probability distribution. Like the distribution parameters, the clipping options are a function of the modality options you selected in Step 3:
If you selected Absolute for the Reference-Dependency, then the Distribution Clipping section will allow you to limit the range of your distribution by setting a minimum and/or a maximum limit ("Figure: Random Variable Wizard—Step 4—Select Distribution Parameters—Seasonal Variation").
If you selected Relative for the Reference-Dependency, (or if your input variable represents a group of variables), then the Distribution Clipping section will only provide a Clip at Zero option allowing you to limit the distribution to positive values (see "Random Variable Wizard—Step 4—Select Distribution Parameters for Variable Group").
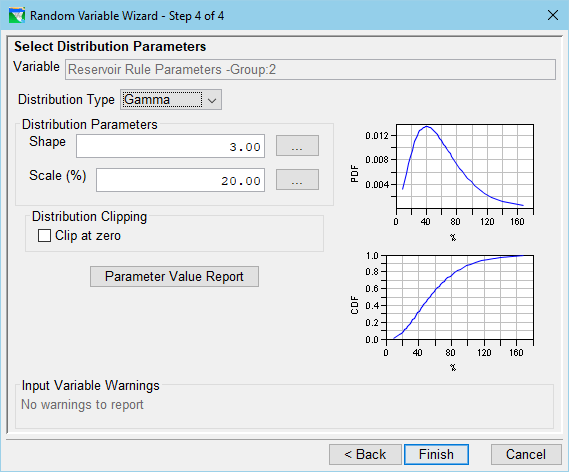
Figure: Random Variable Wizard—Step 4—Select Distribution Parameters for Variable Group
When the Reference Dependency is Relative, a Parameter Value Report button will appear below the Distribution Clipping section. Click the Parameter Value Report button to see how the selected parameters will translate from relative to absolute for each variable in the group. An example of this report is shown in "Figure: Relative Parameter Distribution - Parameter Value Report".

Figure: Relative Parameter Distribution - Parameter Value Report

Note that dimensionless parameters (like shape in the image) are not scaled, and so, show as N/A in the relative column of the Parameter Value Report.
Once you have completed the setup of your input variable, click Finish to close the Input Variable Wizard. A row will appear in the table on the Input Variables sub-tab that represents the input variable you just defined ("Figure: Monte Carlo Tab—Input Variables Sub-tab with several Variables Defined")

Figure: Monte Carlo Tab—Input Variables Sub-tab with several Variables Defined
- Since a large model could require a significant number of input variables, the table of input variables is preceded by a set of Filters that you can use to thin out the list so that you can find a specific variable of interest.
- If you have specified several input variables you may choose to deactivate one or more of them by unchecking the Active checkbox at the start of their row in the table. Only "Active" input variables will be randomized during the run of your Monte Carlo alternative ("Figure: Monte Carlo Tab—Input Variables Sub-tab with several Variables Defined").
You may also choose to specify a linear correlation between two or more of your active input variables by selecting the Correlation button located below the list. This will open the Correlation Matrix editor ("Figure: Input Variable Correlation Matrix Editor"). Use this editor to create a Correlation Set (a selection of input variables) and the correlation matrix that relates the probabilities of the variables in the set to one another. The diagonal cells of the correlation table will always have a value of 1, as any variable's correlation with itself is perfect. All other cells will default to zero, implying independence. A value between -1 and 1 entered into an off-diagonal cell indicates correlation between the row and column variables. Only the entries below the diagonal are editable. The entries above the diagonal are updated automatically to show that the matrix is symmetric.

Figure: Input Variable Correlation Matrix Editor
The Check Dependencies button will display a graphical representation of the dependencies you have defined between your input variables. Creating variable dependencies is an advanced feature, so don't be surprised if you get a message saying that "No dependent variables have been defined…".