Extract Setup
The next step requires a watershed database to be setup and that contains data that will be used to make a forecast. Obtaining data will be different for each watershed and user base. Because of that, the setup process is discussed later in Chapter 9 of this manual, as well as chapter 18 of the HEC-RTS User's Manual. After the model alternatives have been linked together, the user needs
to setup the "extracting of data" from the watershed database to the DSS file that will be used during a forecast compute, usually referred to as the forecast.dss file. HEC-RTS will gather all the DSS pathnames that were specified as "Extract" in the model linking, and copy those pathnames from the watershed database to the forecast.dss file.
When forecast is computed, HEC-RTS will copy all of the models and time series data to a separate directory that usually is named according to the date and time of the forecast. That "forecast time" means that all data up to, and including, that time is known and will be copied to the forecast.dss file. All data after that time is generated when the forecast computes.
Creating an extract group:
- From the HEC-RTS main window (Figure 1.1), click the Setup module, from the Models
menu (Figure 6.2), click Edit Extract, the Extract Editor will open (Figure 7.15).
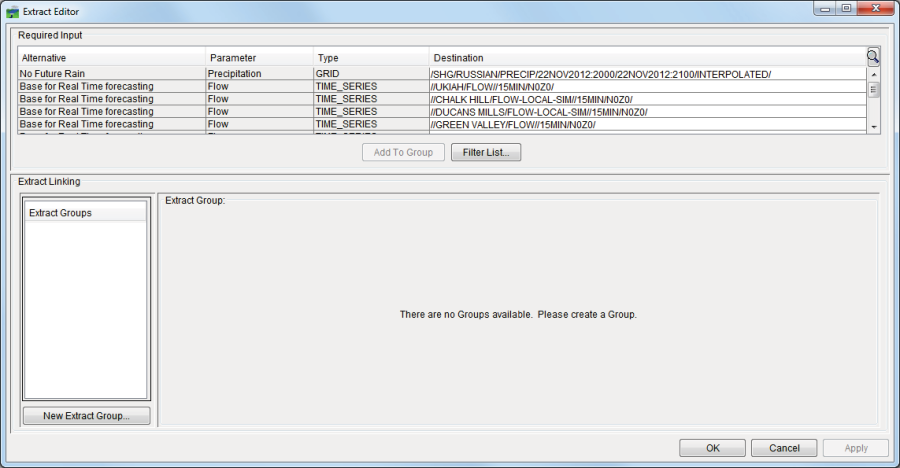
Figure 7.15 Extract Editor
- Click New Extract Group (Figure 7.15), the New Extract Group dialog box will open (Figure 7.16). Enter an extract group name in the Name box (Figure 7.16). Depending on the type of data being extracted, from the Type list (Figure 7.16) select either Time Series or Gridded Data.
- It is recommend that for an HEC-RTS watershed there should be at least two extract groups, one for gridded precipitation data and another for time series data. Precipitation is processed and stored according to the month name in a specific directory under the home directory. When this directory structure is used, the name of the months are automatically incremented on month boundaries so that the DSS files are a reasonable size and a contiguous dataset can be obtained for use by HEC-HMS. The names of the DSS files with gridded data will be similar to "precip.2016.03.dss". For further discussion on data acquisition through Time Series Icons, refer to Chapter 9 of this guide and Chapter 18 of the HEC-RTS User's Manual.
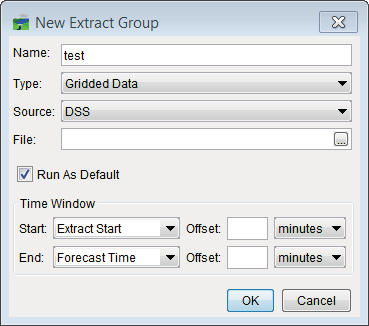
Figure 7.16 New Extract Group Dialog Box – Gridded Data
 From the Source list (Figure 7.16) select the type of data that will be generated for the extract group. For the current version of HEC-RTS, DSS is the only choice for the data type. In the File name box (Figure 7.16), enter or browse (click, an Open Browser will open, Figure 5.5) to the location in the watershed directory for gridded precipitation, and select a gridded precipitation DSS file (with valid data), such as precip.2016.03.dss.
- Click OK, the New Extract Group dialog box will close (Figure 7.16), and the new extract group will display in the Extract Groups box (Figure 7.15). HEC-RTS will have gathered all the pathnames from the model linking for the selected forecast run, that all had an Input From (Figure 7.7) selection of Extract List. The pathnames are listed in the Required Input box of the Extract Editor (Figure 7.17). Select the gridded precipitation pathnames, click Add to Group. The selected pathnames will display in the table in the lower portion of the Extract Editor (Figure 7.17).
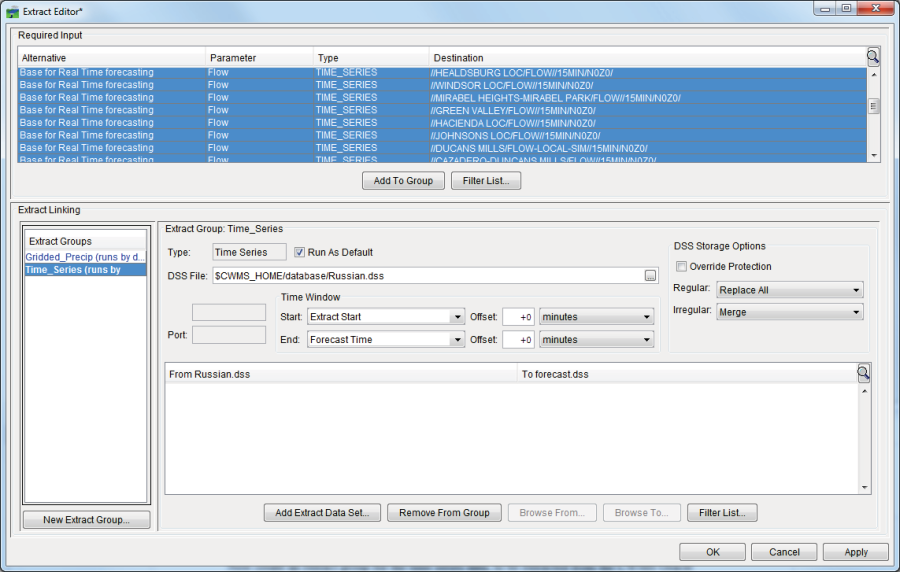
Figure 7.17 Time Series Extract Group
- Click Apply, the extract group will be saved. To create an extract group for the time series data, select a pathname in the top list, then click Ctrl+A to select all of the pathnames. Press Add to Group.
- HEC-RTS will try to match datasets, but it is possible some names will not be close enough to have the right dataset selected. Go through the list, verifying each pathname matches to the correct dataset in your main database. When one does not correctly match, double click on the name, click, which appears to the right of the selected pathname (Figure 7.18). The DSS Grid Record Chooser will open (Figure 7.19).

Figure 7.18 Verifying Matching Pathnames
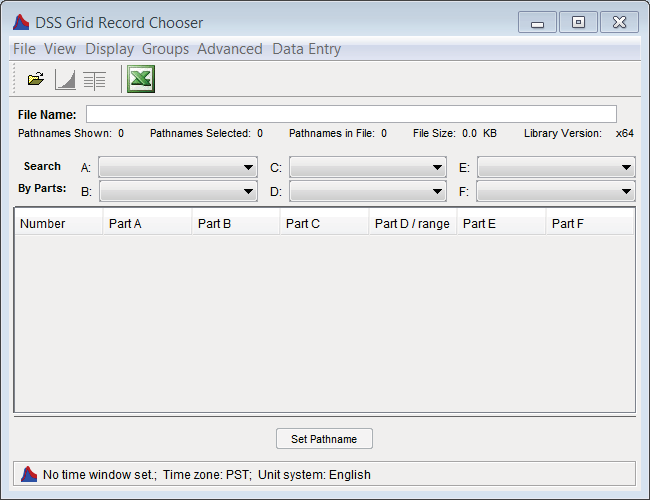
Figure 7.19 DSS Grid Record Chooser
- From the DSS Grid Record Chooser (Figure 7.19), the user can choose the correct pathnames for the dataset. Review all pathnames, and when finished, from the File menu (Figure 7.19) click Close. The DSS Grid Record Chooser will close (Figure 7.19).
- Once the user is finished with extract groups, click OK, and the Extract Editor will close (Figure 7.17).
The user is now at the point where a forecast can be computed. Save the watershed at this point (from the HEC-RTS main window (Figure 1.1), from the File menu, click Save Watershed).
Now from the HEC-RTS main window, click the Modeling module (Figure 3.5). From here, attempt to run a forecast with the current time (assuming you have all the data), or a calibration time.