Defining Synthetic Events
From the Hydrologic Sampling Editor, the Synthetic Events tab allows users to include synthetic, probability-based flood events in the sampling "flood bucket". Users may add events that are larger than historical events, or have different event timing or spatial origin of flow throughout the watershed. For example, users can include 100–, 200–, and 500–year events (1.0%, 0.5%, and 0.2% chance events) in the Bootstrapping Historical/Synthetic Basin-wide Events sampling method, with any number of events defined for each return period/exceedance probability. Creating synthetic events involves selecting an exceedance probability, creating the event, and then providing the inflow time series DSS (*.dss) records that define the event.
From the Synthetic Events tab, the user will first select an exceedance probability, and for that exceedance probability the user can create, rename, create a copy, and delete synthetic events; set a weight for the selected synthetic event; and, view the total weight of events for the selected exceedance probability (which are visible in the Synthetic event dropdown. In addition, a table is provided for the user to define the DSS records for all hydrograph locations. If the Include Forecasts option (review Selecting Bootstrapping Historical/Synthetic Basin-wide Events method) has been selected, forecast time-series for the selected forecast locations will be entered on the Forecasts tab (review the Forecasts Tab section).

The following sections describe steps for creating and defining synthetic events for a selected exceedance probability (review Ranking Events, Uncertainty Method, and Synthetic Event Probabilities (Settings tab)). Any desired number of synthetic events can be created for specified exceedance probabilities. For example, if the user wanted to have three 100-year synthetic events, one 200-year synthetic event, and one 500-year synthetic event, then three corresponding synthetic events would need to be created and defined for exceedance probability 0.0100, and one event each would need to be created and defined for exceedance probability 0.0050 and exceedance probability 0.0020.
Create Synthetic Events and Assign Weights
Synthetic events are created individually for a selected exceedance probability, and any number of synthetic events are allowed. Create new synthetic events and assign weights for the events:
- From the Synthetic Events tab, from the Exceedance Probability list, select an exceedance probability. The associated Return Period box automatically updates (e.g., for the default exceedance probability 0.0200, the return period is 50 years). Note, if the desired exceedance probability is not in the list, return to the Settings tab (review Ranking Events, Uncertainty Method, and Synthetic Event Probabilities (Settings tab)) to add that value to the exceedance probability table.
- Click New synthetic, the Create New Synthetic Event dialog box will open.

- Enter the name of the synthetic event in the Name box (e.g., 1948 100 1912). Enter a description in the Description box (optional, but recommended). To view the entire description for long descriptions, click
 , the Enter Description dialog box will open. Note, the Name (and description) can be used to match the correct DSS file (*.dss) with the correct Synthetic Event.
 - Click OK; the Create New Synthetic Event dialog box will close. The created synthetic event appears in the Synthetic Event list.
- Each synthetic event(s) must be assigned a weight. The weight, when combined with the weights of other synthetic events of the same exceedance probability, defines the relative likelihood of each event within that group. The default weight is 1.00, and users can manually overwrite the default weight for a selected synthetic event. From the Weight box, highlight the default value (1.00) and manually enter the desired weight for the selected synthetic event.
- Click Apply, this will save the synthetic event for the selected exceedance probability. Continue creating synthetic events for the appropriate exceedance probabilities, click Apply when finished.
Assigning Synthetic Hydrograph DSS Records
Once synthetic events have been created for each exceedance probability, users must define the synthetic time series of flow and other defined parameters (variables). From the Hydrographs tab, the DSS input table contains the hydrograph locations that were selected from the Settings tab (review Ranking Events, Uncertainty Method, and Synthetic Event Probabilities (Settings tab)), with a row for each parameter.
In contrast to the historical hydrographs which span the historical period of record (with blanks for all other time periods), the DSS time series for a synthetic event should contain only the time period for the event of interest (e.g., the 100-year flood event time-window), without blanks for all other time periods. Furthermore, the synthetic hydrograph event time-window (start and end dates and times) must be the same for all locations. For example, the following plot displays a flow DSS dataset (time series) for a synthetic event for three locations.

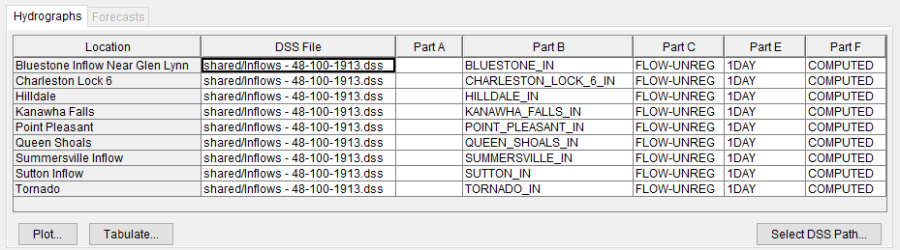
From the DSS input table; users need to specify the DSS records that define the inflow hydrographs (and other parameters) throughout the watershed for selected synthetic event(s). A time series must be defined for each location (review Hydrograph Locations and Parameters) (and each parameter at that location) listed in the DSS input table, for the selected synthetic event (Synthetic Event list).
- For each Location listed, and each parameter at that location, a DSS path must be identified (DSS File and pathname Parts A – F). To define the DSS record for a location of interest, click on a cell of the row of the location.
- Click Select DSS Path, the HEC-DSSVue dialog box will open. Refer to the HEC-DSSVue User's Manual for more information regarding DSS pathnames and HEC-DSSVue.

- From the HEC-DSSVue dialog box, click; the Open HEC-DSS File browser will open. Browse to the location of a DSS file (*.dss) that contains the time series of interest (e.g., hydrographs). Click on the appropriate .dss file, the File name box now contains the name of the selected file (e.g., Inflow – 48-100-1913.dss).

- Click Open, the Open HEC-DSS File browser will close. The HEC-DSSVue dialog box displays the DSS records for the selected DSS file.
- For the location (e.g., Bluestone Inflow Near Glen Lynn) that was selected in the DSS input table in the Hydrologic Sampling Editor, find and select the proper pathname (record) from the list of DSS records in the HEC-DSSVue dialog box, click Set Pathname. From the Hydrologic Sampling Editor, the DSS input table now contains the DSS File pathname (Parts A – F) for the selected Location (e.g., Bluestone Inflow Near Glenn Lynn).
- Select the next location, from the HEC-DSSVue dialog box, find and select the proper pathname (record) from the list of DSS records in the HEC-DSSVue dialog box, click Set Pathname. Repeat this step until all locations in the DSS input table contain the correct DSS filename and the DSS pathnames.

- Click Apply, this saves data and keeps the Hydrologic Sampling Editor open for further modifications. When finished, click OK to save the selected hydrologic sampling alternative and close the Hydrologic Sampling Editor. Data Check (review Hydrologic Sampling Editor Interface) can be used to search for data consistency error(s) prior to closing the editor.
Rename, Copy or Delete Synthetic Events
Rename a Synthetic Event
To rename a synthetic event, from the Synthetic Event list select a synthetic event. Click Rename synthetic, the Rename Synthetic Event dialog box will open. Enter the new name for the synthetic event in the Name box and a description in the Description box (optional, but recommended). Click OK, the Rename Synthetic Event dialog box will close, and the new name will display in the Synthetic Event list.

Copy a Synthetic Event
To copy a synthetic event, from the Synthetic Event list select a synthetic event. Click Save synthetic as, the Save Synthetic Event As dialog box will open. Either use the default name or manually enter the name for the copied synthetic event in the Name box and a description in the Description box (optional, but recommended). Click OK, the Save Synthetic Event As dialog box will close, and the new name will display in the Synthetic Event list.

Delete a Synthetic Event
To delete a synthetic event, from the Synthetic Event list select a synthetic event. Click Delete synthetic, a Confirm delete window will open. Click Yes to delete the selected synthetic event, the Confirm delete window will close and the name will no longer display in the Synthetic Event list.

Forecasts Tab
From the Forecasts tab, of the Synthetic Events tab, a user will select the DSS records containing the time series data that defines the starting forecast volumes of the synthetic events that were defined in the Settings tab (review Hydrograph Locations and Parameters).
- From the Exceedance Probability list, select an exceedance probability.
- From the Synthetic Events for selected Exceedance Probability box, either select a synthetic event from the Synthetic Event list or create a new synthetic event (review the Create Synthetic Events and Assign Weights section).
- For each Location listed, a DSS path must be identified (DSS File and pathname Parts A – F). To define the DSS record for a location of interest, click on a cell of the row of the location (e.g., Bluestone Inflow Near Glen Lynn). Click Select DSS Path.

- The HEC-DSSVue dialog box will open. Refer to the HEC-DSSVue User's Manual for more information regarding DSS pathnames and HEC-DSSVue.
- From the HEC-DSSVue dialog box, click; the Open HEC-DSS File browser will open. Browse to the location of a DSS file (*.dss) that contains the time series of interest (e.g., hydrographs). Click on the appropriate .dss file, the File name box now contains the name of the selected file (e.g., Forecasts – 48-100-1913.dss).
- Click Open, the Open HEC-DSS File browser will close. The HEC-DSSVue dialog box now displays the DSS records for the selected DSS file.
- For the location (e.g., Bluestone Inflow Near Glen Lynn) that was selected in the DSS input table in the Hydrologic Sampling Editor, find and select the proper pathname (record) from the list of DSS records in the HEC-DSSVue dialog box, click Set Pathname. From the Hydrologic Sampling Editor, the DSS input table now contains the DSS File pathname (Parts A – F) for the selected Location (e.g., Bluestone Inflow Near Glenn Lynn).
- Select the next location, from the HEC-DSSVue dialog box, find and select the proper pathname (record) from the list of DSS records in the HEC-DSSVue dialog box, click Set Pathname. Repeat this step until all locations in the DSS input table contain the correct DSS filename and the DSS pathnames.

- Click Apply, this saves data and keeps the Hydrologic Sampling Editor open for further modifications. When finished, click OK to save the selected hydrologic sampling alternative and close the Hydrologic Sampling Editor. Data Check (review Hydrologic Sampling Editor Interface) can be used to search for data consistency error(s) prior to closing the editor.