Creating Alternatives
HEC-WAT helps the user create study alternatives through schematic representations, model alternative identification, and compute sequencing. An alternative in HEC-WAT is a representation of the physical and operational system, and groups a schematic with different measures, operations, and model alternatives. For example, one alternative could be a "current conditions" alternative that represents the current condition in the study area, including the current reservoir operational scheme. Additional alternatives could include represent future changes in land use, differing reservoir operational schemes or various flood risk management measures, including nonstructural measures. The alternative framework within HEC-WAT facilitates creation of simulations across all defined alternatives (using the same analysis period for each), and comparison of model alternative results.
The user can create, view, save, save as, delete, and view properties of alternatives from the HEC-WAT main window, from the the Alternatives and Simulation Manager dialog box or the Study Pane. There are two scenarios for creating alternatives: 1) the user creates an initial alternative (i.e., they did not choose to add a default alternative when the study was created), and 2) the user creates an additional alternative; the workflow(s) available for creating an alternative depend on the scenario.
Scenario 1 - Creating an Initial Alternative
If a study was not created with a default alternative, the user must create the initial alternative via the Alternative and Simulation Manager.
Scenario 2 - Creating an Additional Alternative
If an initial alternative already exists, the user can create an additional alternative via either the Alternative and Simulation Manager or via the Study Pane.
Creating an Alternative from the Study Pane
Users can create a new alternative from the Study Pane (Study Tree), in one of two ways.
- From the Study Tree in the HEC-WAT main window, right-click on the Alternatives folder, and click New from the shortcut menu.
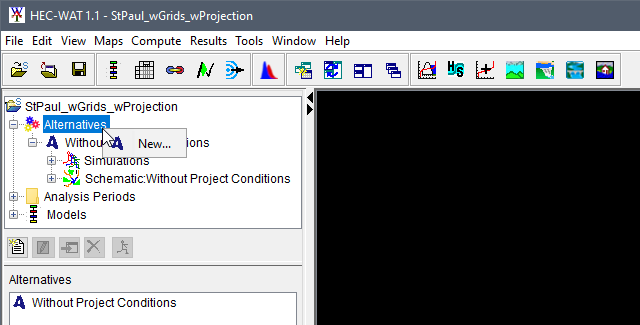
- Alternatively, from the Study Tree, select the Alternatives folder and from the Study Pane toolbar, click
 New.
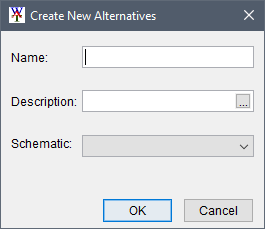
New. - Either way, the Create New Alternative dialog box opens.
- The next steps for creating an alternative are the same as described in Creating an Alternative.
Creating an Alternative from the Alternative and Simulation Manager
The Alternative and Simulation Manager dialog box provides a convenient way to organize and develop the main components for an HEC-WAT study – alternatives, analysis period (time window), and simulations. The Alternative and Simulation Manager has three areas where the user can access commands that will allow the user to create, delete, and rename alternatives. These areas are the Table, Toolbar, and Menu Bar. The Table supports organization of a study's alternatives; a way to track the state of datasets needed for each model, create analysis periods, and create simulations. Users can create a new alternative from the Alternative and Simulation Manager dialog box in one of three ways. Regardless of the approach selected, the Create New Alternative dialog box opens. The steps for creating an alternative using the Create New Alternative dialog box are the same as described in Creating an Alternative.
Option 1
From the Alternative and Simulation Manager dialog box, from the Toolbar, click the Create a new Alternative icon.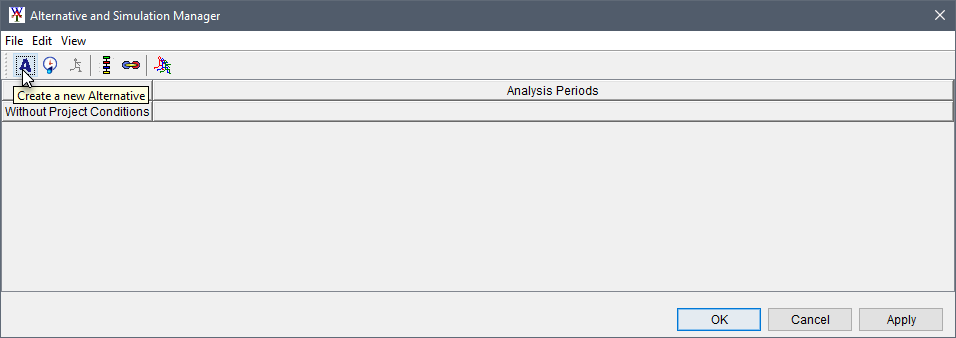
Option 2
From the File menu, point to Alternatives and click New.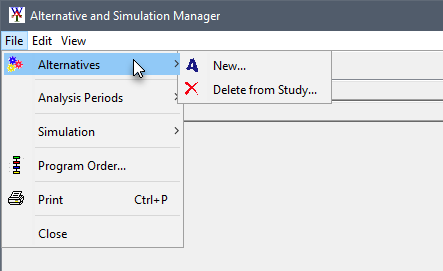
Option 3
From the table, right-click on the Alternatives header and click New, from the shortcut menu.
Creating an Alternative
To create an alternative:
- From the Create New Alternative dialog box, in the Name box enter the name (required) of the new alternative.
- In the Description box, enter a description (optional, but recommended when sharing a study between multiple researchers).
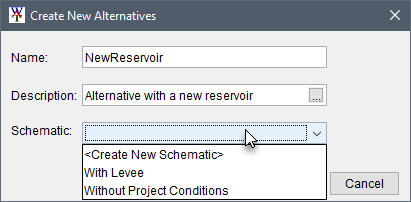
- Each alternative requires a schematic to provide the layout of the study area measures and components. From the Schematic list, select a previously defined schematic (proceed to Step 4), or create a schematic for the alternative (see Step 6).
- Click OK, if there is no map window open in the Desktop Pane, the Create New Alternative dialog box will close and an alternative map window will open in the Desktop Pane.
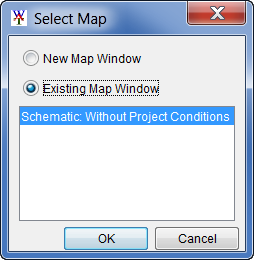
- If a map window is open in the Desktop Pane, the Select Map dialog box will open. The user can choose whether to open the alternative map window in the current map window or in a new map window, click OK. The Select Map dialog box and the Create New Alternative dialog box will both close, and the map window for the new alternative will appear in the Desktop Pane.
- If a schematic needs to be created for the alternative, from the Schematic list, click <Create New Schematic>. Click OK, a warning message appears letting the user know that a schematic was not selected, and asks the user to create a new schematic, click Yes. The Create New Schematics dialog box will open.
- By default, the name of the alternative is automatically added to the Name box for the new schematic. The user can accept this name (e.g., NewReservoir) or enter a different name for the schematic. The user can also enter a description in the Description box (optional, but recommended).
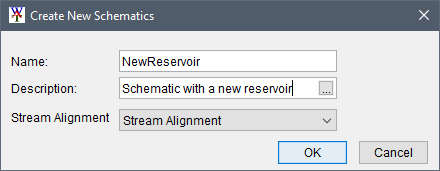
- Click OK, if there is no map window open in the Desktop Pane, the Create New Schematics dialog box will close and an schematic map window opens in the Desktop Pane. Users can now develop the new schematic to provide geo-referencing, stream referencing (stream alignment), common physical features (measures), data exchange locations (common computation points), and a set of features present for a particular modeling scenario (schematics) for the new alternative.
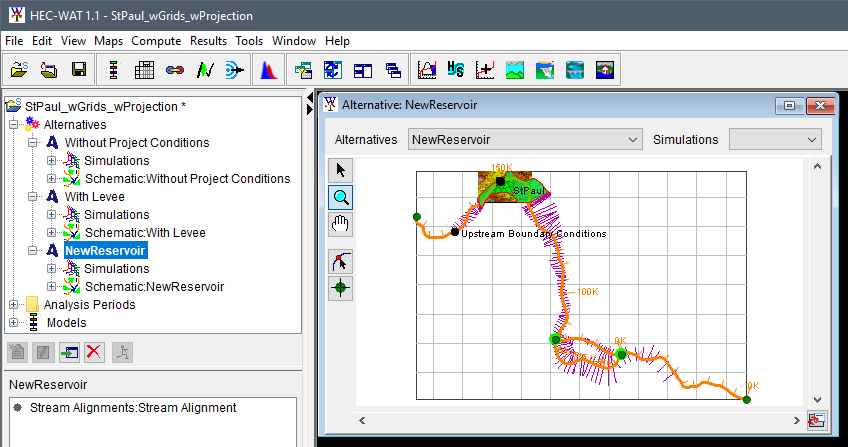
- If a map window is open in the Desktop Pane, the Select Map dialog box will open. The user can choose whether to open the alternative map window in the current map window or in a new map window, click OK. The Select Map dialog box and the Create New Schematics dialog box will both close, and the map window for the new alternative will appear in the Desktop Pane.
- The alternative name will now appear in the table on the Alternative and Simulation Manager dialog box, under the Alternatives column header.
From the Create New Alternative dialog box, enter a unique name for the alternative and a description. Entering a description is optional, but recommended when sharing a study between multiple researchers. Next, associate the new alternative with a schematic. Each alternative requires a schematic to provide the layout of the study area measures and components, users can choose to create the alternative with an existing schematic (e.g., Without Project Conditions) or create the new alternative with a new schematic (<Create New Schematic>).

Create New Alternative with an Existing Schematic
To create the new alternative with an existing schematic:
- From the Create New Alternative dialog box, from the Schematic list, click <Create New Schematic>. Click OK, a warning message appears letting the user know that a schematic was not selected, and asks the user to create a new schematic, click Yes. The Create New Schematics dialog box will open.

- By default, the name of the alternative is automatically added to the Name box for the new schematic. The user can accept this name (e.g., NewReservoir) or enter a different name for the schematic. The user can also enter a description in the Description box (optional, but recommended).
- Click OK, if there is no map window open in the Desktop Pane, the Create New Schematics dialog box will close and an schematic map window opens in the Desktop Pane. Users can now develop the new schematic to provide geo-referencing, stream referencing (stream alignment), common physical features (measures), data exchange locations (common computation points), and a set of features present for a particular modeling scenario (schematics) for the new alternative.

- If a map window is open in the Desktop Pane, the Select Map dialog box will open. The user can choose whether to open the alternative map window in the current map window or in a new map window, click OK. The Select Map dialog box and the Create New Schematics dialog box will both close, and the map window for the new alternative will appear in the Desktop Pane. New alternatives are displayed as a new row in the Alternative and Simulation Manager dialog box, under the Alternatives column header, and as a new alternative node in the Study Tree, under the Alternatives folder.
Alternative Shortcut Menu
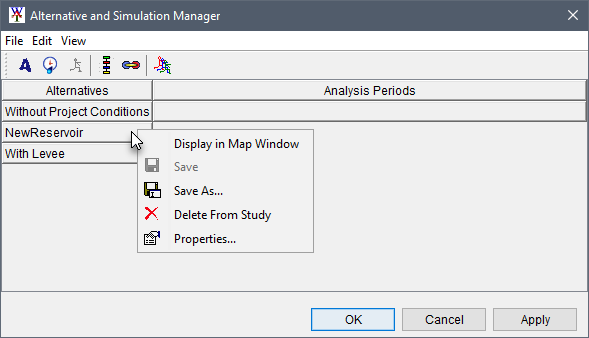
New and existing alternatives can be displayed in a map window, copied, and deleted from the individual alternative shortcut menu. To open the shortcut menu, from either the Study Tree or the Alternative and Simulation Manager dialog box, right-click on an alternative name.
The alternative name will now appear in the table on the Alternative and Simulation Manager dialog box, under the Alternatives column header.
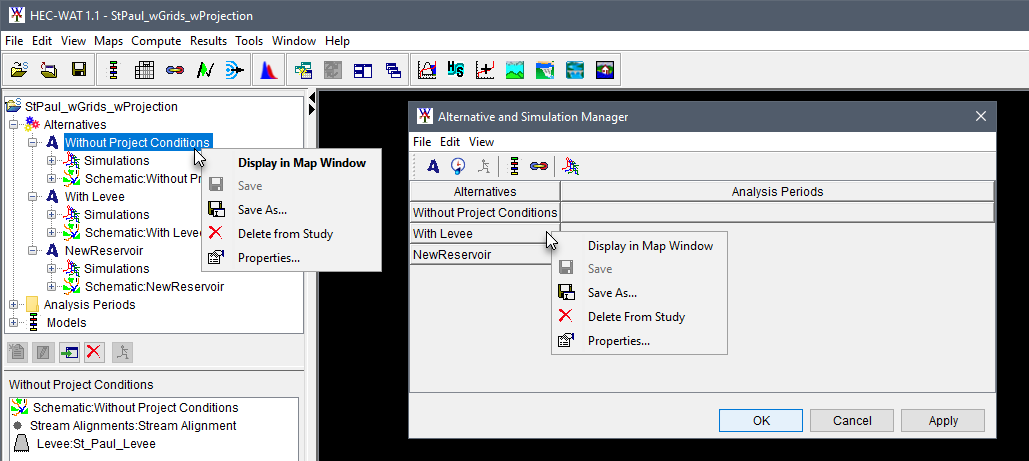
View
To view an alternative in a map window:
- From alternative shortcut menu, click Display in Map Window.
- If there is not a map window open in the Desktop Pane, the alternative map window for the alternative will open in the Desktop Pane. From the alternative map window the user can edit the stream alignment, measures, impact areas, and adjust background maps associated with the alternative.
- If a map window is open in the Desktop Pane, the Select Map dialog box will open. The user can choose whether to open the alternative map window in the current map window or in a new map window, make a selection and click OK. The Select Map dialog box will close, and the alternative map window for the selected alternative will appear in the Desktop Pane.
Save
To save an alternative, from the individual alternative shortcut menu, click Save. Any changes that have occurred to the selected alternative will be saved by HEC-WAT.
Save As
To make a copy from an existing alternative:
- From the individual alternative shortcut menu, click Save As. The Save Alternative As dialog box will open. The information displayed in the dialog box represents the alternative has been selected for copying.
- In the Name box, enter the name (required) of the new alternative, and in the Description box, enter a description (optional, but recommended).
- The user can also choose to create a copy of the associated schematic (will create a new schematic with the new alternative name) or use the associated schematic of the alternative the user has selected to make a copy of.
- The alternative name will now appear on the Study Tree, under the Alternatives folder.
Delete from Study
To delete an alternative, from the individual alternative shortcut menu, click Delete From Study. Users can also delete an alternative from the Alternative and Simulation Manager dialog box, from the File menu by pointing to Alternatives and clicking Delete From Study.
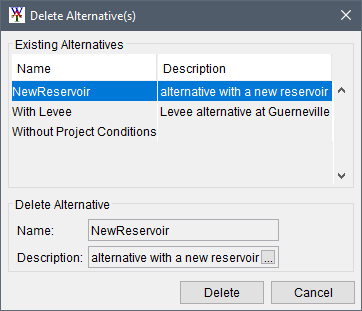
A Confirm Manager Delete message dialog opens requesting users to confirm the delete action. Click Yes, the Confirm Manager Delete message dialog closes. The alternative will no longer appear on the Study Tree under the Alternatives folder.

Alternative Properties
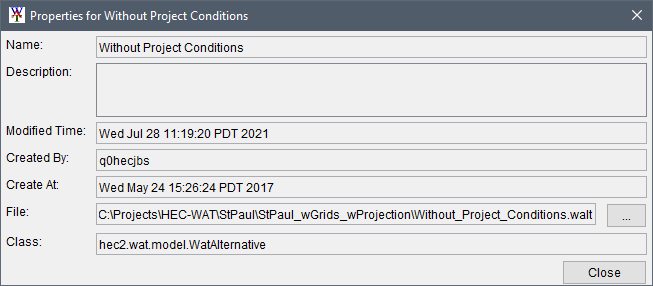
The properties of an alternative include the name, description, when the alternative was modified, who created the alternative, when the alternative was created, and the file that contains the alternative data.
To view the properties of an alternative, from the individual alternative shortcut menu select Properties. This elicits the Properties for <AlternativeName> dialog box. The dialog presents the name and description of the selected alternative; the date and time the alternative was last modified (not the date and time that individual models making up the simulation were last modified); the location of the alternative file; and, the name of the file which contains information about the alternative.
