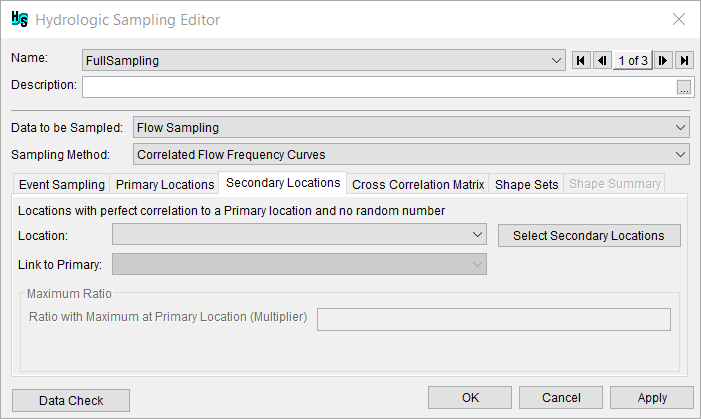
Secondary Locations
Secondary locations may be defined in the watershed where the scaling factor applied is not sampled from a frequency curve but applied as a ratio to one of the primary locations sampled. Secondary locations may be used to add inflows for a less significant inflow location, such as a small tributary or local inflows. As opposed to primary locations (review Primary Locations), which generate flow magnitude from frequency curves based on a unique pseudorandom value, flow for each secondary location is instead generated as a ratio of the flow magnitude from the associated primary location. This method for generating flows for secondary locations results in a perfect correlation of flows between each secondary location and its associated primary location.
From the Hydrologic Sampling Editor, the Secondary Locations tab allows the user to define secondary flow locations, chosen from common computation points in the watershed.
The Secondary Locations tab has two options based on the selected Location. The Link to Primary list, consists of primary locations, while the Maximum Ratio box contains the Ratio with Maximum at Primary Location (Multiplier). Users create a list of secondary locations, then enter information specific for each secondary location.

Location List

The first step is to define the secondary flow location(s):
- From the Secondary Locations tab, click Select Secondary Locations, the Selection Editor will open.
Select a secondary flow location(s) from the Available Locations list individually, or select multiple while holding the Ctrl key, and click Add to move the selected location(s) to the Selected Locations list. Add All moves all Available Locations to the Selected Locations list. Alternatively, double-clicking a desired location (e.g., Queen Shoals) moves the location to the Selected Locations list.
Note
All common computation points added as primary locations in the Primary Locations tab (review Primary Locations) are displayed with "~Prim:" in front of the location name at the bottom of the Available Locations list. The "~Prim:" indicates that those locations were already selected as primary locations, and should therefore not be selected again. If one or more of the primary locations are re-selected as secondary locations, and the OK is clicked, then a Location Selection Warning window will open. Warning the user that the selected location will be deleted as a primary location and added as a secondary location. If the user clicks Yes, those locations will change from primary to secondary, and any previously specified frequency curve inputs will be lost.

Following the successful selection of the secondary locations, click OK, the Selection Editor dialog will close. Users can modify the secondary locations list at any time. However, if a user attempts to remove secondary locations, then a Location Selection Warning message will open, which requires the user to confirm the deletion of the secondary location and all related information.
The Location list automatically populates with all locations set in the Selection Editor as secondary locations.
Next, for each secondary location listed in the Location list, the user must specify the primary location that the secondary location will be linked with (Link to Primary list) and the maximum ratio for the primary location (Maximum Ratio box).
Link to Primary List and Maximum Ratio Box
The Link to Primary list contains the primary flow locations specified in the Primary Locations tab (review Primary Locations). Each secondary location must be linked to a primary location. The Correlated Flow Frequency Curves sampling algorithm generates the flow magnitude at the secondary location by multiplying the randomly sampled primary flow magnitude by the entered maximum ratio.
- From the Location list, select a secondary location.
- From the Link to Primary list; select the primary location to link to the selected secondary location. Note, if the list does not contain the required primary location for the selected secondary location, refer to Primary Locations to add the missing primary location.

- Next, set the maximum ratio value if the default value of 1.0 is not appropriate. In the Ratio with Maximum at Primary Location (Multiplier) box, enter the ratio value for the selected secondary and linked primary locations. The maximum ratio (1.0 equals 100%) is required, and the entered ratio is multiplied by the primary location's sampled maximum flow to define the flow magnitude of the secondary location.
- Repeat Steps 1 through 3 for all defined secondary locations in the Location list, to define each secondary location to a primary location and define the appropriate maximum ratio value.
- Click Apply to save changes made to the Secondary Locations tab before continuing to the next tab. Alternatively, click OK to save the hydrologic sampling alternative and close the Hydrologic Sampling Editor. Users can click Data Check (Section 1.2.6) to determine if any secondary locations were missed before proceeding to the Correlation Matrix tab (refer to Correlation Between Locations), if desired. Note, the Data Check (review Hydrologic Sampling Editor Interface, Data Check section) is generally used after all required inputs have been defined to avoid generating a long list of as-yet undefined inputs (e.g., undefined Correlation Matrix and Shape Sets data).
Ratio with Maximum at Primary Location
The Ratio with Maximum at Primary Location scales the Primary Location Hydrograph peak flow by the specified ratio value. In the figure, the scaled Primary Location Hydrograph has a peak flow of 2,290 cfs. If the user specified ratio is set to 0.25, the Primary Location Hydrograph will be scaled down by 0.25 to obtain the Secondary Location Hydrograph. Currently, the ratio will always be applied to the Primary Location Hydrograph peak flow value.

