Creating Additional Schematics
The Creating the Default Schematic page describes the steps for creating the schematic for the default HEC-WAT alternative (i.e., Without Project Conditions). Additional schematics can be created and are useful if the HEC-WAT study has other alternatives with differences, such as an additional project in the study area. There are two ways to create a schematic, one is from the Schematic tab, and the other is when an alternative is created.
To create a schematic from the Schematic tab:
- From the Schematic tab, on the Study Pane, right-click on the Schematics folder, from the shortcut menu click New.
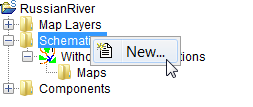
- The Create New Schematics dialog box will open.
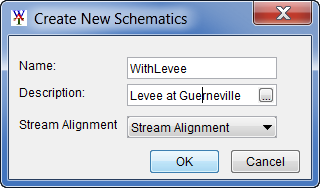
- In the Name box enter the name (required), and in the Description box, enter a description (optional, but recommended).
- Select a stream alignment around which the schematic will be built. HEC-WAT allows for multiple stream alignments in a study. From the Stream Alignment list, select a stream alignment (e.g., Stream Alignment).
- Click OK, the Create New Schematics dialog box will close. In the Study Pane, the Schematics folder will now contain the new schematic.
- A map window will open in the Desktop Pane representing the schematic. Now the user needs to review the new schematic to see if any adjustment needs to be made to the stream alignment; or if measures, CCPs, and/or impact areas need to be added, edited, or deleted.
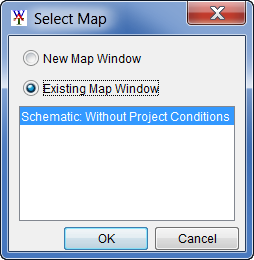
- If a map window is open in the Desktop Pane, the Select Map dialog box will open (Figure 6.15). The user can choose whether to open the schematic in the current map window or in a new map window, click OK. The Select Map dialog box and the Create New Schematics dialog box will both close, and the map window for the new schematic will appear in the Desktop pane. Now the user needs to review the new schematic to see if any adjustment needs to be made to the stream alignment; or if measures, CCPs, and/or impact areas need to be added, edited, or deleted.
To create a schematic when creating an alternative:
- From the Study tab, on the Study Pane, right-click on the Alternatives folder, from the shortcut menu click New.
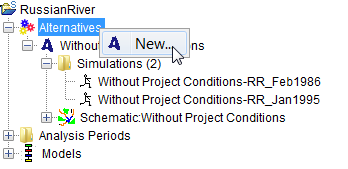
- The Create New Alternatives dialog box will open. Enter the alternative name in the Name box (required), and an optional (recommended) description in the Description box.
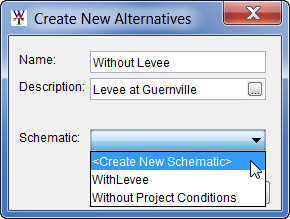
- Each alternative requires a schematic to provide the layout of the study area measures and components. Select a previously defined schematic, or create a schematic for the alternative from the Schematic list.
- Click OK, the Create New Schematics dialog box will close. If a map window is not already open in the Desktop Pane, the Create New Alternatives dialog box will close and a map window will open in the Desktop Pane representing the alternative.
- However, if a map window is already open in the Desktop Pane, the Select Map dialog box will open. The user can choose whether to open the alternative in the current map window or in a new map window, click OK. The Select Map dialog box and the Create New Alternatives dialog box will both close, and the map window for the new alternative will appear in the Desktop Pane.
- If a new schematic for the alternative needs to be created, from the Schematic list, click <Create New Schematic>. Click OK, a No schematic was selected warning window will open. The window is asking the user if a schematic needs to be created, click Yes. The Create New Schematics dialog box will open. A name for the schematic is automatically generated based on the name of the alternative.
- The schematic name will now appear on the Schematic tab, under the Schematics folder. Now the user needs to review the new schematic to see if any adjustment needs to be made to the stream alignment; or if measures, CCPs, and/or impact areas need to be added, edited, or deleted.