Edit a Flood Risk Analysis Simulation
Existing Flood Risk Analysis (FRA) simulations can be edited from the Study Tree or from the Alternative Simulation Manager. To edit the existing simulation from the Study Tree, right-click on the simulation of interest and select Edit Simulation from the shortcut menu. Alternatively, from the Alternative and Simulation Manager (opened from the WAT Tools toolbar by clicking ![]() ), from the table right-click on the simulation of interest and select Edit Simulation from the shortcut menu.
), from the table right-click on the simulation of interest and select Edit Simulation from the shortcut menu.

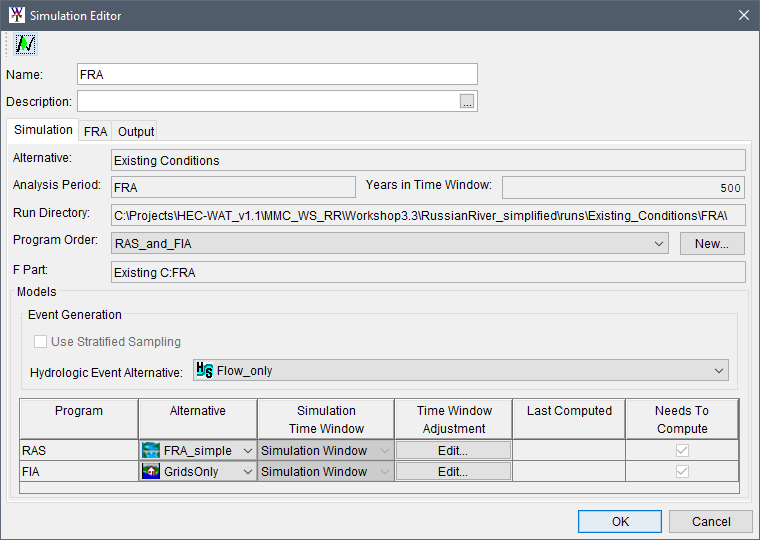
Either option opens the Simulation Editor for the Flood Risk Analysis simulation.

Simulation Tab
From the Simulation tab in the Simulation Editor, users can edit the Description field and change the selected Program Order, model Alternative(s), Simulation Time Window, and/or Time Window Adjustment for each model alternative.
Simulation Time Window
Connecting a model alternative to a Time Window Modifier alternative in the Models table modifies the simulation time window for that model alternative, either by shortening or expanding it. As a best practice, subsequent model alternatives in the simulation should generally be connected to the same Time Window Modifier alternative to ensure that those model alternatives' simulation time windows match that of prior model alternatives. If the simulation time windows of the subsequent model alternatives are not modified, there is a risk that those model alternatives' time windows will be larger than the previous model alternatives' time windows. This could mean that adequate input data might be unavailable for those model alternatives and the simulation will not complete. More information regarding the Simulation Time Window time window modifier alternative, please review the Time Window Modifier Plugin document.
FRA Tab
From the FRA tab in the Simulation Editor, users can adjust the Number of Years in Realization, Number of Realizations, the Initial Realization Seed, and/or Initial Event Seed.
Setting FRA Realizations and Events
The number of events and the analysis period length are used to define the number of lifecycles within a realization. For example, an analysis period that is 50 years long will result in 10 lifecycles if the years per realization is set to 500. The years per realization should be set to an even multiplier of the analysis period length. For example, the user can enter 1,000 years per realization and then 100 realizations. In this case, 100 separate realizations of 1,000 years will be simulated, providing 100 flow and stage frequency curves that extend to 1/1,000 ACE (by sorting and ranking the flows/stages then dividing the rank by the total number of years in a realization, 1,000).

Users can also check the checkbox to Allow User Override of Initial Model Seeds to enable the Initial Model Seed User Override column to modify the initial seed of for specific model alternatives.
Note
When the Allow User Override of Initial Model Seeds option is enabled all seeds must be overridden.

Output Tab
From the Output tab in the Simulation Editor, users can add specific filters for files to be retained after a compute completes, regardless of the settings selected from the Run FRA Simulation dialog box (please review the Computing Flood Risk Analysis Simulations section for more information regarding the Run FRA Simulation dialog box).

To enable the ability to add specific output file name filters, check the Use Filters checkbox. Next click the Add Filter ![]() button to open the Enter Filter dialog box. Users can enter specific file names by clicking the
button to open the Enter Filter dialog box. Users can enter specific file names by clicking the ![]() Browse To button and navigating to the desired file. Alternatively, users can enter a filter file type (e.g., *.log) in the Filter text box. From the Enter Filter dialog box, click OK. The filter is added to the Active File Name Filters box in the Output tab. Users can add only one filter at a time.
Browse To button and navigating to the desired file. Alternatively, users can enter a filter file type (e.g., *.log) in the Filter text box. From the Enter Filter dialog box, click OK. The filter is added to the Active File Name Filters box in the Output tab. Users can add only one filter at a time.

Added filters can be removed by selecting the filter from the Active File Name Filters box and clicking the Delete Filter ![]() button.
button.
Save Changes
After making modifications to an FRA simulation, click OK to close the Simulation Editor and save the changes. From the HEC-WAT main window, click the Save the Study button from the toolbar.