Managing Simulations
In HEC-WAT, there are multiple ways to create and manage simulations. This section discusses the main ways to manage simulations and provides details of some of the common activities for simulations. Detailed descriptions of creating, computing, and viewing results of simulations are reserved for the sections on Deterministic and FRA simulations. The shortcut menu for an individual simulation allows users to view the selected simulation in a map window, edit the model alternatives in the simulation, remove the simulation map window, edit the simulation, open simulation appropriate tools, compute, view the log of the compute, view results, save changes to the simulation, delete the simulation from the study, view the simulation's properties, and browse to the runs folder associated with the active simulation.
Accessing the Individual Simulation Shortcut Menu
Users can access the shortcut menu for individual simulations from the Study Tree, or from the Alternative and Simulation Manager. To access the shortcut menu from the Study Tree, right-click on the simulation of interest. Alternatively, to access the shortcut menu from the Alternative and Simulation Manager (opened from the WAT Tools toolbar by clicking ![]() ), right-click on the simulation of interest from the table. Either way, the shortcut menu for the simulation opens. Note in the image below that the simulation shortcut menu opened from the Study Tree is a Flood Risk Analysis, FRA, simulation, but the simulation shortcut menu opened from the Alternative and Simulation Manager is a Deterministic simulation.
), right-click on the simulation of interest from the table. Either way, the shortcut menu for the simulation opens. Note in the image below that the simulation shortcut menu opened from the Study Tree is a Flood Risk Analysis, FRA, simulation, but the simulation shortcut menu opened from the Alternative and Simulation Manager is a Deterministic simulation.

Note: The user must expand the Alternative and Simulation Manager dialog box so that the length of the individual simulation shortcut menu fits within the dialog box.
View a Simulation in a Map Window
In a simulation map window, users can view and edit model alternative components, as well as view model alternatives results for computed simulations.
It is important to know that the simulation open in an active map window links the simulation to the Study Tree as well as the Compute and Results menu commands. Specifically, when a simulation is open in the active map window, it is automatically selected in the Study Tree (which updates the Content Pane). Also, only compute and result commands relevant to the simulation will be listed or accessible in the Compute and Results menus.
A map window is considered the active map window when it is the only map window open, or it is the selected map window when more than one map window is open in the Desktop Pane.
To view a simulation in a map window:
- From the individual simulation shortcut menu, click Display in Map Window.
- If there is not a map window open in the Desktop Pane, the simulation map window for the simulation will open in the Desktop Pane. From the simulation map window the user can edit the stream alignment, view model alternative results, and edit model alternatives that are associated with a simulation.
- If a map window is open in the Desktop Pane, the Select Map dialog box opens. The user can choose whether to open the simulation map window in the current map window or in a new map window, and click OK. The Select Map dialog box closes, and the simulation map window for the selected simulation appears in the Desktop Pane.

Edit the Model Alternatives of a Simulation
Users can edit the model alternatives in a simulation from the individual simulation shortcut menu. To edit the model alternatives associated with a simulation:
- From the individual simulation shortcut menu, point to Edit Model, from the sub-menu click on the model alternative (e.g., FRA_simple) to edit the model in its native model interface (e.g., HEC-RAS).

- If editors are provided by the plugin, then the plugin's software associated with the model alternative that was selected will open. For example, if the model alternative GridsOnly is selected, the HEC-FIA software will open with the GridsOnly alternative selected.
- The user can now make changes to the selected model alternative, save, and close the editor provided by the plugin.
Remove a Simulation from the Active Map Window
When a simulation is displayed in an open map window, the individual simulation shortcut menu displays the Remove from Map Window command below the Edit Model command. Click the Remove from Map Window command to remove the selected simulation from the active map window. The Remove from Map? message box opens requesting "Do you really want to remove the simulation from the active map window?"; click Yes. The message box closes, and the map window will no longer display the simulation.
Edit a Simulation
The Simulation Editor can be accessed for any simulation from the individual simulation's shortcut menu. Depending on the type of simulation selected (deterministic or Flood Risk Analysis), the Simulation Editor dialog box contains different features. For editing a deterministic simulation Refer to the Edit a Deterministic Simulation section for editing a deterministic simulation, and refer to the Edit a Flood Risk Analysis Simulation section for editing FRA simulations.
To access the Simulation Editor and edit either type of simulation:
- From the individual simulation shortcut menu, click Edit Simulation. The Simulation Editor opens for the selected simulation (e.g., the deterministic simulation, Without Project Conditions-RR_Feb1986).

- The user can edit the description of the simulation. The editor also provides the user with information about which HEC-WAT alternative and analysis period are associated with the simulation, and what model alternatives are currently being computed for the simulation. The user can change the model alternatives and setup time window adjustments for each model alternative.
- Click OK, the Simulation Editor closes, and the information changed will be saved.
Tools
The Tools sub-menu commands provided from the individual simulation shortcut menu are context specific. For deterministic computes, the Model Linking Editor is presented as an option. For Flood Risk Analysis (FRA) computes, the Model Linking Editor, Model Skip Flags Editor, and Output Variable Editor are presented.

Model Linking Editor
The Model Linking Editor can be accessed through the shortcut menu. When using the shortcut menu on a specified simulation, the Model Linking Editor opens with the simulation selected.
Model Skip Flags Editor
The Model Skip Flags Editor is only presented in FRA computes.
Output Variable Editor
The Output Variable Editor is only presented in FRA computes
Compute a Simulation
The individual simulation shortcut menu provides access to the Compute menu item. The Compute menu item presents options about how to compute the simulation. The options vary for the deterministic and Flood Risk Analysis (FRA) compute types. For computing a deterministic simulation refer to the Computing a Deterministic Simulations section, for FRA simulations refer to the Computing Flood Risk Analysis Simulations section.
View the Compute Log
The option to view the compute log is context specific. The View Compute Log shortcut menu option will only be listed for individual simulations that have been computed. Otherwise, the log file will not exist and therefore will not be available from the individual simulation shortcut menu.
Deterministic Simulation
To view the compute log of a deterministic simulation:
- From the individual deterministic simulation shortcut menu, click View Compute Log from the individual simulation shortcut menu. The SimulationName.log Editor opens (e.g., Deterministic.log).

- The compute log editor contains information regarding the compute for the selected simulation. This information is provided by each individual software application that was part of the compute.
- To close the editor, from the File menu, click Close.
Flood Risk Analysis Simulation
To view the compute log of a Flood Risk Analysis (FRA) simulation:
- From the individual deterministic simulation shortcut menu, click View Compute Log from the individual simulation shortcut menu.
- If the results for a simulation have not been selected, from the Select Event Results dialog box (review the Flood Risk Analysis Results section), then an Open browser window opens. Navigate to the desired realization and lifecycle folder and select the SimulationName.log file (e.g., FRA.log) and click Open.
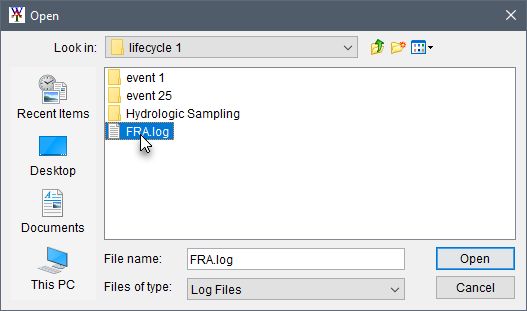
- The SimulationName.log Editor opens (e.g., FRA.log).

- The compute log editor contains information regarding the compute for the selected simulation. This information is provided by each individual software application that was part of the compute.
- To close the editor, from the File menu, click Close.
Simulation Results
Once a simulation has been computed, the results are viewable through the right-click menu item on a simulation. The available results will vary between deterministic and Flood Risk Analysis simulations, and depend upon the selected model alternatives for the simulation. For the results for a deterministic simulation refer to the Deterministic Simulation Results section, for FRA simulations refer to the Flood Risk Analysis Results section.
To view results for a simulation (e.g., deterministic), from the individual simulation shortcut menu, point to Results; from the sub-menu, the user can view results from the individual models (e.g., Summary Output Table - POR_simple) and review the DSS file (by clicking Simulation DSS File from the Results sub-menu) associated with the simulation.
 simulation shortcut menu, Results sub-menu options.")
Save a Simulation
When there are unsaved changes, the simulation displays an asterisk at the end of the simulation name. To save a simulation, click Save from the individual simulation shortcut menu.
Delete a Simulation
Click Delete From Study in the individual simulation shortcut menu to delete a study. A warning message will appear asking if the user really wants to delete the selected simulation. Click Yes to delete the simulation.
Simulation Information
From the individual simulation shortcut menu, click Properties to view information about a simulation.
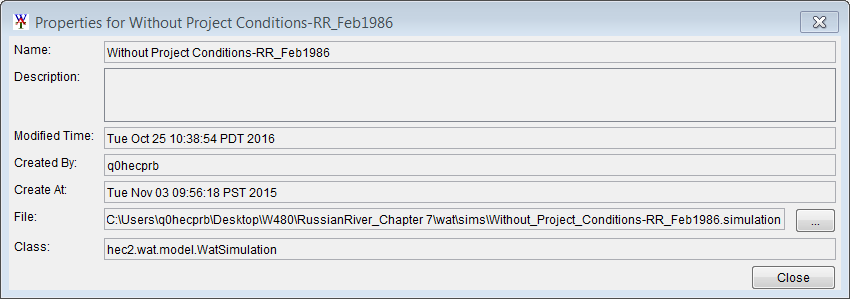
This dialog displays information about the selected simulation – name of simulation; description; date simulation was last modified; who created the simulation; date simulation was created; and the location of the simulation file.
Browse Run Folder
From the individual simulation shortcut menu, the Browse Run Folder option opens the location of the results that are generated by HEC-WAT when a simulation is computed. The user can view the simulation.dss file using HEC-DSSVue from this location; and view any files or folders saved by the plugins in the program order.